> ## Documentation Index
> Fetch the complete documentation index at: https://docs.truu.ai/llms.txt
> Use this file to discover all available pages before exploring further.
# 3. Configure Automatic Provisioning (SCIM)
This is what keeps TOTAL in sync with your directory automatically.
### 3.1 — Connect Azure to TOTAL's Provisioning Endpoint
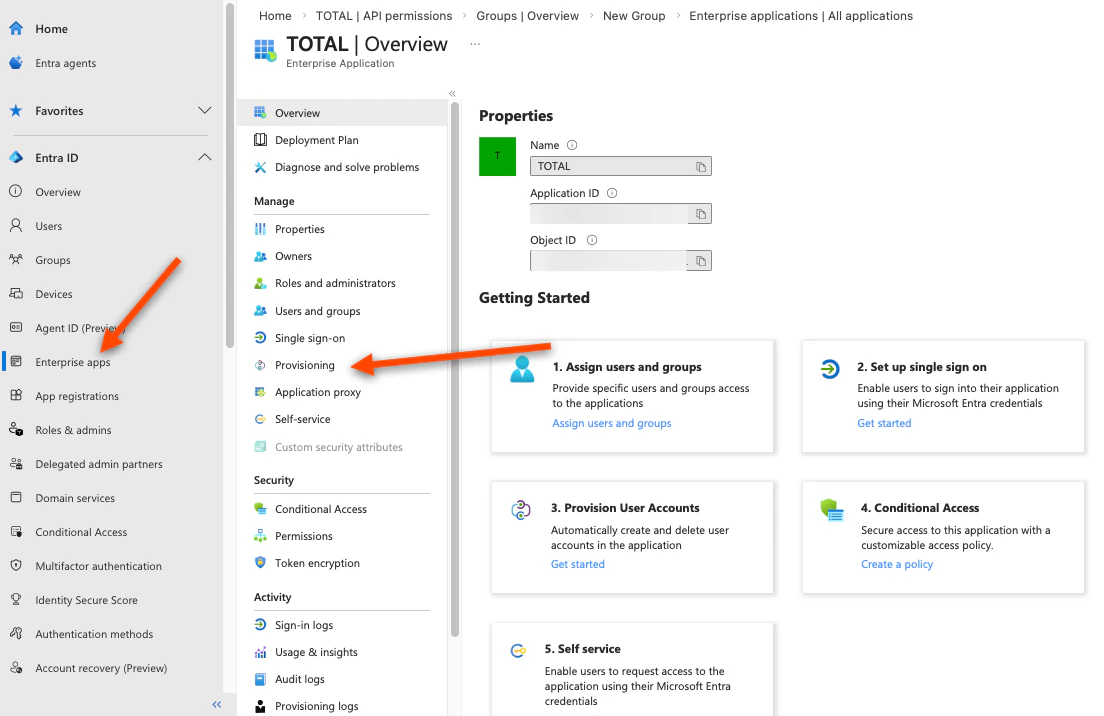
1. Azure Portal → **Enterprise applications** → TOTAL → **Provisioning** (left sidebar)
 2. Set **Provisioning Mode** to **Automatic**
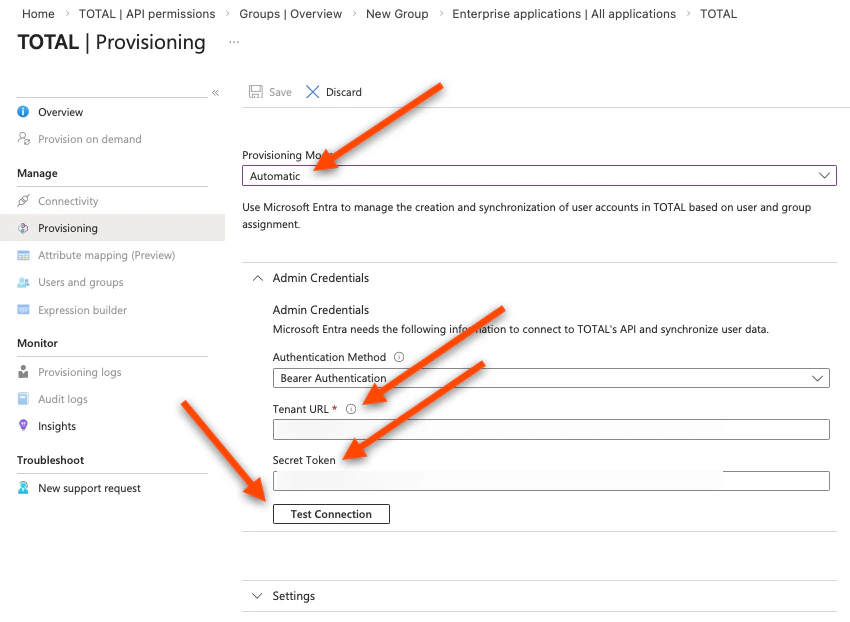 3. Under **Admin Credentials**, enter:
* **Tenant URL**: copy this from the TOTAL Enrollment Console (Settings → SSO & Provisioning)
* **Secret Token**: copy this from the TOTAL Enrollment Console (Settings → SSO & Provisioning)
4. Click **Test Connection** — wait for the green checkmark confirming it can reach TOTAL
5. Click **Save**
### 3.2 — Fix the User ID Mapping (Critical Step)
Azure's default configuration sends the wrong identifier for users, which will cause sign-in to fail. You must change one setting:
1. Still in the **Provisioning** section, click **Mappings**
2. Still in the **Provisioning** section, click **Provision Microsoft Entra ID Users**
3. In the attribute mapping table, find the row where the **customappsso** column says `externalId`
4. Click **Edit**
5. Change the **Source attribute** dropdown to `objectId`
* If `externalId` is not already in the list, click **Add New Mapping**, set **Source attribute** to `objectId` and **Target attribute** to `externalId`, then click **Ok**
6. Ensure that the **customappsso Attribute** "title" is "jobTitle"
7. Ensure that the **customappsso Attribute** "urn:ietf:params:scim:schemas:extension:enterprise:2.0:User:department" is "department".
8. Click **Ok**, then **Save**
> **Why this matters:** TOTAL identifies each user by their Azure Object ID — a unique identifier that is the same across both sign-in (OIDC) and provisioning (SCIM). Azure's default maps a different field here, which causes a mismatch. Setting it to `objectId` ensures both systems use the same identifier.
### 3.3 — Assign Your Admin Groups to the Application
1. **Enterprise applications** → TruU TOTAL Security → **Users and groups** → **Add user/group**
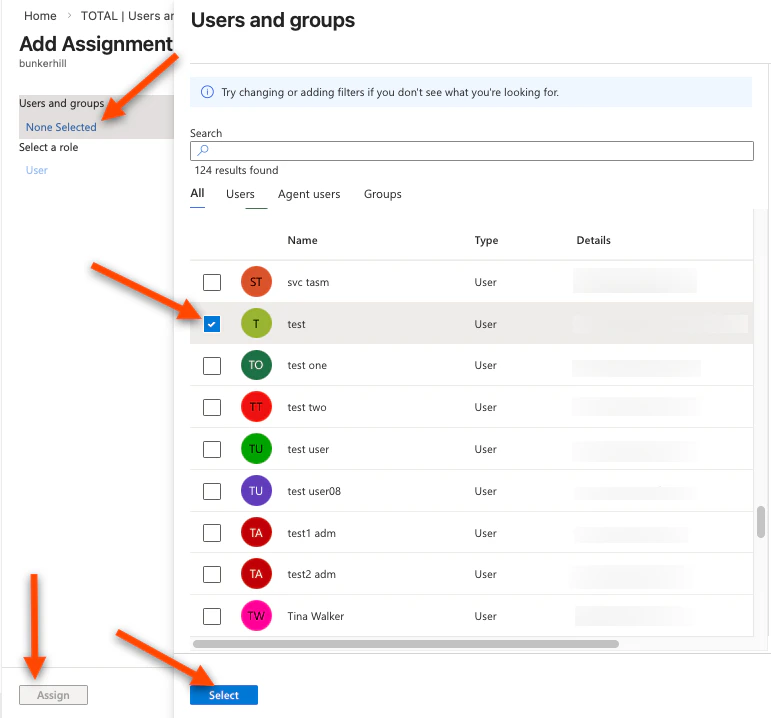
2. Click **None Selected** under Groups
3. Search for and select each of the TOTAL groups you created in Part 2
4. Click **Select**, then **Assign** There is no Scope tab in Provisioning. Instead, you assign groups through the **Users and groups** tab:
3. Under **Admin Credentials**, enter:
* **Tenant URL**: copy this from the TOTAL Enrollment Console (Settings → SSO & Provisioning)
* **Secret Token**: copy this from the TOTAL Enrollment Console (Settings → SSO & Provisioning)
4. Click **Test Connection** — wait for the green checkmark confirming it can reach TOTAL
5. Click **Save**
### 3.2 — Fix the User ID Mapping (Critical Step)
Azure's default configuration sends the wrong identifier for users, which will cause sign-in to fail. You must change one setting:
1. Still in the **Provisioning** section, click **Mappings**
2. Still in the **Provisioning** section, click **Provision Microsoft Entra ID Users**
3. In the attribute mapping table, find the row where the **customappsso** column says `externalId`
4. Click **Edit**
5. Change the **Source attribute** dropdown to `objectId`
* If `externalId` is not already in the list, click **Add New Mapping**, set **Source attribute** to `objectId` and **Target attribute** to `externalId`, then click **Ok**
6. Ensure that the **customappsso Attribute** "title" is "jobTitle"
7. Ensure that the **customappsso Attribute** "urn:ietf:params:scim:schemas:extension:enterprise:2.0:User:department" is "department".
8. Click **Ok**, then **Save**
> **Why this matters:** TOTAL identifies each user by their Azure Object ID — a unique identifier that is the same across both sign-in (OIDC) and provisioning (SCIM). Azure's default maps a different field here, which causes a mismatch. Setting it to `objectId` ensures both systems use the same identifier.
### 3.3 — Assign Your Admin Groups to the Application
1. **Enterprise applications** → TruU TOTAL Security → **Users and groups** → **Add user/group**
2. Click **None Selected** under Groups
3. Search for and select each of the TOTAL groups you created in Part 2
4. Click **Select**, then **Assign** There is no Scope tab in Provisioning. Instead, you assign groups through the **Users and groups** tab:
 Only users in these groups will be provisioned to TOTAL. Only users and groups assigned here will be provisioned to TOTAL.
### 3.4 — Start Provisioning
1. **Enterprise applications** → TOTAL → **Provisioning**
2. Click **Start provisioning**
3. Navigate back to **Enterprise applications** → TOTAL → **Provisioning**
4. Set **Provisioning Status** to **On**
5. Click **Save**
Azure will run an initial sync. For small groups (under 50 users) this typically completes in 5–10 minutes. You will see a summary on the Provisioning page showing how many users and groups were synced.
### 3.5 — Provision on Demand
1. Open **Provision on demand**
2. Search for and **select** your created admin group (see above)
3. Keep **View members only** selected
4. Select the admin users you want to provision, then run **Provision**
Only users in these groups will be provisioned to TOTAL. Only users and groups assigned here will be provisioned to TOTAL.
### 3.4 — Start Provisioning
1. **Enterprise applications** → TOTAL → **Provisioning**
2. Click **Start provisioning**
3. Navigate back to **Enterprise applications** → TOTAL → **Provisioning**
4. Set **Provisioning Status** to **On**
5. Click **Save**
Azure will run an initial sync. For small groups (under 50 users) this typically completes in 5–10 minutes. You will see a summary on the Provisioning page showing how many users and groups were synced.
### 3.5 — Provision on Demand
1. Open **Provision on demand**
2. Search for and **select** your created admin group (see above)
3. Keep **View members only** selected
4. Select the admin users you want to provision, then run **Provision**