> ## Documentation Index
> Fetch the complete documentation index at: https://docs.truu.ai/llms.txt
> Use this file to discover all available pages before exploring further.
# Configure Entra ID and CBA and Cloud Trust
> To utilize Microsoft Entra's (Azure) certificate-based authentication (CBA) feature, customers can configure their Microsoft Entra (Azure) tenant to support user authentication via X.509 certificates. These certificates are verified against the TruU Cloud Public Key Infrastructure (PKI), facilitating a more secure login process for both apps and browsers. This method of authentication is considered phishing-resistant due to the utilization of an X.509 certificate. When users attempt to sign in, they will be presented with the option to authenticate using a certificate rather than entering a password. In cases where multiple applicable certificates are found on the device, users are able to choose which certificate they wish to authenticate with. The selected certificate undergoes validation, user account binding is confirmed, and if these checks are successful, the user is granted access. Before proceeding with the configuration, it is crucial to ensure that certain prerequisites are met. For detailed instructions, the Microsoft guide on how to configure Microsoft Entra certificate-based authentication should be consulted.
**Prerequisites:**
* Obtaining either the Global admin or Privileged Authentication Administrator role within Microsoft Entra, as only individuals with these roles are authorized to configure the certificate authority (CA) in Microsoft Entra ID
* Configuring the TruU Cloud Trust PKI as specified in the TruU Cloud Trust Configuration Guide
* Setting up a certificate authority (CA) in Microsoft Entra ID (Azure AD) and activating certificate-based authentication (CBA)
* Ensuring the certificate authority (CA) has an Internet-facing URL with a publicly accessible Certificate Revocation List (CRL)
* Confirming that the domain controller can communicate with the CRL by configuring the necessary firewall ports. Alternative solutions are available if company policies restrict internet access for the domain controller
* Issuing and publishing a user certificate designed for client authentication to be used with Microsoft Entra ID (Azure AD)
## Configure TruU Cloud Trust and obtain certs and CRL information
Note: You will need to have the certificates and URLs prepared ahead of time in order to supply this information into the CA setup
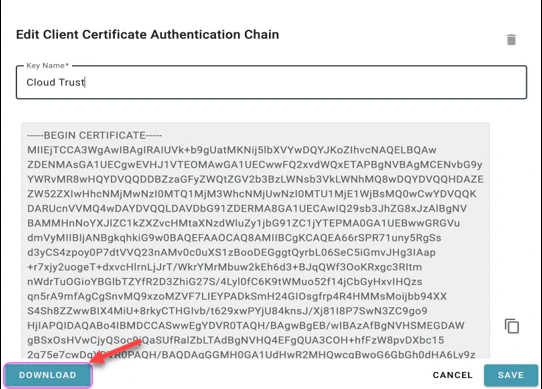
1. In the TruU admin console navigate to the "Identity Servers" tab, then go to the "Key Store" page and search for C\_loud Trust entries for Root\_ and *client certificate authentication chain entries* and download the certificates
 2. Firstly, access the Cloud Trust entry to download the "client\_certificate\_auth\_chain.pem" file
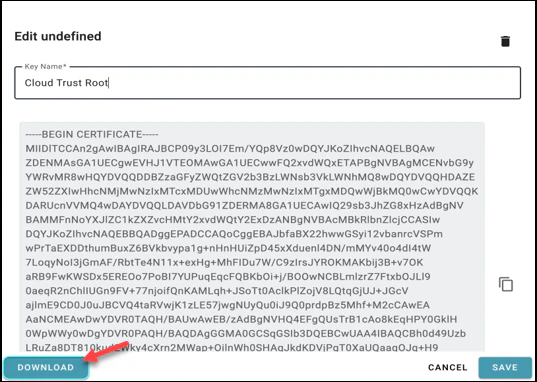
 3. Subsequently, click on the **Cloud Trust Root entry** and download the "cloud\_ca\_root.pem" file
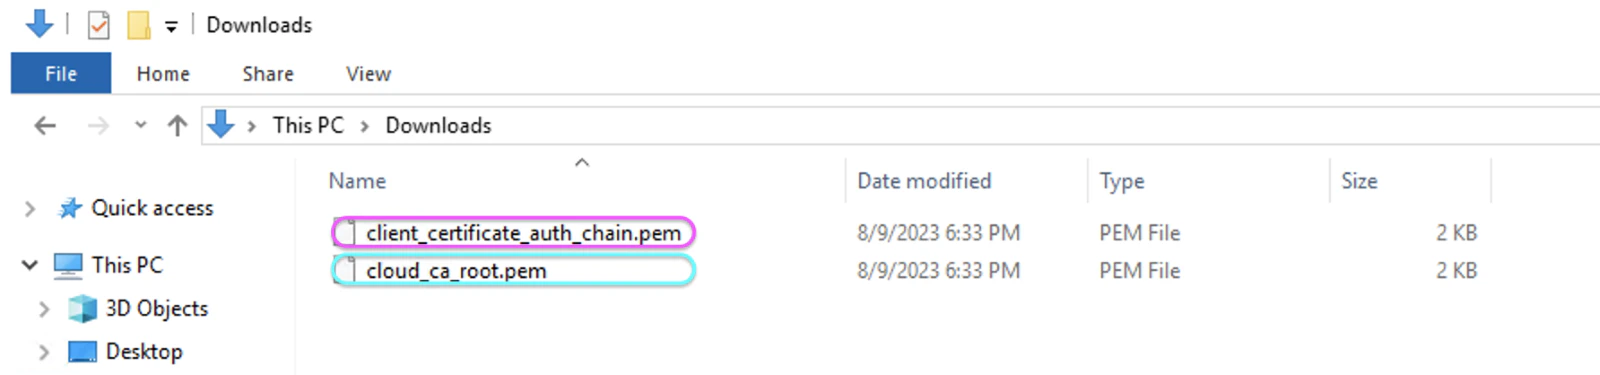
 4. Once these files are downloaded, they must be copied to the domain controller or to a system that is accessible by your Microsoft Entra portal
 5. On your domain controller, you must add the Root certificate to the Trusted Root Certificate Authorities store. Additionally, the Issue Cloud Trust CA chain certificate should be added to the Intermediate Certificate Authorities store
Note: The issuing certificate is also placed into the NTAuthCertificates container. For detailed instructions, refer to the [TruU Cloud Trust Configuration Guide](https://docs.truu.ai/docs/configuring-cloud-trust-copy)
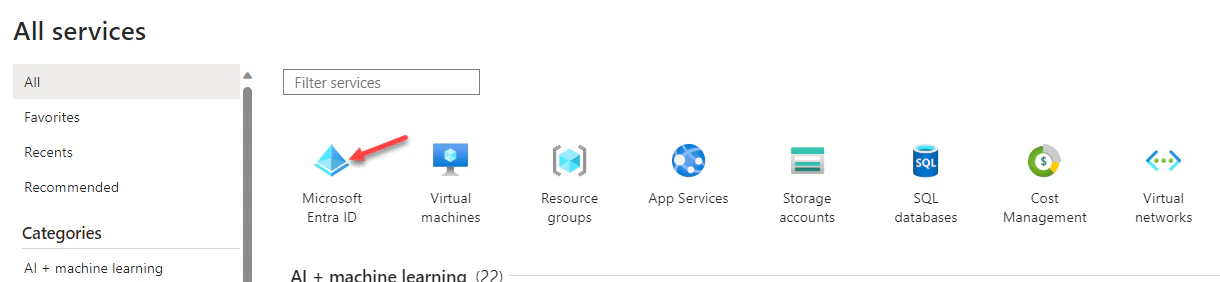
6. To proceed with the certification authorities configuration, sign into the Microsoft Entra portal as a Global Administrator. Navigate to Microsoft Entra ID, select **Security**, and then choose **Certificate Authorities** from the menu on the left-hand side
5. On your domain controller, you must add the Root certificate to the Trusted Root Certificate Authorities store. Additionally, the Issue Cloud Trust CA chain certificate should be added to the Intermediate Certificate Authorities store
Note: The issuing certificate is also placed into the NTAuthCertificates container. For detailed instructions, refer to the [TruU Cloud Trust Configuration Guide](https://docs.truu.ai/docs/configuring-cloud-trust-copy)
6. To proceed with the certification authorities configuration, sign into the Microsoft Entra portal as a Global Administrator. Navigate to Microsoft Entra ID, select **Security**, and then choose **Certificate Authorities** from the menu on the left-hand side

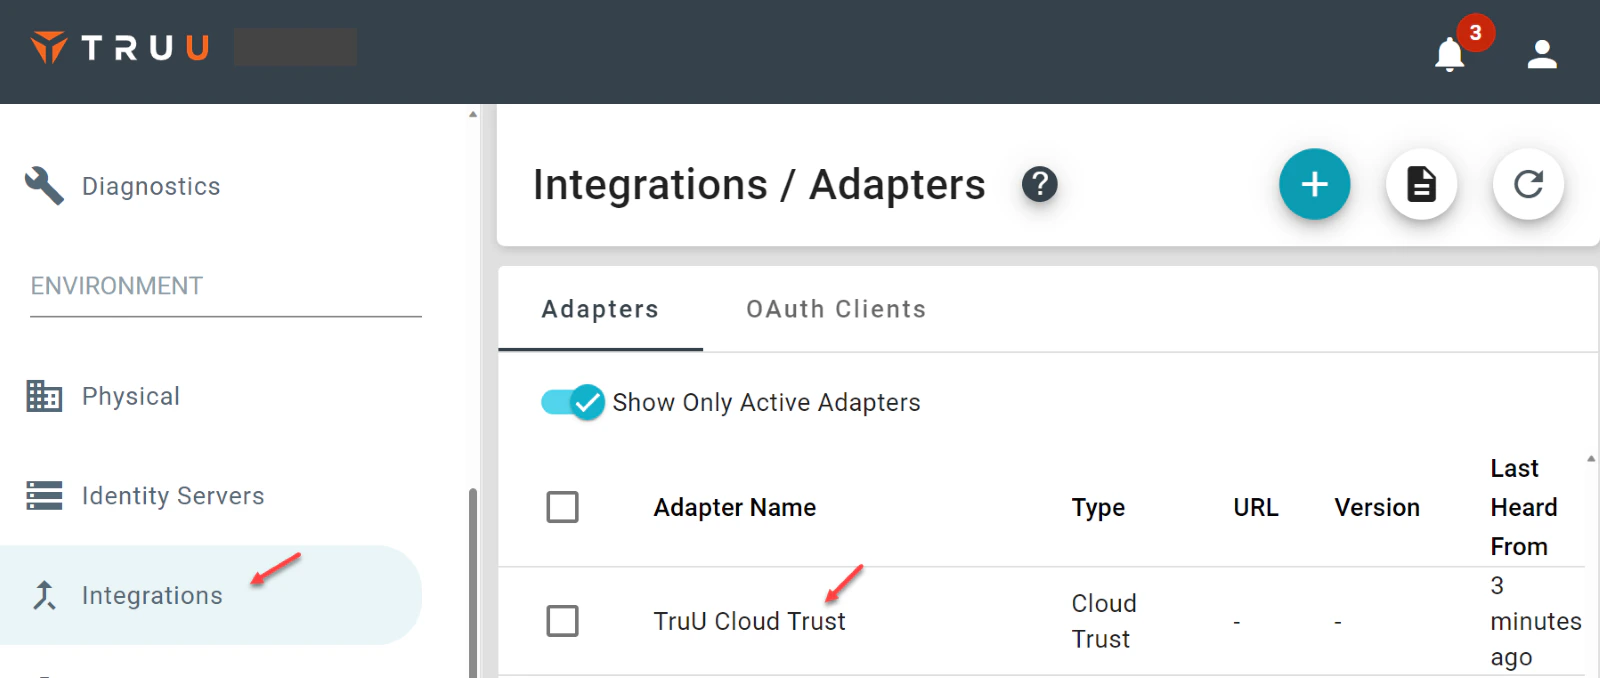
 7. Next, locate your CRL URL by going to the TruU Admin portal, navigating to "Integrations", then "Adapters", and click on **TruU Cloud Trust**. Upon opening the form, scroll to the top to find your Root and Issuing CA CRL information
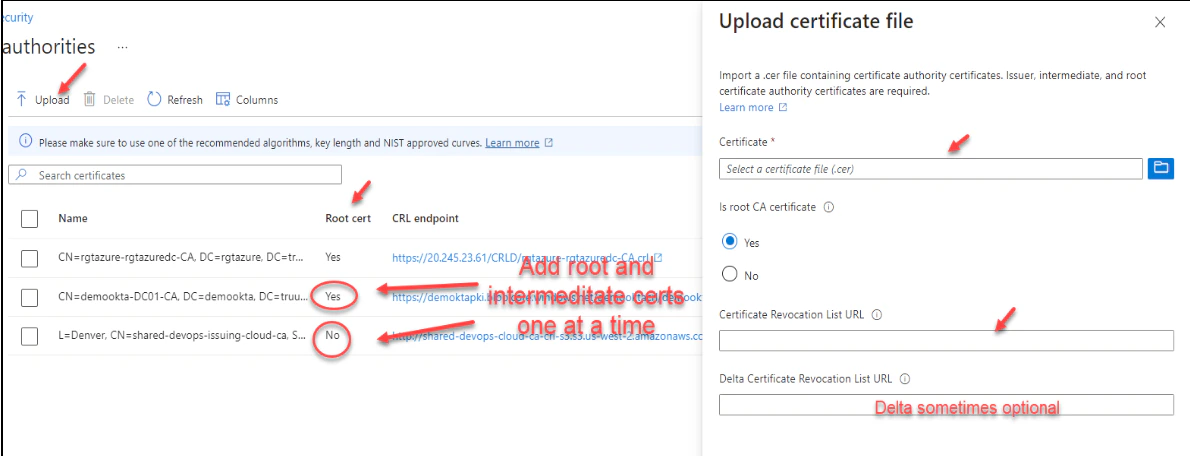
 8. For both the Root and the Issuing CA certificates, follow these sub-steps
a. Upload the .pem file you have downloaded
b. Indicate whether the CA is a root certificate by selecting **Yes**, and select **No** if it is not
c. Provide the http internet-facing URL for both the Issuing and Root CRLs. The CRLs contain all revoked certificates, which is necessary to ensure that authentication with revoked certificates will fail, thus maintaining control over certificate renewal
d. Optionally, set the *Delta CRL URL*, which is the http internet-facing URL for the CRL that includes all revoked certificates issued since the last base CRL was published
e. After clicking **Add**, remember to save the configuration. Repeat the process for the second .pem file
8. For both the Root and the Issuing CA certificates, follow these sub-steps
a. Upload the .pem file you have downloaded
b. Indicate whether the CA is a root certificate by selecting **Yes**, and select **No** if it is not
c. Provide the http internet-facing URL for both the Issuing and Root CRLs. The CRLs contain all revoked certificates, which is necessary to ensure that authentication with revoked certificates will fail, thus maintaining control over certificate renewal
d. Optionally, set the *Delta CRL URL*, which is the http internet-facing URL for the CRL that includes all revoked certificates issued since the last base CRL was published
e. After clicking **Add**, remember to save the configuration. Repeat the process for the second .pem file
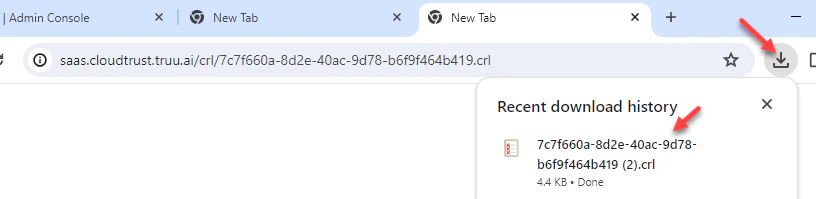
 9. To ensure the domain controller can successfully reach the published Certificate Revocation List (CRL), there are two verification methods that can be employed: using a web browser or the command prompt
a. Firstly, from the domain controller, copy the *URL* for the *Issuing Certification Authority (CA) CRL* obtained earlier and paste it into any web browser. If the URL is accessible, a .crl file should automatically download to the downloads folder
9. To ensure the domain controller can successfully reach the published Certificate Revocation List (CRL), there are two verification methods that can be employed: using a web browser or the command prompt
a. Firstly, from the domain controller, copy the *URL* for the *Issuing Certification Authority (CA) CRL* obtained earlier and paste it into any web browser. If the URL is accessible, a .crl file should automatically download to the downloads folder
 b. Alternatively, an administrator can open a command prompt with elevated privileges and execute the following command, making sure to point it to the .pem file that was downloaded in the previous step:
`certutil -verify -urlfetch “path to truu chain cert”`
During the command's output, one should examine the Certificate Distribution Point (CDP) section. A status of "Verified" indicates proper communication with the CRL. Conversely, a "Failed" status suggests that there may be an issue, such as the need to consult with the firewall team to ensure that the domain controller's internet ports are open to reach the CRL
b. Alternatively, an administrator can open a command prompt with elevated privileges and execute the following command, making sure to point it to the .pem file that was downloaded in the previous step:
`certutil -verify -urlfetch “path to truu chain cert”`
During the command's output, one should examine the Certificate Distribution Point (CDP) section. A status of "Verified" indicates proper communication with the CRL. Conversely, a "Failed" status suggests that there may be an issue, such as the need to consult with the firewall team to ensure that the domain controller's internet ports are open to reach the CRL
 NOTE: Moving on to the configuration of the authentication binding policy, this policy dictates the required strength of authentication, which can be set to either single-factor or multi-factor authentication. Administrators have the ability to modify the default settings and create custom policy rules by associating them with issuer Subject or policy Object Identifier (OID) fields in the certificate
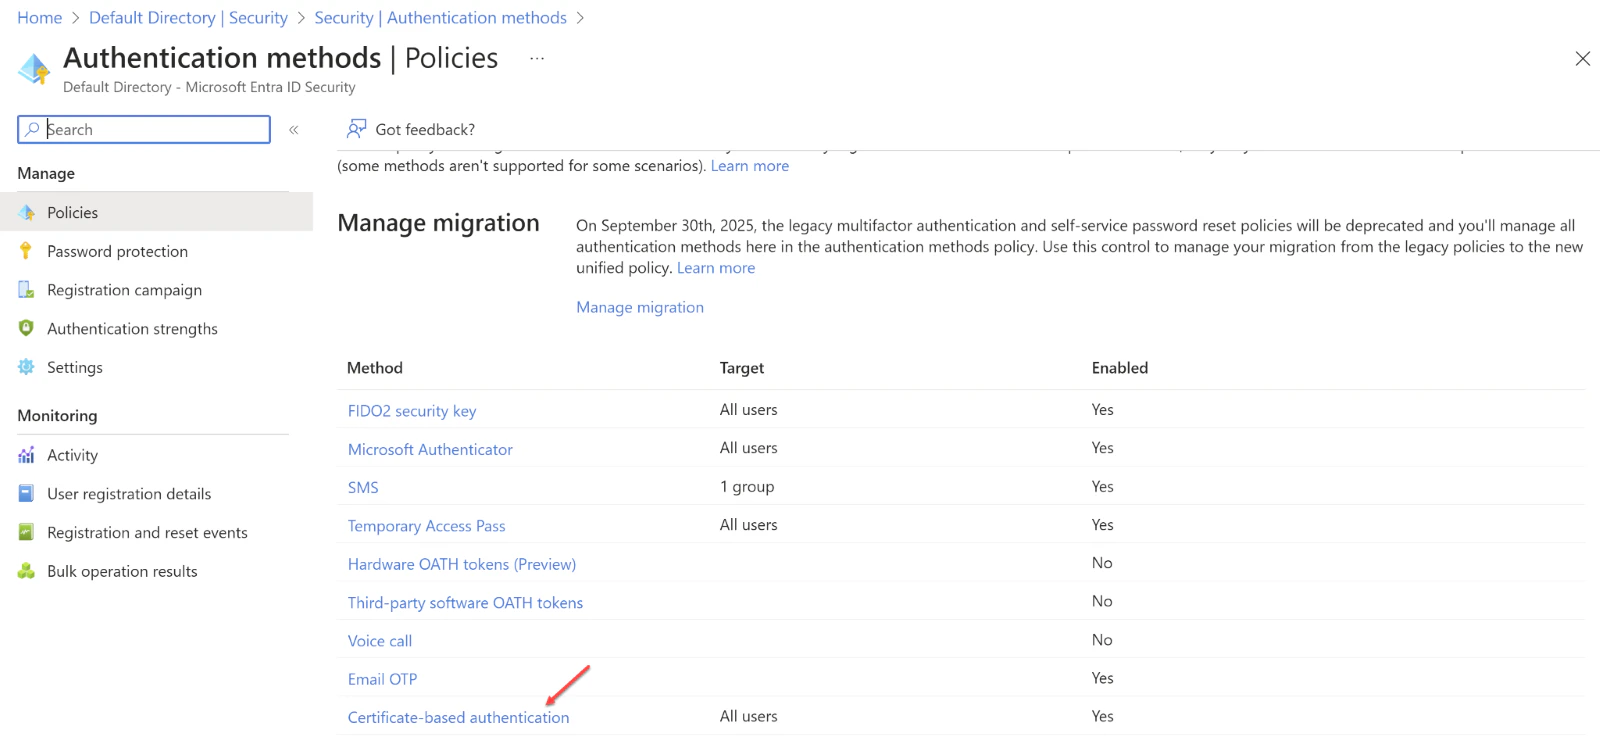
## To enable certificate-based authentication and configure user bindings in the Entra portal, follow these steps:
1. Log into the Microsoft Entra portal with **Authentication Policy Administrator** credentials
2. Navigate to **Microsoft Entra ID** (formerly Azure Active Directory), and on the left-hand menu, select **Security**
3. Proceed to **Authentication methods** and then to **Policies**
4. Under **Manage**, find and click on **Authentication methods** and then **Certificate-based Authentication**
NOTE: Moving on to the configuration of the authentication binding policy, this policy dictates the required strength of authentication, which can be set to either single-factor or multi-factor authentication. Administrators have the ability to modify the default settings and create custom policy rules by associating them with issuer Subject or policy Object Identifier (OID) fields in the certificate
## To enable certificate-based authentication and configure user bindings in the Entra portal, follow these steps:
1. Log into the Microsoft Entra portal with **Authentication Policy Administrator** credentials
2. Navigate to **Microsoft Entra ID** (formerly Azure Active Directory), and on the left-hand menu, select **Security**
3. Proceed to **Authentication methods** and then to **Policies**
4. Under **Manage**, find and click on **Authentication methods** and then **Certificate-based Authentication**
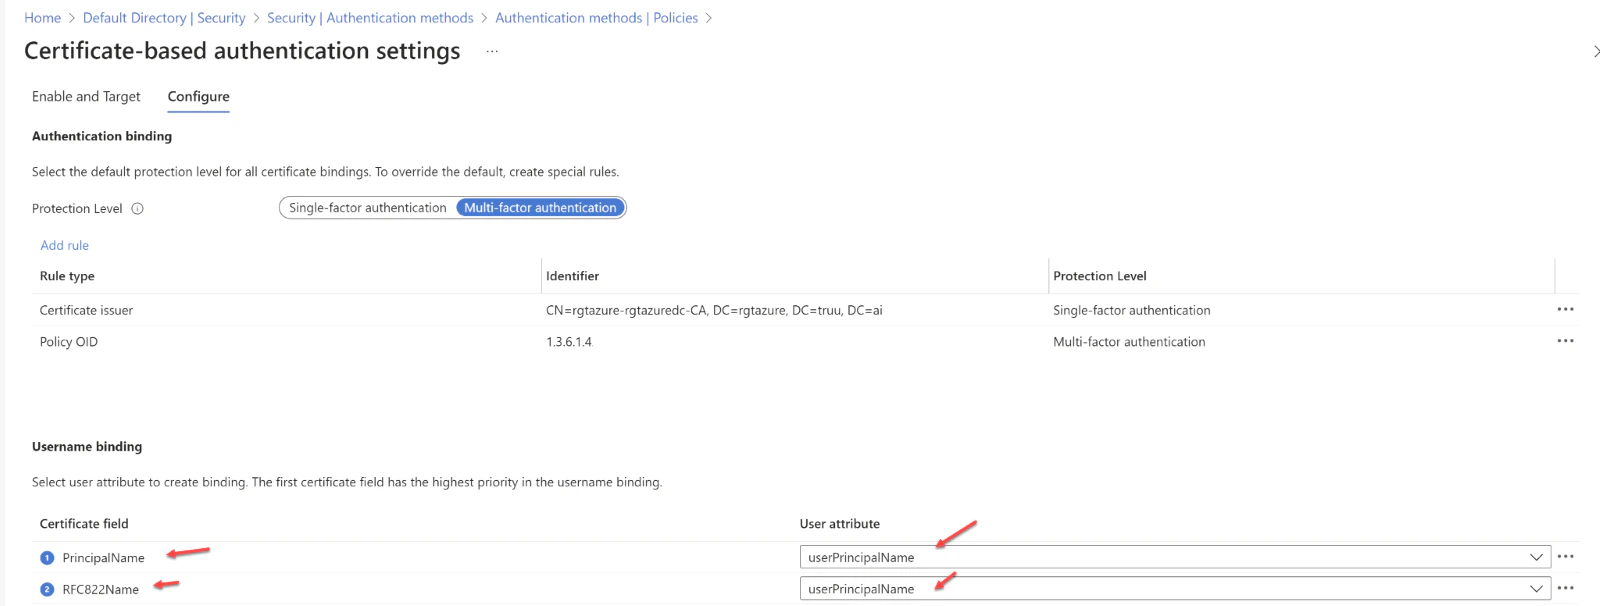
 5. Use the **Configure** option to set up authentication binding and username binding
6. Note that the **protection level** attribute defaults to Single-factor authentication. To enhance security, select **Multi-factor authentication** to change the default setting to MFA
5. Use the **Configure** option to set up authentication binding and username binding
6. Note that the **protection level** attribute defaults to Single-factor authentication. To enhance security, select **Multi-factor authentication** to change the default setting to MFA
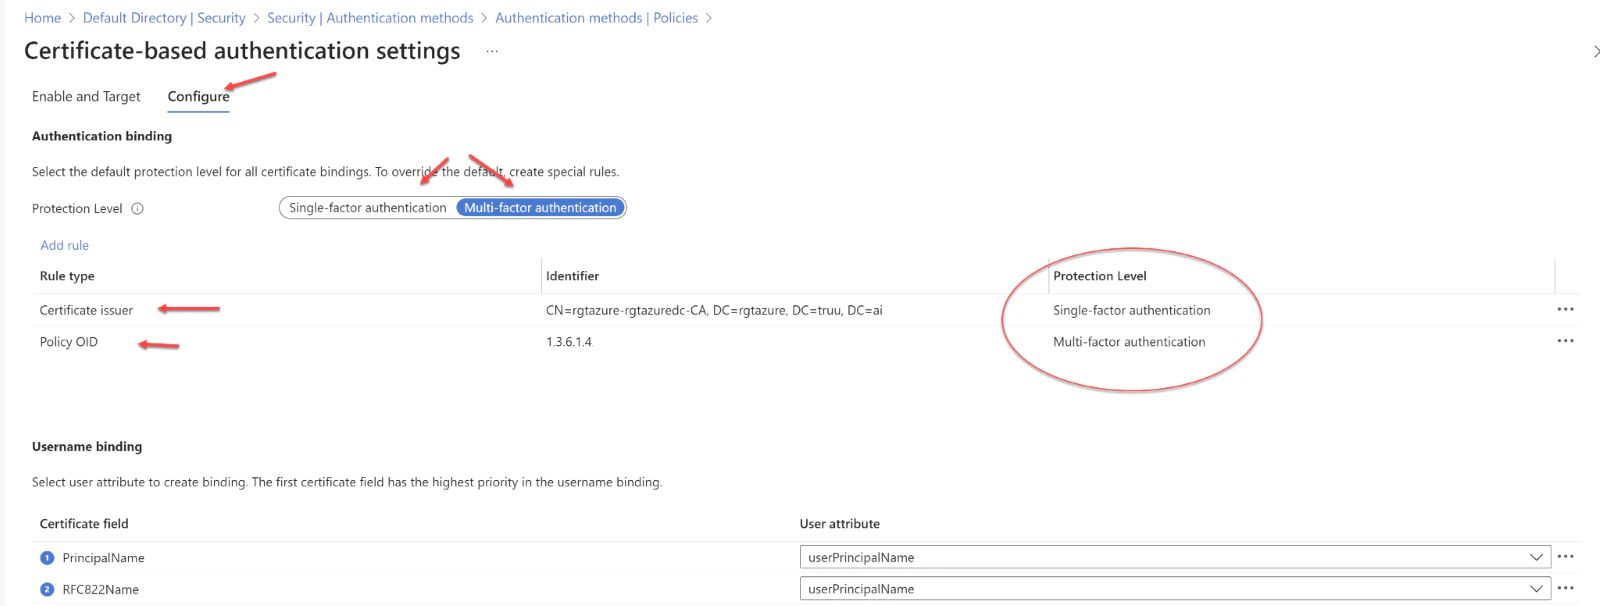 7. We can enhance security by setting up custom authentication binding rules, which determine the protection level required for client certificates. These rules can be based on the certificate's issuer Subject or Policy OID fields. Essentially, authentication binding rules associate certificate attributes—either issuer or Policy OID—with a specified value, establishing a default protection level for that rule. It's possible to create multiple rules to meet various security requirements. To introduce custom rules, one should navigate to the "Add Rule" option
 8. When creating a rule based on the certificate issuer, the following steps should be followed
a. Select **Certificate issuer**
b. Choose an identifier for the Certificate issuer from the dropdown menu
c. Set **Multi-factor authentication** as the protection level. To establish a rule using Policy OID, click Policy OID
e. Input the desired value for the *Policy OID*
f. Again, select **Multi-factor authentication** as the protection level
After setting up the rules, click **Ok** to save them
NOTE: Moving on to configuring the username binding policy, this is crucial for identifying the user within the tenant. By default, the system maps the Principal Name in the certificate to the onPremisesUserPrincipalName attribute in the user object. However, administrators have the flexibility to override this default setting by creating custom mappings
Currently, there are two certificate fields supported for this purpose: SAN (Subject Alternate Name) Principal Name and SAN RFC822Name. These can be mapped against two user object attributes: userPrincipalName and onPremisesUserPrincipalName. To configure the username binding policy, one would follow the specific steps provided for these mappings
It's important to note that if a username binding policy utilizes attributes synced from on-premises, like the onPremisesUserPrincipalName attribute of the user object, any administrator with access to the Entra ID Connect server could potentially alter the sync attribute mapping. Consequently, this could change the value of the synced attribute to fit their requirements. Therefore, caution is advised when implementing policies that rely on synced attributes
1. To set up username binding, one must choose from the available X.509 certificate fields and associate them with corresponding user attributes. The order in which username bindings are arranged is significant because it establishes the hierarchy of priority. The top binding in the list is given the highest precedence. If the authentication system locates the designated X.509 certificate field within the certificate and fails to match it with a user object, the authentication will not succeed. In this scenario, Microsoft Entra ID ceases further attempts with subsequent bindings. It is only when the specific X.509 certificate field is absent from the certificate that the system proceeds to the next priority level
2. Once the desired binding is configured, one must click **Save** to ensure the changes are captured
8. When creating a rule based on the certificate issuer, the following steps should be followed
a. Select **Certificate issuer**
b. Choose an identifier for the Certificate issuer from the dropdown menu
c. Set **Multi-factor authentication** as the protection level. To establish a rule using Policy OID, click Policy OID
e. Input the desired value for the *Policy OID*
f. Again, select **Multi-factor authentication** as the protection level
After setting up the rules, click **Ok** to save them
NOTE: Moving on to configuring the username binding policy, this is crucial for identifying the user within the tenant. By default, the system maps the Principal Name in the certificate to the onPremisesUserPrincipalName attribute in the user object. However, administrators have the flexibility to override this default setting by creating custom mappings
Currently, there are two certificate fields supported for this purpose: SAN (Subject Alternate Name) Principal Name and SAN RFC822Name. These can be mapped against two user object attributes: userPrincipalName and onPremisesUserPrincipalName. To configure the username binding policy, one would follow the specific steps provided for these mappings
It's important to note that if a username binding policy utilizes attributes synced from on-premises, like the onPremisesUserPrincipalName attribute of the user object, any administrator with access to the Entra ID Connect server could potentially alter the sync attribute mapping. Consequently, this could change the value of the synced attribute to fit their requirements. Therefore, caution is advised when implementing policies that rely on synced attributes
1. To set up username binding, one must choose from the available X.509 certificate fields and associate them with corresponding user attributes. The order in which username bindings are arranged is significant because it establishes the hierarchy of priority. The top binding in the list is given the highest precedence. If the authentication system locates the designated X.509 certificate field within the certificate and fails to match it with a user object, the authentication will not succeed. In this scenario, Microsoft Entra ID ceases further attempts with subsequent bindings. It is only when the specific X.509 certificate field is absent from the certificate that the system proceeds to the next priority level
2. Once the desired binding is configured, one must click **Save** to ensure the changes are captured
 Note that Microsoft Entra ID supports a specific set of username bindings. They are as follows:
* Subject Alternative Name (SAN) Principal Name bound to userPrincipalName
* SAN Principal Name bound to onPremisesUserPrincipalName
* SAN RFC822Name bound to userPrincipalName
* SAN RFC822Name bound to onPremisesUserPrincipalName
## Enabling Certificate-Based Authentication (CBA) within the tenant,
1. Begin by logging into the Microsoft Entra portal as an Authentication Policy Administrator
2. Navigate to the "Security" section found in the menu on the left-hand side
3. Under the "Manage" category, locate and select **Authentication methods** followed by **Certificate-based Authentication**
4. To activate CBA, you will find an "Enable and Target" section, where you should select **Enable** to switch on CBA
5. CBA can be implemented for all users or a targeted subset of users
1. To enable CBA for every user, click on **All Users**
2. Alternatively, if you wish to activate CBA for specific users or groups, opt for **Select Users**
Note that Microsoft Entra ID supports a specific set of username bindings. They are as follows:
* Subject Alternative Name (SAN) Principal Name bound to userPrincipalName
* SAN Principal Name bound to onPremisesUserPrincipalName
* SAN RFC822Name bound to userPrincipalName
* SAN RFC822Name bound to onPremisesUserPrincipalName
## Enabling Certificate-Based Authentication (CBA) within the tenant,
1. Begin by logging into the Microsoft Entra portal as an Authentication Policy Administrator
2. Navigate to the "Security" section found in the menu on the left-hand side
3. Under the "Manage" category, locate and select **Authentication methods** followed by **Certificate-based Authentication**
4. To activate CBA, you will find an "Enable and Target" section, where you should select **Enable** to switch on CBA
5. CBA can be implemented for all users or a targeted subset of users
1. To enable CBA for every user, click on **All Users**
2. Alternatively, if you wish to activate CBA for specific users or groups, opt for **Select Users**
 Once certificate-based authentication is enabled on the tenant, all users within the tenant will be presented with the option to sign in using a certificate. However, it's important to note that only those users who have been specifically enabled for certificate-based authentication will successfully authenticate using an X.509 certificate.
Note: To test your configuration, it is essential to verify both your certificate and any custom authentication binding rules you may have set up
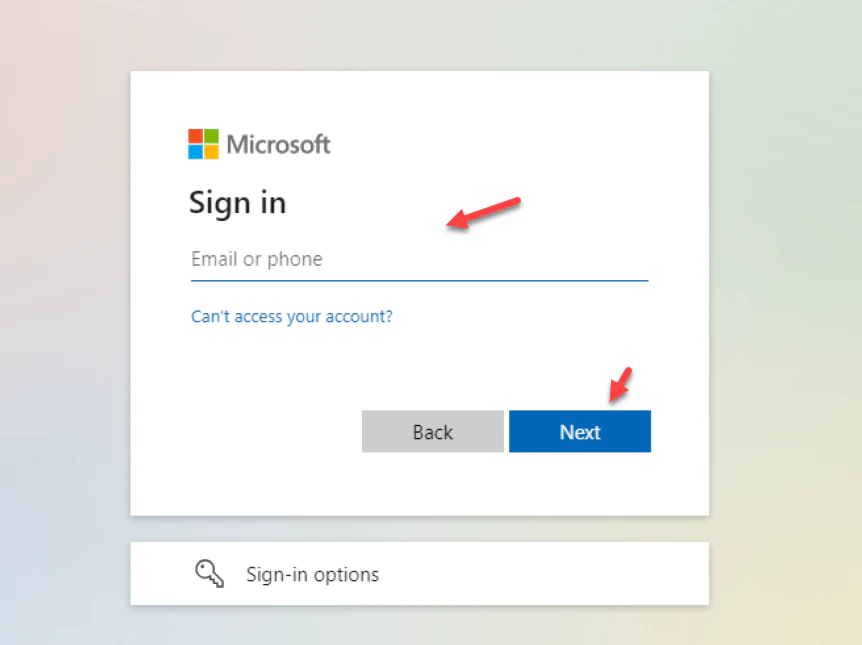
To begin testing your certificate, attempt to sign into the MyApps portal using the browser on your device. Follow these steps:
1. Enter your *User Principal Name (UPN)*
2. Click **Next**
3. Choose the **Sign in with a certificate** option
Once certificate-based authentication is enabled on the tenant, all users within the tenant will be presented with the option to sign in using a certificate. However, it's important to note that only those users who have been specifically enabled for certificate-based authentication will successfully authenticate using an X.509 certificate.
Note: To test your configuration, it is essential to verify both your certificate and any custom authentication binding rules you may have set up
To begin testing your certificate, attempt to sign into the MyApps portal using the browser on your device. Follow these steps:
1. Enter your *User Principal Name (UPN)*
2. Click **Next**
3. Choose the **Sign in with a certificate** option
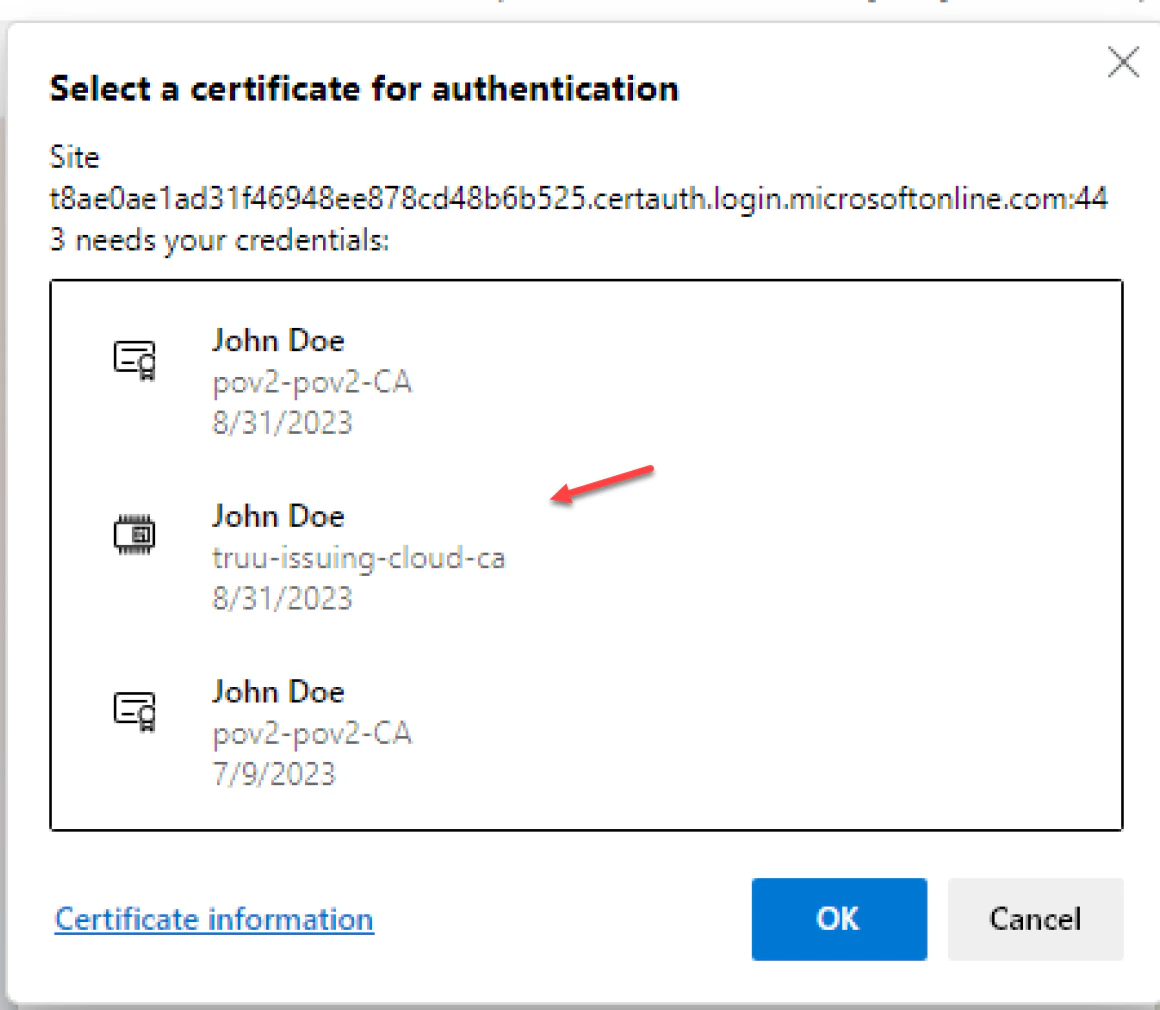
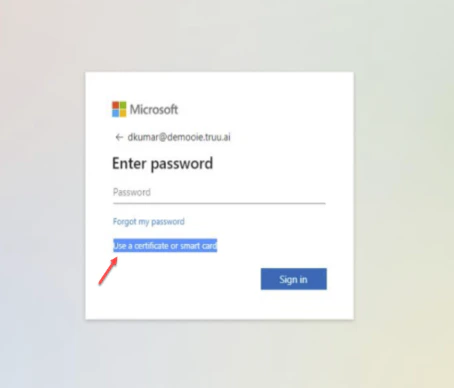 4. Select **Use certificate or Smart card** option
1. It is worth mentioning that users might encounter a certificate prompt during their first login attempt. This prompt can be managed through a registry key or a group policy which can suppress the certificate selection prompt if so desired
4. Select **Use certificate or Smart card** option
1. It is worth mentioning that users might encounter a certificate prompt during their first login attempt. This prompt can be managed through a registry key or a group policy which can suppress the certificate selection prompt if so desired
 ***
[Configure Entra ID for Microsoft CBA](https://docs.truu.ai/docs/copy-of-cba-with-entra-id-and-microsoft-ca)
***
[Configure Entra ID for Microsoft CBA](https://docs.truu.ai/docs/copy-of-cba-with-entra-id-and-microsoft-ca)