> ## Documentation Index
> Fetch the complete documentation index at: https://docs.truu.ai/llms.txt
> Use this file to discover all available pages before exploring further.
# Intune User Driven Autopilot Setup
> TruU Windows Autopilot User-Driven Mode enables new Windows devices to be automatically configured from their factory state to a fully operational, ready-to-use state.
During the **Out-of-Box Experience (OOBE)**, the TruU enrollment process runs seamlessly, ensuring that the device is set up and TruU login is fully configured before the user completes the Autopilot process.
This automated deployment eliminates the need for IT personnel to physically handle the device, streamlining the onboarding process and enhancing security.
The process is simple. Devices can be shipped or distributed to the end user directly with the following instructions:
* Unbox the device, plug it in, and turn it on.
* If it uses multiple languages, select a language, locale, and keyboard.
* Connect it to a wireless or wired network with internet access. If using wireless, first connect to the wi-fi network.
* Specify an e-mail address account and password/TruU QR sign-in for the organization.
The rest of the process is automated. The device does the following steps:
1. Join the organization.
2. Enroll in Microsoft Intune or another mobile device management (MDM) service.
3. Download and install the assigned Applications and Configs (TruU Windows Authenticator is installed)
TruU authenticator **Get Started** screen will automatically appear and user will have to complete the simple on screen instructions.
## **Prerequisite**
1. Windows 10/11 device with Trusted Platform Module (TPM) 2.0
2. Intune Administrator account to configure the setup.
3. Microsoft Intune and Entra ID P1 license
4. MDM user scope should be set.
## Step 1: Create a dynamic device group with the Group tag for User-Driven devices
1. Sign in to the Microsoft Intune admin center > Groups > New Group.
 2. Select **Security** for **Group type**, give a name. (eg. UserDriven Autopilot Devices)
3. For **Membership type**, choose **Dynamic Device**.
4. Select **Add dynamic query**.
*(device.devicePhysicalIds -any (* -eq "\[OrderID]:UserDriven"))\_
In the above query, ‘UserDriven' stands for GroupTag. Any device that has group tag 'UserDriven’ will automatically be member of this group.
5. Save the created group.
## Step 2: Create User-Driven Autopilot deployment Profile
You can refer to the Microsoft article and create the User-Driven Autopilot profile as per your organization requirement. [Tutorial/User-driven?Azure-ad-join-autopilot-profile#Create-and-assign-user-driven-microsoft-entra-join-autopilot-profile](https://learn.microsoft.com/en-us/autopilot/tutorial/user-driven/azure-ad-join-autopilot-profile#create-and-assign-user-driven-microsoft-entra-join-autopilot-profile)
**Note:** Assign the created User-Driven Autopilot Profile to the dynamic device group which was created in the previous step.
## Step 3: Register devices as Autopilot devices
1. Collect the HardwareID/hash from the devices which needs to be enrolled in self-deployment mode by referring the [Autopliot/add devices#collect the hardware hash](https://learn.microsoft.com/en-us/autopilot/add-devices#collect-the-hardware-hash)
2. Sign into the [Microsoft Intune admin center](https://go.microsoft.com/fwlink/?linkid=2109431).
3. In the **Home** screen, select **Devices** in the left hand pane.
4. In the **Devices | Overview** screen, under **By platform**, select **Windows**.
5. In the **Windows | Windows devices** screen, under **Device onboarding**, select **Enrollment**.
6. In the **Windows | Windows enrollment** screen, under **Windows Autopilot**, select **Devices**.
7. In the **Windows Autopilot devices** screen that opens, select **Import**.
2. Select **Security** for **Group type**, give a name. (eg. UserDriven Autopilot Devices)
3. For **Membership type**, choose **Dynamic Device**.
4. Select **Add dynamic query**.
*(device.devicePhysicalIds -any (* -eq "\[OrderID]:UserDriven"))\_
In the above query, ‘UserDriven' stands for GroupTag. Any device that has group tag 'UserDriven’ will automatically be member of this group.
5. Save the created group.
## Step 2: Create User-Driven Autopilot deployment Profile
You can refer to the Microsoft article and create the User-Driven Autopilot profile as per your organization requirement. [Tutorial/User-driven?Azure-ad-join-autopilot-profile#Create-and-assign-user-driven-microsoft-entra-join-autopilot-profile](https://learn.microsoft.com/en-us/autopilot/tutorial/user-driven/azure-ad-join-autopilot-profile#create-and-assign-user-driven-microsoft-entra-join-autopilot-profile)
**Note:** Assign the created User-Driven Autopilot Profile to the dynamic device group which was created in the previous step.
## Step 3: Register devices as Autopilot devices
1. Collect the HardwareID/hash from the devices which needs to be enrolled in self-deployment mode by referring the [Autopliot/add devices#collect the hardware hash](https://learn.microsoft.com/en-us/autopilot/add-devices#collect-the-hardware-hash)
2. Sign into the [Microsoft Intune admin center](https://go.microsoft.com/fwlink/?linkid=2109431).
3. In the **Home** screen, select **Devices** in the left hand pane.
4. In the **Devices | Overview** screen, under **By platform**, select **Windows**.
5. In the **Windows | Windows devices** screen, under **Device onboarding**, select **Enrollment**.
6. In the **Windows | Windows enrollment** screen, under **Windows Autopilot**, select **Devices**.
7. In the **Windows Autopilot devices** screen that opens, select **Import**.
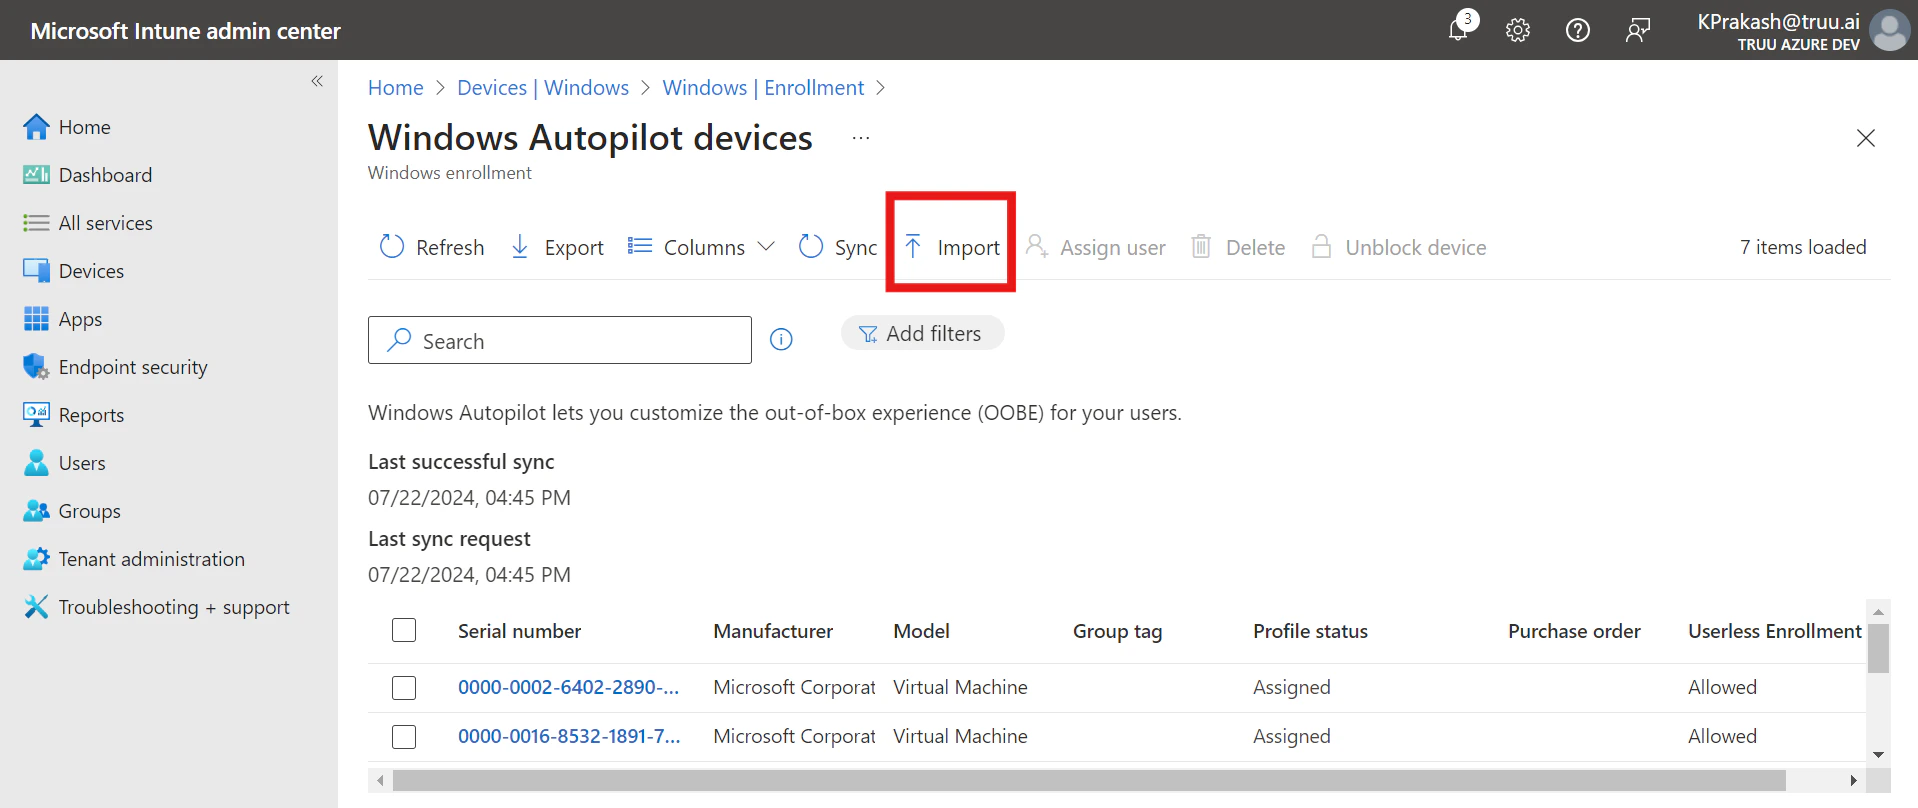 8. Import the .csv(hardware hash) file of the all devices which needs to be enrolled.
9. After the import is complete, select **Sync**. (A message displays saying that the sync is in progress. The sync process might take a few minutes to complete, depending on how many devices are being synchronized.)
10. Click on the newly added devices and add the Group tag as ‘UserDriven’
11. Once the GroupTag has been assigned, wait for the Profile status to change from **Unassigned** to **Assigned** state.
## Step 4: Package and Deploy TruU Windows Authenticator in Intune
Complete this step by following the instructions in the link [Package and Deploy TruU Windows authenticator in Intune](https://docs.truu.ai/docs/package-and-deploy-truu-windows-authenticator-in-intune)
## Step 5: Configure and assign Autopilot Enrollment Status Page (ESP)
1. Sign into the [Microsoft Intune admin center](https://go.microsoft.com/fwlink/?linkid=2109431).
2. In the **Home** screen, select **Devices** in the left hand pane.
3. In the **Devices | Overview** screen, under **By platform**, select **Windows**.
4. In the **Windows | Windows devices** screen, under **Device onboarding**, select **Enrollment**.
5. In the **Windows | Windows enrollment** screen, under **Windows Autopilot**, select **Enrollment Status Page**.
6. In the **Enrollment Status Page** screen that opens, select **Create**.
7. The **Create profile** screen opens. In the **Basics** page:
a. Next to **Name**, enter a name for the ESP profile.
b. Next to **Description**, enter a description.
c. Select **Next**.
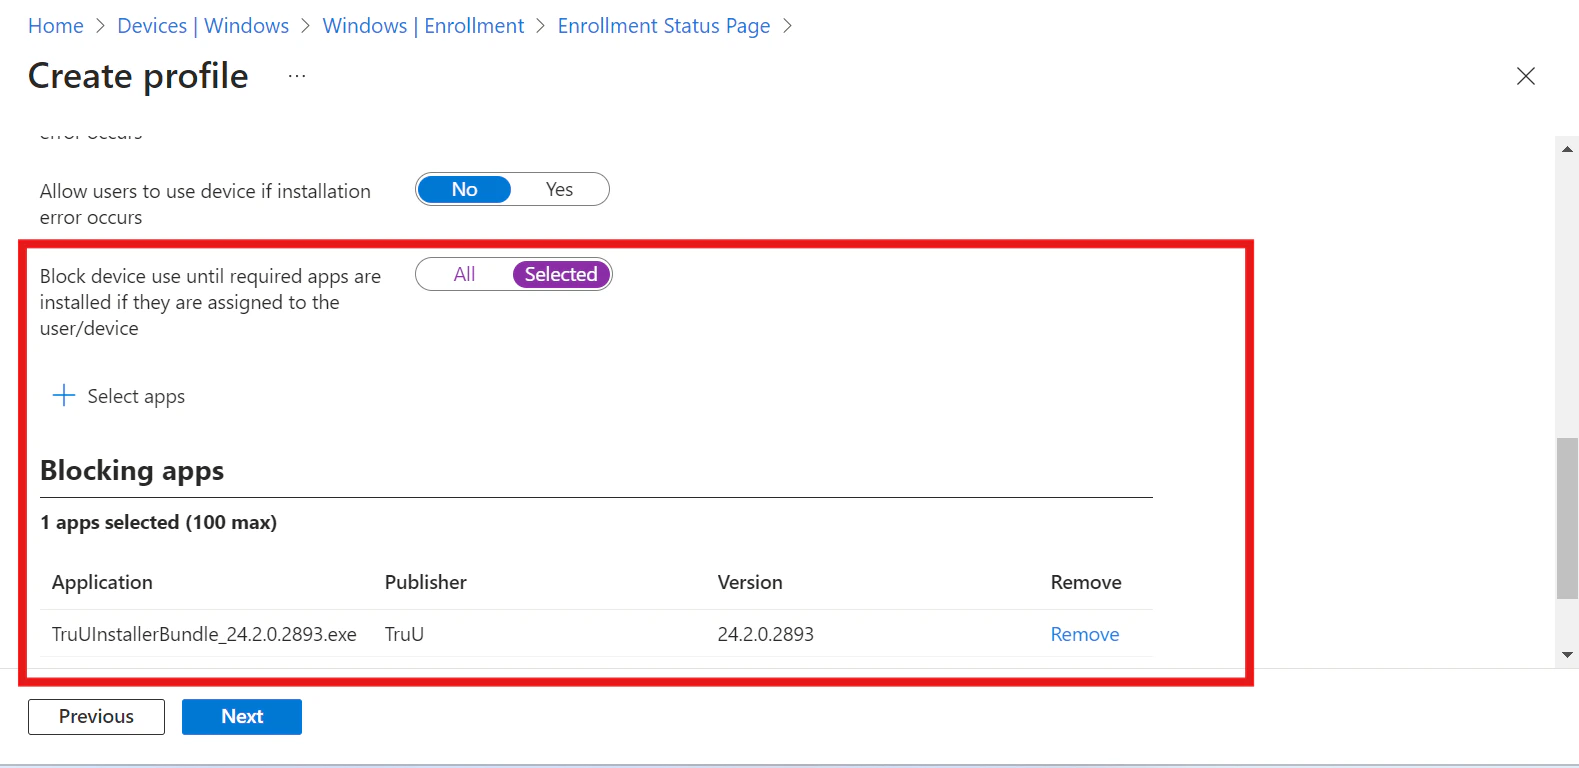
8. In the **Settings** page, toggle the option **Show app and profile configuration progress** to **Yes**.
9. Configure the settings as desired. However, make sure that you select the latest **TruU for Windows application which was created in step 4** under “**Block device use until these required apps are installed if they are assigned to the user/device**:”
8. Import the .csv(hardware hash) file of the all devices which needs to be enrolled.
9. After the import is complete, select **Sync**. (A message displays saying that the sync is in progress. The sync process might take a few minutes to complete, depending on how many devices are being synchronized.)
10. Click on the newly added devices and add the Group tag as ‘UserDriven’
11. Once the GroupTag has been assigned, wait for the Profile status to change from **Unassigned** to **Assigned** state.
## Step 4: Package and Deploy TruU Windows Authenticator in Intune
Complete this step by following the instructions in the link [Package and Deploy TruU Windows authenticator in Intune](https://docs.truu.ai/docs/package-and-deploy-truu-windows-authenticator-in-intune)
## Step 5: Configure and assign Autopilot Enrollment Status Page (ESP)
1. Sign into the [Microsoft Intune admin center](https://go.microsoft.com/fwlink/?linkid=2109431).
2. In the **Home** screen, select **Devices** in the left hand pane.
3. In the **Devices | Overview** screen, under **By platform**, select **Windows**.
4. In the **Windows | Windows devices** screen, under **Device onboarding**, select **Enrollment**.
5. In the **Windows | Windows enrollment** screen, under **Windows Autopilot**, select **Enrollment Status Page**.
6. In the **Enrollment Status Page** screen that opens, select **Create**.
7. The **Create profile** screen opens. In the **Basics** page:
a. Next to **Name**, enter a name for the ESP profile.
b. Next to **Description**, enter a description.
c. Select **Next**.
8. In the **Settings** page, toggle the option **Show app and profile configuration progress** to **Yes**.
9. Configure the settings as desired. However, make sure that you select the latest **TruU for Windows application which was created in step 4** under “**Block device use until these required apps are installed if they are assigned to the user/device**:”
 10. Assign this ESP profile to the dynamic device group created in step 1.
## Step 6: Enable the Security Keys (FIDO2) sign-in
To enable the use of security keys using Intune, complete the following steps:
1. Sign in to the [Microsoft Intune admin center](https://intune.microsoft.com/).
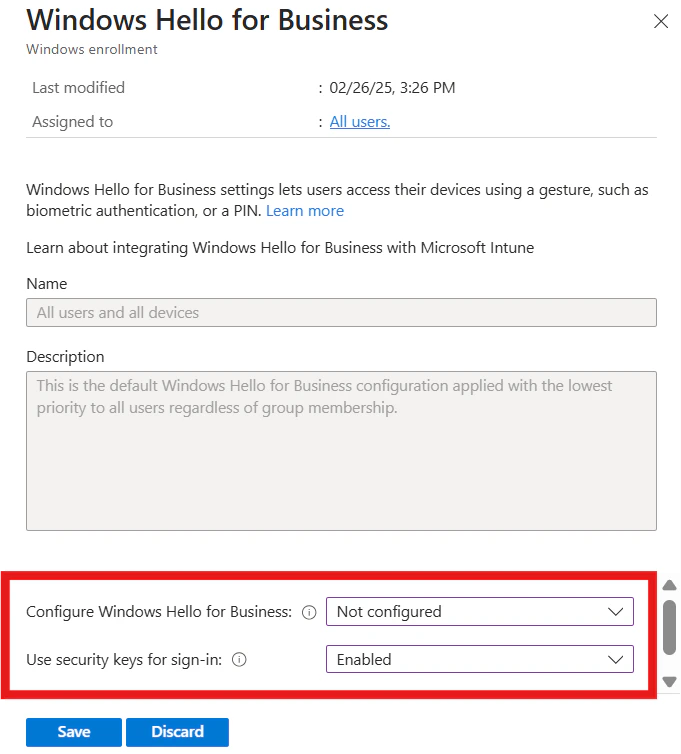
2. Browse to **Devices** > **Enroll Devices** > **Windows enrollment** > **Windows Hello for Business**.
3. Set **Use security keys for sign-in** to **Enabled**.
4. Configure Windows Hello for Business shall be **Not configured** or **Disabled** state.
10. Assign this ESP profile to the dynamic device group created in step 1.
## Step 6: Enable the Security Keys (FIDO2) sign-in
To enable the use of security keys using Intune, complete the following steps:
1. Sign in to the [Microsoft Intune admin center](https://intune.microsoft.com/).
2. Browse to **Devices** > **Enroll Devices** > **Windows enrollment** > **Windows Hello for Business**.
3. Set **Use security keys for sign-in** to **Enabled**.
4. Configure Windows Hello for Business shall be **Not configured** or **Disabled** state.
 **Note:** This will not enable security keys on already provisioned devices. In that case use the next method (Targeted Intune deployment)
To target specific device groups to enable the credential provider, use the following custom settings via Intune:
1. Sign in to the [Microsoft Intune admin center](https://intune.microsoft.com/).
2. Browse to **Devices** > **Windows** > **Configuration profiles** > **Create profile**.
3. Configure the new profile with the following settings:
* Platform: Windows 10 and later
* Profile type: Templates > Custom
* Name: Security Keys for Windows Sign-In
* Description: Enables FIDO Security Keys to be used during Windows Sign In
4. Select **Next** > **Add** and in **Add Row**, add the following Custom OMA-URI settings:
* Name: Turn on FIDO Security Keys for Windows Sign-In
* Description: (Optional)
* OMA-URI: ./Device/Vendor/MSFT/PassportForWork/SecurityKey/UseSecurityKeyForSignin
* Data Type: Integer
* Value: 1
5. Assign the Policy to the Groups that should support TruU login.
Now your user-driven Intune Autopilot along with TruU setup is complete. To understand the Enrollment workflow and User experience refer to the following link [User-driven-autopilot-enrollment-workflow](https://docs.truu.ai/docs/intune-user-driven-autopilot-enrollment-workflow)
***
[TruU Intune Autopilot Deployment](/docs/truu-intune-autopilot-deployment)
[TruU-Intune Self-Deployment Autopilot Setup](/docs/truu-intune-self-deployment-autopilot-setup)
**Note:** This will not enable security keys on already provisioned devices. In that case use the next method (Targeted Intune deployment)
To target specific device groups to enable the credential provider, use the following custom settings via Intune:
1. Sign in to the [Microsoft Intune admin center](https://intune.microsoft.com/).
2. Browse to **Devices** > **Windows** > **Configuration profiles** > **Create profile**.
3. Configure the new profile with the following settings:
* Platform: Windows 10 and later
* Profile type: Templates > Custom
* Name: Security Keys for Windows Sign-In
* Description: Enables FIDO Security Keys to be used during Windows Sign In
4. Select **Next** > **Add** and in **Add Row**, add the following Custom OMA-URI settings:
* Name: Turn on FIDO Security Keys for Windows Sign-In
* Description: (Optional)
* OMA-URI: ./Device/Vendor/MSFT/PassportForWork/SecurityKey/UseSecurityKeyForSignin
* Data Type: Integer
* Value: 1
5. Assign the Policy to the Groups that should support TruU login.
Now your user-driven Intune Autopilot along with TruU setup is complete. To understand the Enrollment workflow and User experience refer to the following link [User-driven-autopilot-enrollment-workflow](https://docs.truu.ai/docs/intune-user-driven-autopilot-enrollment-workflow)
***
[TruU Intune Autopilot Deployment](/docs/truu-intune-autopilot-deployment)
[TruU-Intune Self-Deployment Autopilot Setup](/docs/truu-intune-self-deployment-autopilot-setup)