> ## Documentation Index
> Fetch the complete documentation index at: https://docs.truu.ai/llms.txt
> Use this file to discover all available pages before exploring further.

# Okta Unified Directory

> This is the step by step guide as to how one configures TruU with their Okta Unified Directory.

**Directory Configuration**

1. Go to your "TruU Admin Portal" and, under the "Settings" drop down menu, select **Directory**. Then, click the **(+)** to add a new directory

<img src="https://mintcdn.com/truu-2/YlfY4z_3_-uDkBaP/images/docs/4af10acd192b5bdfb8cb080846d17e01db8716bca7ea73f912e71d80bb82b9e0-image.png?fit=max&auto=format&n=YlfY4z_3_-uDkBaP&q=85&s=7e8ca4f7cc724f0753ab0158c79e434d" alt="" width="2880" height="1502" data-path="images/docs/4af10acd192b5bdfb8cb080846d17e01db8716bca7ea73f912e71d80bb82b9e0-image.png" />

2. Next, enter all of the the required information in all valid fields:

| Setting                                                                   | Description                                                                                                                                                                                                                                                                                                                                                                                                 |
| ------------------------------------------------------------------------- | ----------------------------------------------------------------------------------------------------------------------------------------------------------------------------------------------------------------------------------------------------------------------------------------------------------------------------------------------------------------------------------------------------------- |
| Configuration Name                                                        | A unique name to identify the directory connection. For best practice, directory names should be based on the instance and region where the directory resides (e.g. US-Denver-Production)                                                                                                                                                                                                                   |
| Tenant ID                                                                 | The URL of your Okta tenant (e.g. ‘https\://\<tenant-name>.okta.com’)                                                                                                                                                                                                                                                                                                                                       |
| Okta API Token                                                            | An Okta API token authorizes TruU Identity Servers to securely query users in the Okta directory                                                                                                                                                                                                                                                                                                            |
| Automatically Remove Devices Based on Changes to User Status in Directory | Setting this to ‘True’ will automatically unenroll devices when user accounts are removed from the corporate directory. Additionally, you can specify whether devices should be unenrolled for other user account changes such as Account Deactivated, Account Suspended, or Account Locked (differs depending on directory). You can also choose to remove the user record from the admin console entirely |

<img src="https://mintcdn.com/truu-2/m22YLP0oXSNG0U3O/images/docs/8a104bc-image.png?fit=max&auto=format&n=m22YLP0oXSNG0U3O&q=85&s=0425c367d4183bdfc02aa67c49564b5f" alt="" width="664" height="632" data-path="images/docs/8a104bc-image.png" />

NOTE: If not all of your users have the same UPN suffix that ends with \<domain>, this can be set to **No** and revisited at a later time

3. In order to insert your *Okta API Token*, you must create the Okta API Token on your Okta Admin Console. To do so, follow the steps below:
   1. On the Okta Admin Console, navigate to the "Security" dropdown menu and select **API**
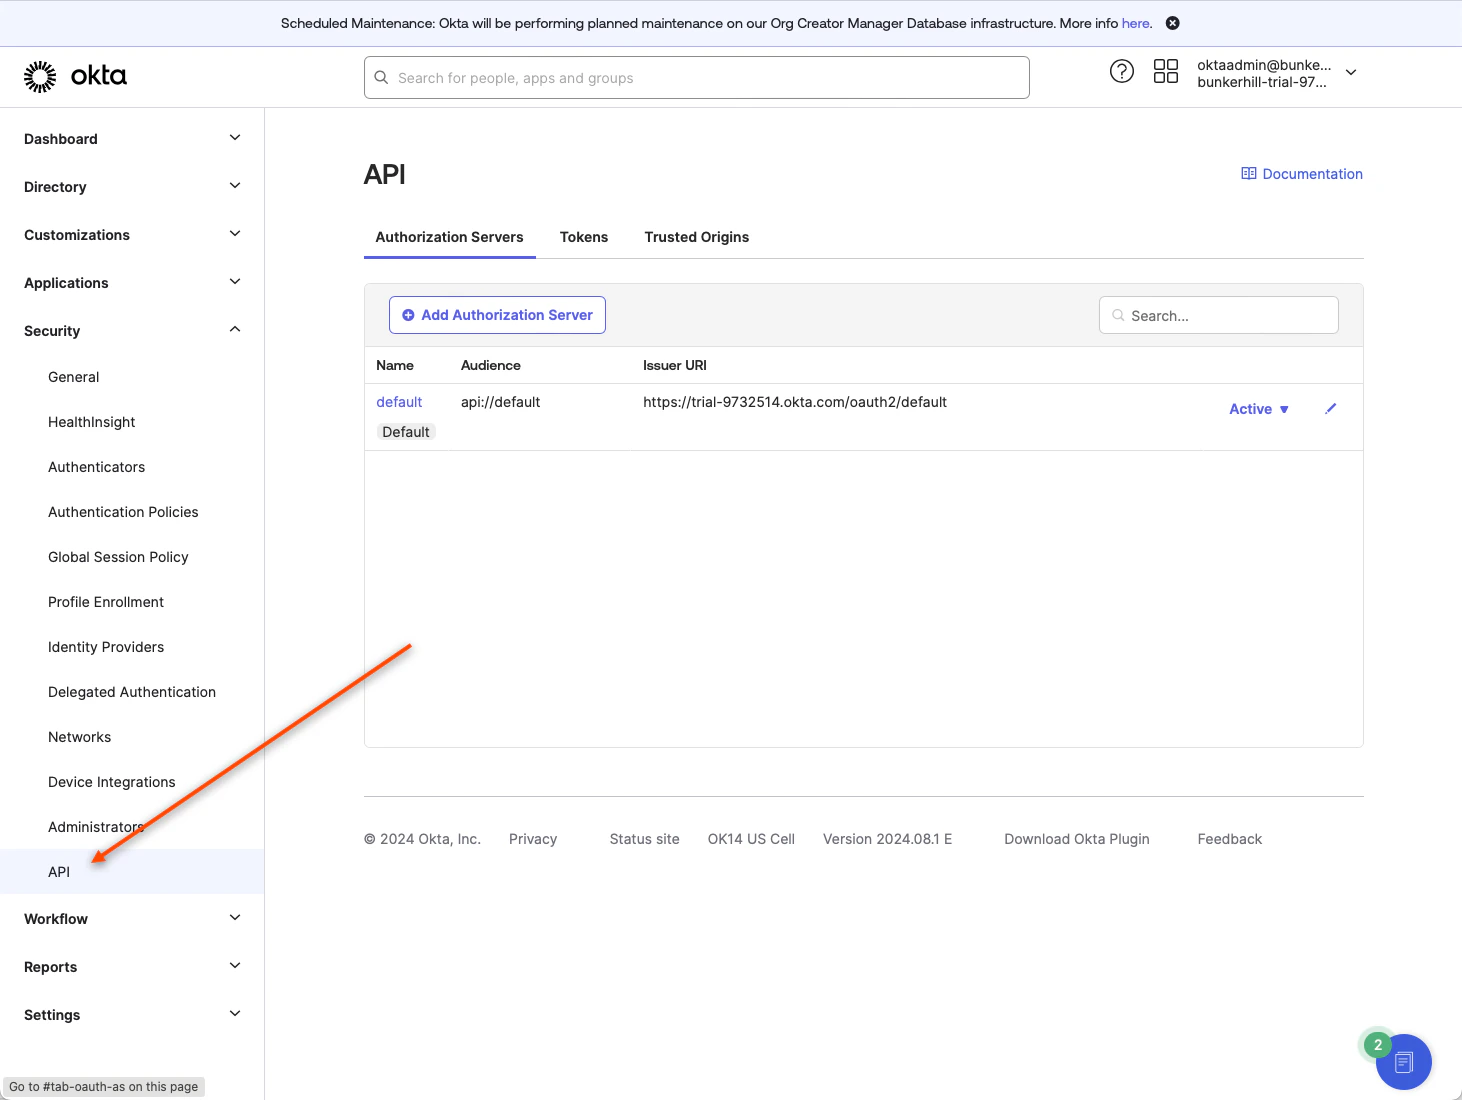
      <img src="https://mintcdn.com/truu-2/0zTsJHKKI2cGP3Gv/images/docs/ffd981a119828625f8dc866e03f7838654a74d1059ee73d45c14ae9033716d62-image.png?fit=max&auto=format&n=0zTsJHKKI2cGP3Gv&q=85&s=185de11344785996419d5cc9cb870e2b" alt="" width="1462" height="1100" data-path="images/docs/ffd981a119828625f8dc866e03f7838654a74d1059ee73d45c14ae9033716d62-image.png" />
   2. Click **Tokens**
      <img src="https://mintcdn.com/truu-2/rjjBxA7Z_Wk_-34G/images/docs/f5aa690f7a727732344a37f808ec3154d253a9938b8ed7d5d4bdb282d5c429a4-image.png?fit=max&auto=format&n=rjjBxA7Z_Wk_-34G&q=85&s=c9c6bd482e9a3e64a93744884f802027" alt="" width="1462" height="1100" data-path="images/docs/f5aa690f7a727732344a37f808ec3154d253a9938b8ed7d5d4bdb282d5c429a4-image.png" />
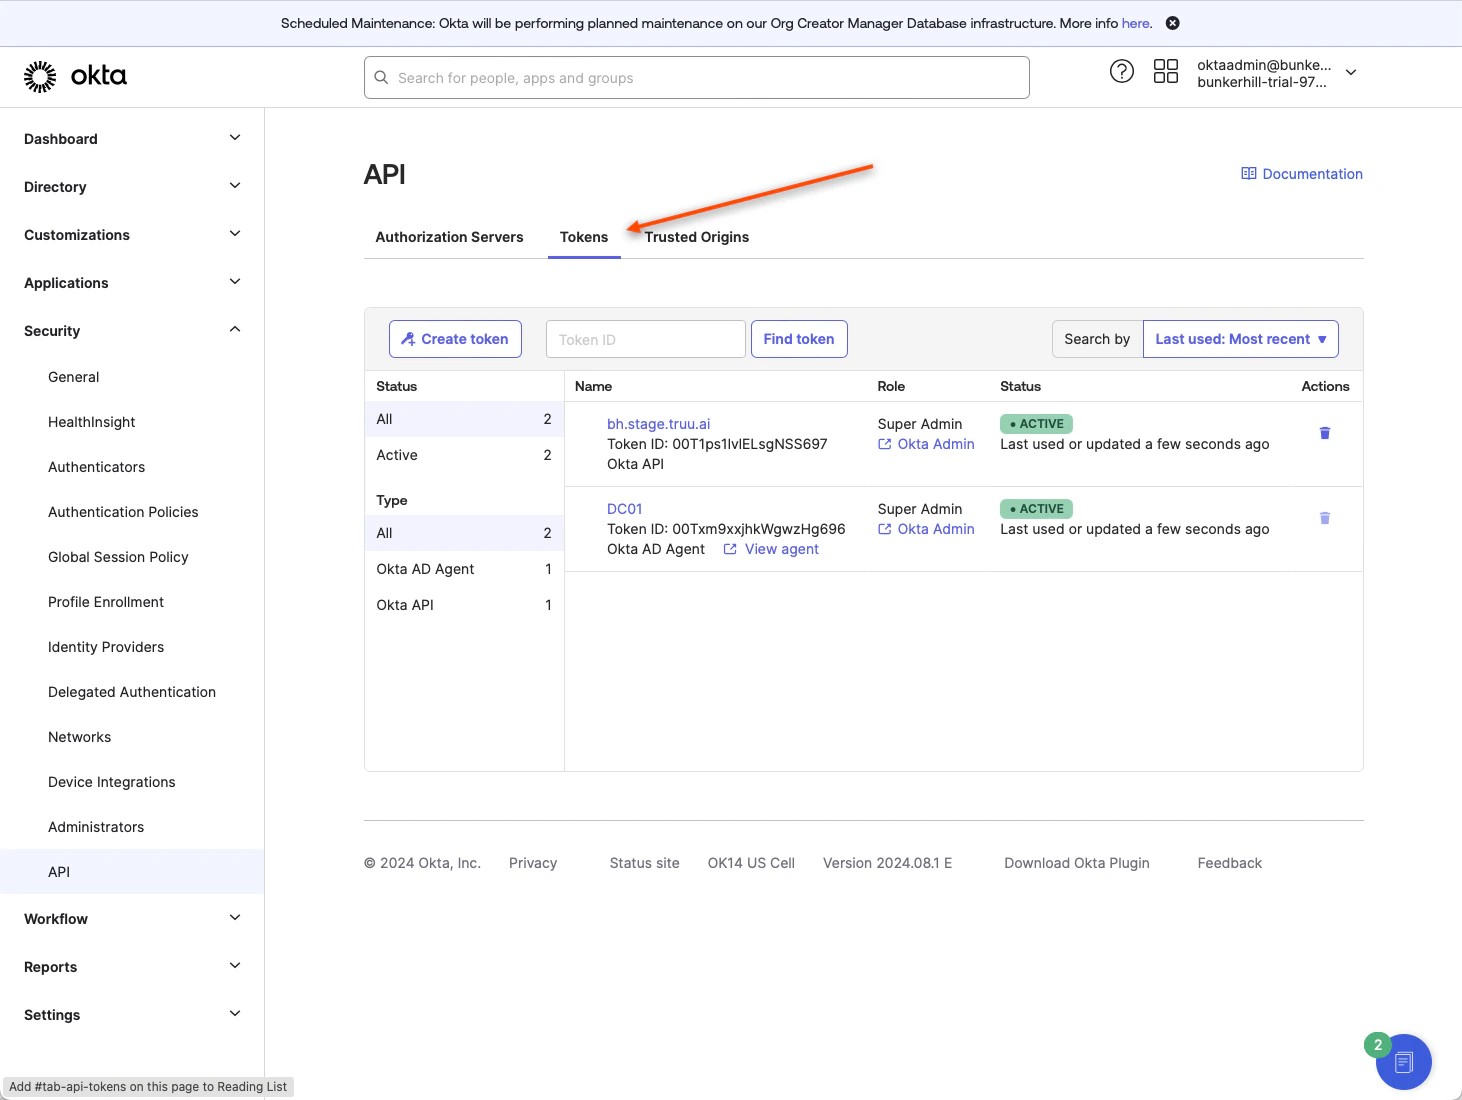
   3. Click **Create Token**
      <img src="https://mintcdn.com/truu-2/jMF4bYA9yOA_2TKv/images/docs/36d0e65f97159798f7a04d7c7b9d585f15eddf78275c3c0e49f25a761d2b42cd-image.png?fit=max&auto=format&n=jMF4bYA9yOA_2TKv&q=85&s=18c0f8c9b245dd29f7ec3a392e425528" alt="" width="1462" height="1100" data-path="images/docs/36d0e65f97159798f7a04d7c7b9d585f15eddf78275c3c0e49f25a761d2b42cd-image.png" />
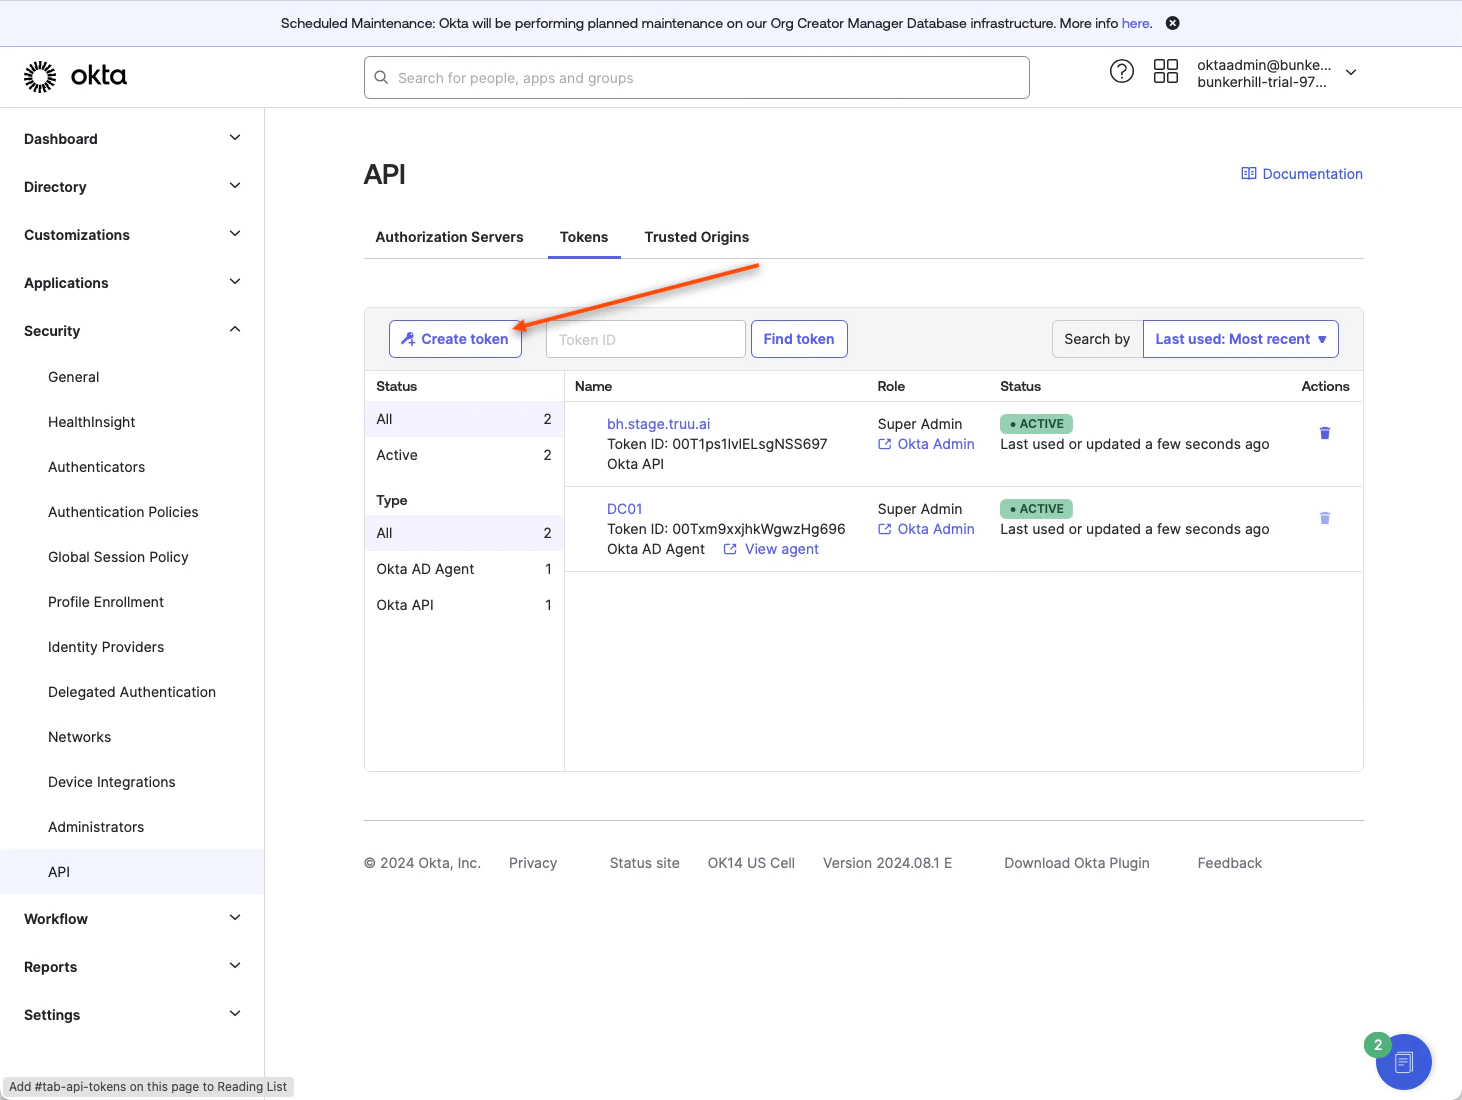
   4. Name your token (we suggest "*TruU*") and select **Any IP** in the second drop down. Then, click **Create token**
      <img src="https://mintcdn.com/truu-2/qCK1oWL4jNpZKJ8A/images/docs/924ce35b75cfa9183bbbb602a78c6638b004fbcea00cd61b78bc158be5851ec7-image.png?fit=max&auto=format&n=qCK1oWL4jNpZKJ8A&q=85&s=d99100f9d533d668f6716f9bd8d8cdf5" alt="" width="480" height="358" data-path="images/docs/924ce35b75cfa9183bbbb602a78c6638b004fbcea00cd61b78bc158be5851ec7-image.png" />
   5. You have now generated your API Token. This "Token Value" you will be able to copy and paste into your TruU Admin Console by clicking the marked "copy" button, and click **Ok, got it**
      <img src="https://mintcdn.com/truu-2/ehCBQgFdl_pQd0MN/images/docs/b9e217cbacebb1d1cbd8def9e08ab1bc5c362ce0fd1f2161510776573fc80a58-image.png?fit=max&auto=format&n=ehCBQgFdl_pQd0MN&q=85&s=4223405ca3174912cad157966c5a322f" alt="" width="479" height="393" data-path="images/docs/b9e217cbacebb1d1cbd8def9e08ab1bc5c362ce0fd1f2161510776573fc80a58-image.png" />
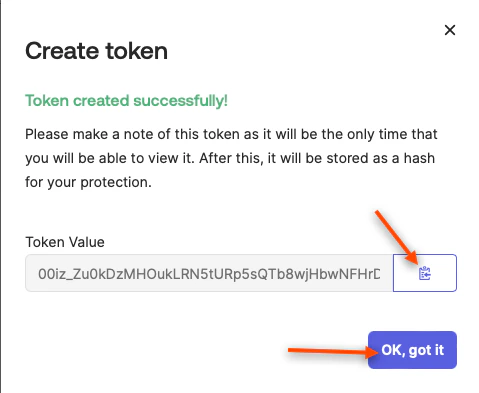
   6. This token value will be pasted in the "Okta API Token" section of the Directory Configuration page in the TruU Admin Console as seen below
      <img src="https://mintcdn.com/truu-2/rjjBxA7Z_Wk_-34G/images/docs/e4bbbe1ad7cf3d4ea4adf531fe144d8caab86ba942820b2f04710375463de7d1-image.png?fit=max&auto=format&n=rjjBxA7Z_Wk_-34G&q=85&s=83f89ac4ee002bbacfd4c897fdd34599" alt="" width="545" height="519" data-path="images/docs/e4bbbe1ad7cf3d4ea4adf531fe144d8caab86ba942820b2f04710375463de7d1-image.png" />
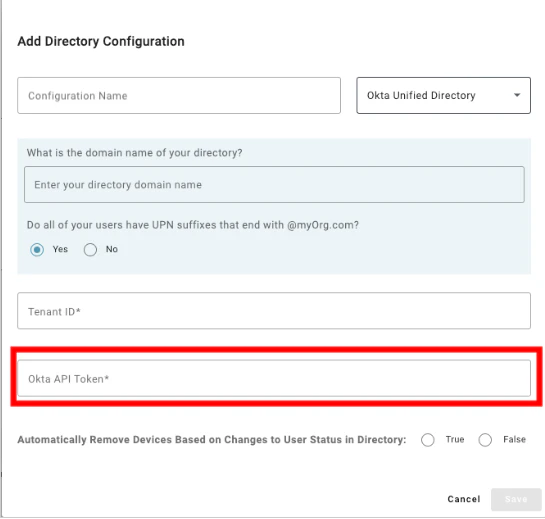
4. Once you fill in all the fields, click **Save**. You will be prompted with the following pop-up. Select **Go Now**
   <img src="https://mintcdn.com/truu-2/YlfY4z_3_-uDkBaP/images/docs/62169736c263b9db28f6c8ed1717b9a725e9db4364aa49fc8e2f7b7b53a73fc4-image.png?fit=max&auto=format&n=YlfY4z_3_-uDkBaP&q=85&s=621a08c7c3754ef3e24d027caca53a1a" alt="" width="1916" height="942" data-path="images/docs/62169736c263b9db28f6c8ed1717b9a725e9db4364aa49fc8e2f7b7b53a73fc4-image.png" />
5. Now make sure you are in the *Global Attributes* tab and click on the **Gear icon** in the top right portion of the screen. Here, you are able to select what your Primary User Identifier will be for the user throughout the system. Make sure you click **Save** on the pop up window

<img src="https://mintcdn.com/truu-2/ehCBQgFdl_pQd0MN/images/docs/b2baea2-image.png?fit=max&auto=format&n=ehCBQgFdl_pQd0MN&q=85&s=c66f21f2c7f98081c1d8cdade13e4bc7" alt="" width="1600" height="738" data-path="images/docs/b2baea2-image.png" />

6. Navigate to the **"Identity Servers"** tab under the "Environment" section. Click on the **Cluster** tab, and select your directory. Upon selection, choose your directory configuration in the prompted drop down menu under \_Directory Connection

<img src="https://mintcdn.com/truu-2/0zTsJHKKI2cGP3Gv/images/docs/f830e5f-image.png?fit=max&auto=format&n=0zTsJHKKI2cGP3Gv&q=85&s=c087dbfe2af4122a8e4bc0361867bda8" alt="" width="1600" height="806" data-path="images/docs/f830e5f-image.png" />

7. It may require 2-3 minutes, but once you get the "Healthy" diagnostic, you have successfully configured your directory

<img src="https://mintcdn.com/truu-2/rjjBxA7Z_Wk_-34G/images/docs/ee85be0-image.png?fit=max&auto=format&n=rjjBxA7Z_Wk_-34G&q=85&s=5111020f9ff8f6a261f3a502671d303d" alt="" width="1588" height="736" data-path="images/docs/ee85be0-image.png" />

***

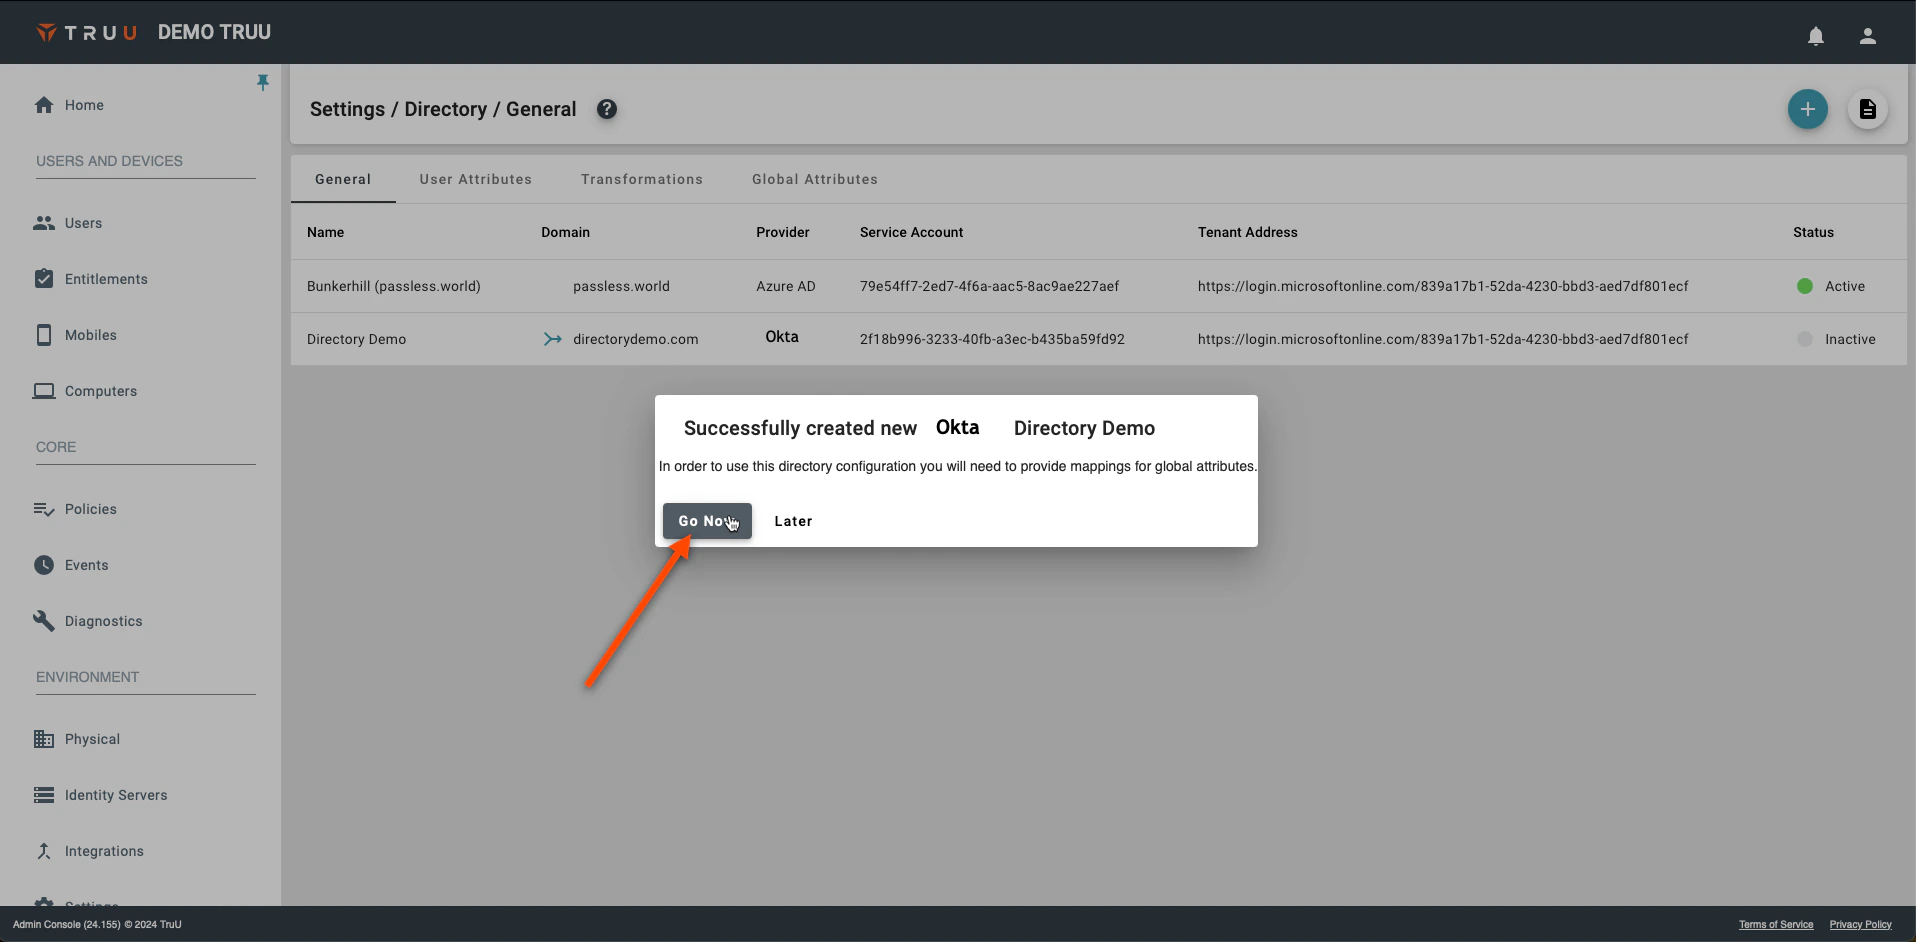
[Entra ID Configuration Automation](/docs/entra-id-configuration-automation)

[FIDO2](/docs/fido2)
