> ## Documentation Index
> Fetch the complete documentation index at: https://docs.truu.ai/llms.txt
> Use this file to discover all available pages before exploring further.
# TruU JAMF Pre-Stage Deployment using JAMF Setup Manager
> This is a step by step guide as to how one deploys TruU using JAMF Setup Manager
### Preface
**What is Jamf Setup Manager?** Jamf Setup Manager enhances the setup process by integrating with Baseline and DEP Notify, offering a streamlined and secure method for provisioning Macs before they reach end users. By working within Setup Assistant and before user creation, it ensures that MDM-capable users and the FileVault secure token flow remain untouched
Key features include:
1. **Seamless Integration with Setup Assistant**: Setup Manager runs during the initial setup phase, ensuring the MDM and secure token processes are not disrupted
2. **Customizable via Configuration Profiles**: Administrators have full control over the setup process through configuration profiles. These profiles determine which policies and installations are executed
3. **Flexible Assignments**: New Macs can be pre-configured and assigned to the appropriate users before distribution
4. **Non-intrusive Process**: By executing before user creation, Setup Manager ensures the device is ready without interfering with user workflows
\*\*NOTE: \*\*The Jamf Setup Manager Package also comes pre-loaded with Installomator and SwiftDialog
**Requirements** The minimum requirements for your Apple devices: • A Jamf Pro Server running version 11.9 or later • A Jamf Pro account with Administrator Privileges • A Mac computer running macOS 14.5 or later
Jamf Setup Manager Github: [GitHub - Jamf-Concepts/Setup-Manager: Enrollment progress manager](https://github.com/Jamf-Concepts/Setup-Manager) Jamf Concepts to download setup manager: [JAMF Concepts](https://concepts.jamf.com/)
## Jamf Setup Manager: Workflow and Execution
Here's a streamlined breakdown of setting up Jamf Setup Manager:
1. **Configuration Profile Setup**: Use a configuration profile to define app installations, package deployments, and branding. Jamf Setup Manager is installed during PreStage enrollment via Automated Device Enrollment
2. **Enrollment Actions**: Tasks, like package installations, are defined in the configuration profile and triggered by Jamf policies.
3. **Package Installation**: Custom policies deploy packages using Installomater, integrated within Jamf Setup Manager
4. **Branding**: Icons, titles, and messages specified in the profile create a personalized setup experience
5. **Custom Attributes**: You can set attributes like computer name and asset tag during the setup process
6. **Final Action**: Setup Manager concludes with a defined action, like a system restart or finishing Setup Assistant
7. **Cleanup**: A flag file (/private/var/db/.JamfSetupEnrollmentDone) is created upon completion to prevent reruns
**NOTE**: If you are already using the JAMF Setup Manager in your environment, navigate to the following sections of this document: **Create a JAMF Setup Manager Configuration Profile**, **Upload Packages to JAMF Pro (specifically step 11)**, and **Create a Policy in JAMF Pro**.
## Jamf Pro Preparation for Setup Manager
Ensure that you have the following hardware and software. Download the items from the links provided below:
* Jamf Setup Manager: [Releases - JAMF-Concepts/Setup-Manager](https://github.com/Jamf-Concepts/Setup-Manager/releases)
* Jamf Composer: [JAMF Account](https://account.jamf.com/login)
* Jamf Pro Server (Version 11.9): Ensure you are working with Jamf Pro server 11.9 or later to utilize the features and functionalities outlined in this guide
* A Non-Production Mac with macOS 14.5: The Mac should be enrolled in Apple Business Manager (ABM) or Apple School Manager (ASM) and assigned to your Jamf Pro server
1. Log into your Jamf Pro Server with administrative credentials
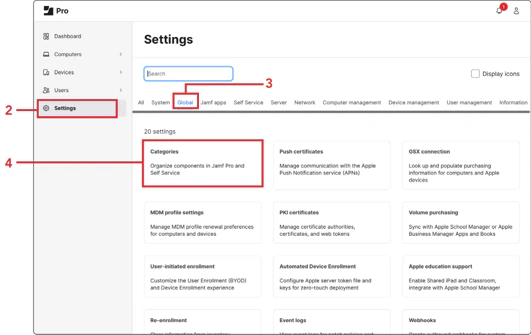
 2. Click **Settings**
3. Click **Global**
4. Click **Categories**
2. Click **Settings**
3. Click **Global**
4. Click **Categories**
 5. Click **New**
6. Enter *Jamf Setup Manager* for the Display Name
7. Click **Save**
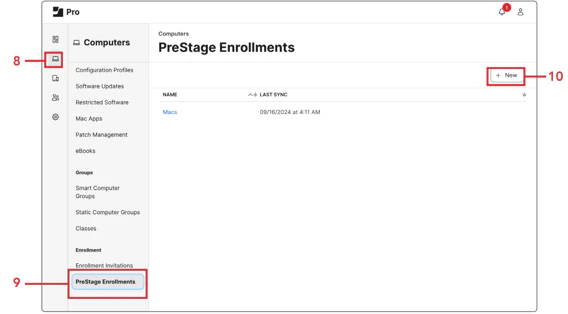
8. Click **Computers**
9. Click **PreStage Enrollments**
10. Click **New**
5. Click **New**
6. Enter *Jamf Setup Manager* for the Display Name
7. Click **Save**
8. Click **Computers**
9. Click **PreStage Enrollments**
10. Click **New**
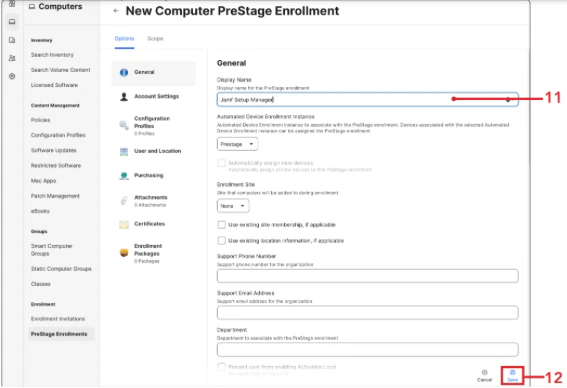
 11. Enter *Jamf Setup Manager* for the Display Name
12. Click **Save**. We will finish the configuration of the PreStage in Section 7 of this guide
11. Enter *Jamf Setup Manager* for the Display Name
12. Click **Save**. We will finish the configuration of the PreStage in Section 7 of this guide
 13. Click **Computers**
14. Click **Smart Computer Groups**
15. Click **New**
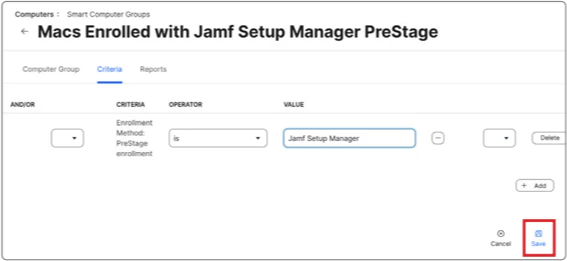
16. For the Display Name, enter *Macs Enrolled with Jamf Setup Manager PreStage*
17. Click **Criteria**
18. Click **Add**
19. Click **Show Advanced Criteria**
20. Scroll to Enrollment Method: PreStage Enrollment
21. Click **Choose**
22. Click **Browse (..,)**
23. Choose **Jamf Setup Manager**
24. Click **Save**
13. Click **Computers**
14. Click **Smart Computer Groups**
15. Click **New**
16. For the Display Name, enter *Macs Enrolled with Jamf Setup Manager PreStage*
17. Click **Criteria**
18. Click **Add**
19. Click **Show Advanced Criteria**
20. Scroll to Enrollment Method: PreStage Enrollment
21. Click **Choose**
22. Click **Browse (..,)**
23. Choose **Jamf Setup Manager**
24. Click **Save**
 ## Create a Jamf Setup Manager Configuration Profile
Overview In this section, we will configure and deploy the Jamf Setup Manager configuration profiles using Jamf Pro. Jamf Pro makes this process straightforward with a built-in template that simplifies the creation and deployment of configuration profiles to macOS devices. At the end of the section we will create a configuration profile that will be used in to enable FileVault at enrollment.
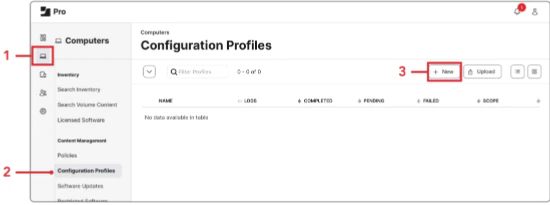
1. Click **Computers**
2. Click **Configuration Profiles**
3. Click **New**
## Create a Jamf Setup Manager Configuration Profile
Overview In this section, we will configure and deploy the Jamf Setup Manager configuration profiles using Jamf Pro. Jamf Pro makes this process straightforward with a built-in template that simplifies the creation and deployment of configuration profiles to macOS devices. At the end of the section we will create a configuration profile that will be used in to enable FileVault at enrollment.
1. Click **Computers**
2. Click **Configuration Profiles**
3. Click **New**
 4. Enter *Jamf Setup Manager* for the name. The Jamf Setup Manager Profile defines how the setup assistant installs apps, deploys packages, applies custom branding and allows the manual creation of computer name and asset tags during Automated Device Enrollment (ADE)
5. Set the "Category" to **Jamf Setup Manager**
6. Click on **Application & Custom Settings**
7. Click **Jamf Applications**
8. Click **Add**
9. Click on the **Jamf Application domain menu**
10. Select **com.jamf.setupmanager**
11. Select the following:
1. **Version:1.0**
2. Variant: **Setup Manager.json**
4. Enter *Jamf Setup Manager* for the name. The Jamf Setup Manager Profile defines how the setup assistant installs apps, deploys packages, applies custom branding and allows the manual creation of computer name and asset tags during Automated Device Enrollment (ADE)
5. Set the "Category" to **Jamf Setup Manager**
6. Click on **Application & Custom Settings**
7. Click **Jamf Applications**
8. Click **Add**
9. Click on the **Jamf Application domain menu**
10. Select **com.jamf.setupmanager**
11. Select the following:
1. **Version:1.0**
2. Variant: **Setup Manager.json**
 12. Let’s configure the icon, title and message we would like for the employee to see when they enroll the Mac for the first time. Scroll down to "Preference Domain Properties"
1. Icon Source - This can come from a URL, path to an application where the icon will be pulled automatically if the application exists on the Mac
2. Title - Add your organization here
3. Message - A message you want to display to your users
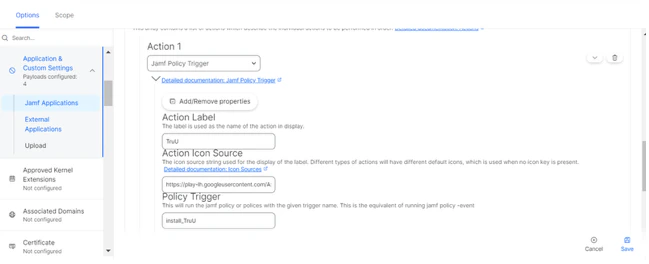
13. In the Enrollment Actions section, click **Add Item**
14. For item 1, select **Jamf Policy Trigger**. Enter the following:
1. Action Label - The verbiage you want the employee to see when the policy is running in Jamf Setup Manager. This guide will use TruU
2. Action Icon Source - This can be a URL or a path to an application. This guide will use the URL below [https://play-lh.googleusercontent.com/Ax3ZF3BvNa8p8\_ojgJo-JyINulb9fLz5qkb9T0JsK0omEf1zGp5Mc8k970pkMzrM-v1Y](https://play-lh.googleusercontent.com/Ax3ZF3BvNa8p8_ojgJo-JyINulb9fLz5qkb9T0JsK0omEf1zGp5Mc8k970pkMzrM-v1Y)
3. Policy Trigger - Even though the policy has not been created, we are going to name the policy trigger: *install\_TruU*
15. Click **Add Item**. You can also add other applications which needs to be deployed during the Jamf setup manager
12. Let’s configure the icon, title and message we would like for the employee to see when they enroll the Mac for the first time. Scroll down to "Preference Domain Properties"
1. Icon Source - This can come from a URL, path to an application where the icon will be pulled automatically if the application exists on the Mac
2. Title - Add your organization here
3. Message - A message you want to display to your users
13. In the Enrollment Actions section, click **Add Item**
14. For item 1, select **Jamf Policy Trigger**. Enter the following:
1. Action Label - The verbiage you want the employee to see when the policy is running in Jamf Setup Manager. This guide will use TruU
2. Action Icon Source - This can be a URL or a path to an application. This guide will use the URL below [https://play-lh.googleusercontent.com/Ax3ZF3BvNa8p8\_ojgJo-JyINulb9fLz5qkb9T0JsK0omEf1zGp5Mc8k970pkMzrM-v1Y](https://play-lh.googleusercontent.com/Ax3ZF3BvNa8p8_ojgJo-JyINulb9fLz5qkb9T0JsK0omEf1zGp5Mc8k970pkMzrM-v1Y)
3. Policy Trigger - Even though the policy has not been created, we are going to name the policy trigger: *install\_TruU*
15. Click **Add Item**. You can also add other applications which needs to be deployed during the Jamf setup manager
 16. Click **Scope**
17. Click **Add**
18. Click **Computer Groups**
19. Click **Add** for "Macs Enrolled with Jamf Setup Manager PreStage"
20. Click **Done**
21. Click **Save**
## Create a Configuration profile for FileVault Enablement
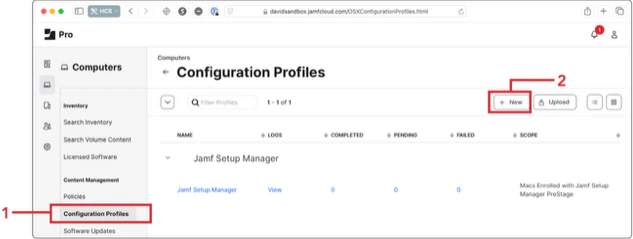
1. Click **Configuration Profiles**
2. Click **New**
16. Click **Scope**
17. Click **Add**
18. Click **Computer Groups**
19. Click **Add** for "Macs Enrolled with Jamf Setup Manager PreStage"
20. Click **Done**
21. Click **Save**
## Create a Configuration profile for FileVault Enablement
1. Click **Configuration Profiles**
2. Click **New**
 3. In the name field, enter *FileVault Enablement* for ADE
4. Select the category, **Jamf Setup Manager**
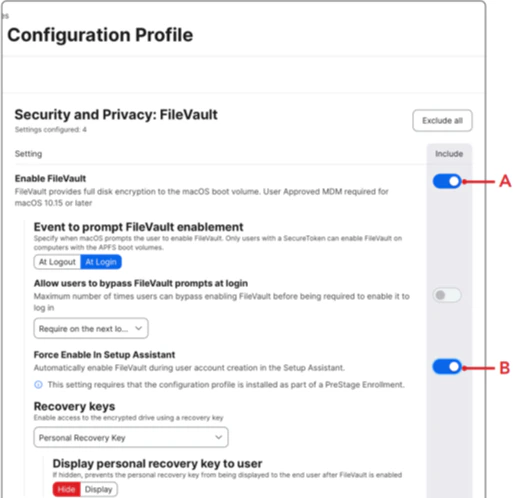
5. Scroll down to the **Security** and **Privacy Payload**
6. Click **FileVault**
7. Enable the following:
1. Enable **FileVault**
2. Force Enable in Setup Assistant
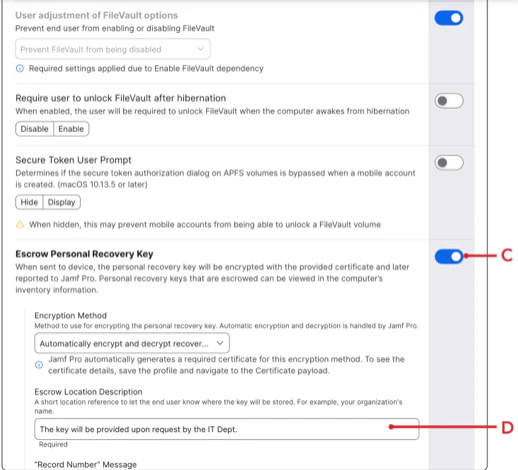
3. Escrow Personal Recovery Key
4. Enter the following message: The key will be provided upon request by the IT Dept
3. In the name field, enter *FileVault Enablement* for ADE
4. Select the category, **Jamf Setup Manager**
5. Scroll down to the **Security** and **Privacy Payload**
6. Click **FileVault**
7. Enable the following:
1. Enable **FileVault**
2. Force Enable in Setup Assistant
3. Escrow Personal Recovery Key
4. Enter the following message: The key will be provided upon request by the IT Dept
 8. Click **Scope**
9. Click **Add**
10. Click **Computer Groups**
11. Click **Add** for Macs Enrolled with Jamf Setup Manager PreStage
12. Click **Done**
13. Click **Save**
## Upload Packages to Jamf Pro
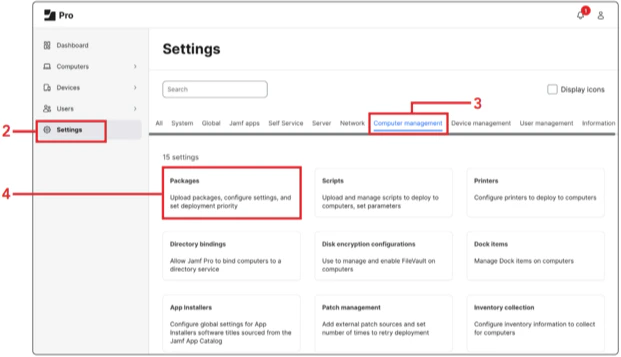
1. Go back to your Jamf Pro Server.
2. Click **Settings**
3. Click **Computer management**
4. Click **Packages**
8. Click **Scope**
9. Click **Add**
10. Click **Computer Groups**
11. Click **Add** for Macs Enrolled with Jamf Setup Manager PreStage
12. Click **Done**
13. Click **Save**
## Upload Packages to Jamf Pro
1. Go back to your Jamf Pro Server.
2. Click **Settings**
3. Click **Computer management**
4. Click **Packages**
 5. Click **New**
6. Drag the Setup.Manager.1.0-368.pkg from your "Downloads folder" to the “Drop file here” field
7. Set the Category to J**amf Setup Manager**
8. Click **Save**
9. Click **Previous** (←)
10. Click **New**
11. Repeat steps 6 through 9 to upload TruU PKG file
12. Confirm you have uploaded the following packages before continuing:
1. Setup.Manager.1.0-368.pkg
2. TruU.pkg
3. ADE Tracker (use for the pre-stage deployment on slow networks). **NOTE**: You must make sure to set this package's priority to the highest priority (1) [Importing TruU Packages for JAMF Setup](https://docs.truu.ai/docs/importing-truu-packages-for-jamf-setup#/)
## Create a Policy in Jamf Pro
1. Click **Computers**
2. Click **Policies**
3. Click **New**
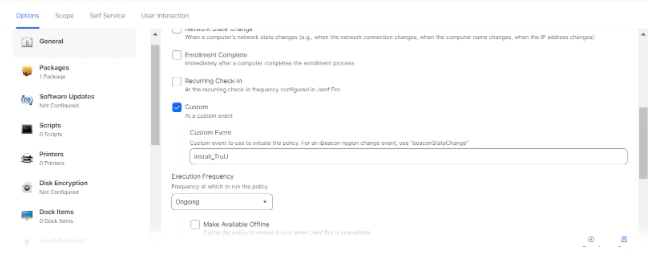
4. Configure the following:
1. Display Name: TruU\_XXX
2. Category: Select a category of your choosing. This guide will use Jamf Setup Manager
3. Trigger: Select Custom and enter install\_TruU
4. Execution Frequency: Ongoing
5. Click **New**
6. Drag the Setup.Manager.1.0-368.pkg from your "Downloads folder" to the “Drop file here” field
7. Set the Category to J**amf Setup Manager**
8. Click **Save**
9. Click **Previous** (←)
10. Click **New**
11. Repeat steps 6 through 9 to upload TruU PKG file
12. Confirm you have uploaded the following packages before continuing:
1. Setup.Manager.1.0-368.pkg
2. TruU.pkg
3. ADE Tracker (use for the pre-stage deployment on slow networks). **NOTE**: You must make sure to set this package's priority to the highest priority (1) [Importing TruU Packages for JAMF Setup](https://docs.truu.ai/docs/importing-truu-packages-for-jamf-setup#/)
## Create a Policy in Jamf Pro
1. Click **Computers**
2. Click **Policies**
3. Click **New**
4. Configure the following:
1. Display Name: TruU\_XXX
2. Category: Select a category of your choosing. This guide will use Jamf Setup Manager
3. Trigger: Select Custom and enter install\_TruU
4. Execution Frequency: Ongoing
 5. Click the **Packages** payload
6. Click **Configure**
7. Click **add** for TruU.pkg
8. Confirm the action is set to **install**
9. Click **Scope**
10. Click **Add**
11. Click **Computer Groups**
12. Click **Add** for Macs Enrolled with Jamf Setup Manager PreStage
13. Click **Done**
14. Click **Save**
15. Confirm the policy was created
## Add TruU Mac Authenticator config file
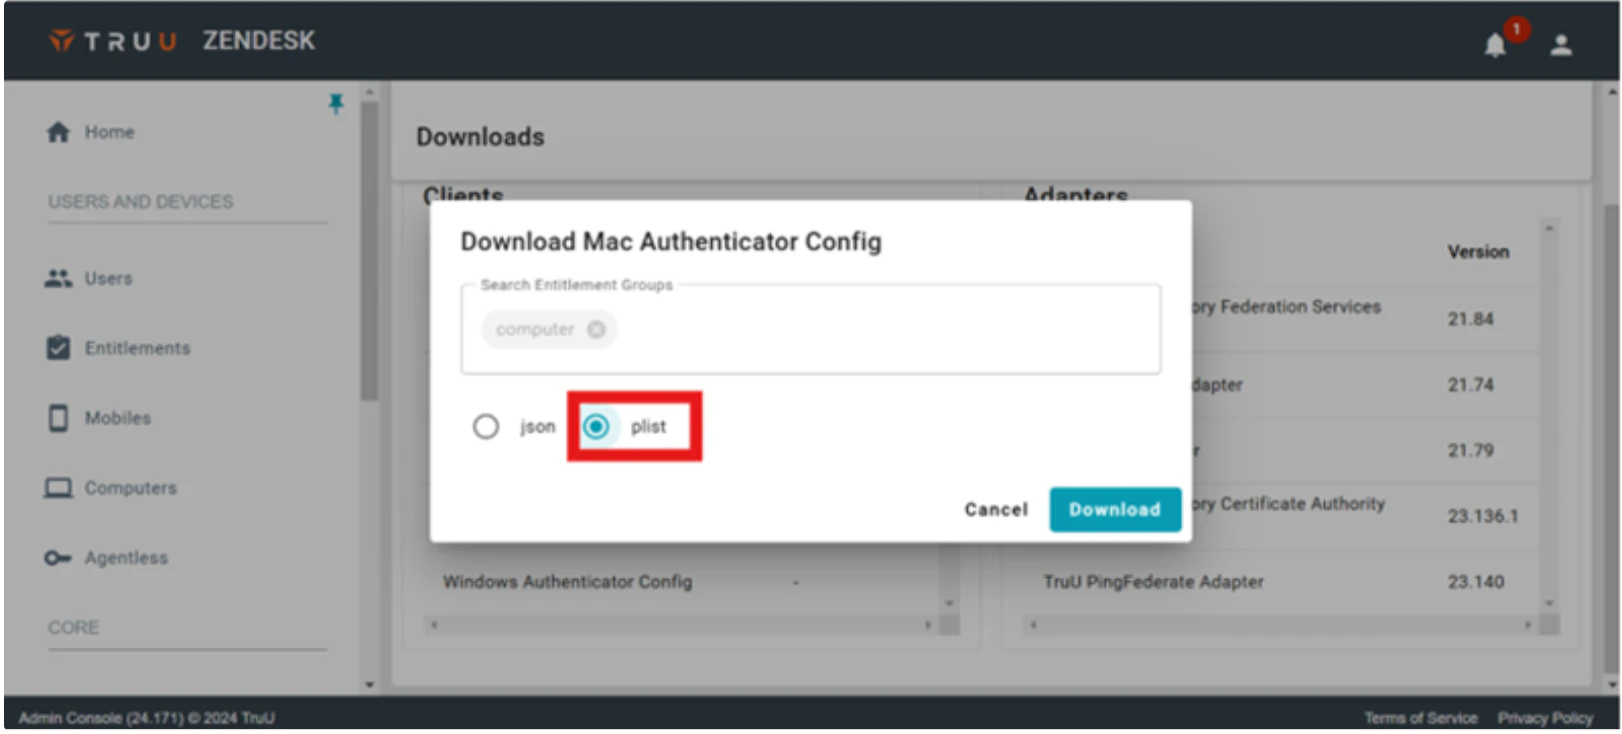
1. Download the TruU MA config file from the your admin console in *plist* format.
5. Click the **Packages** payload
6. Click **Configure**
7. Click **add** for TruU.pkg
8. Confirm the action is set to **install**
9. Click **Scope**
10. Click **Add**
11. Click **Computer Groups**
12. Click **Add** for Macs Enrolled with Jamf Setup Manager PreStage
13. Click **Done**
14. Click **Save**
15. Confirm the policy was created
## Add TruU Mac Authenticator config file
1. Download the TruU MA config file from the your admin console in *plist* format.
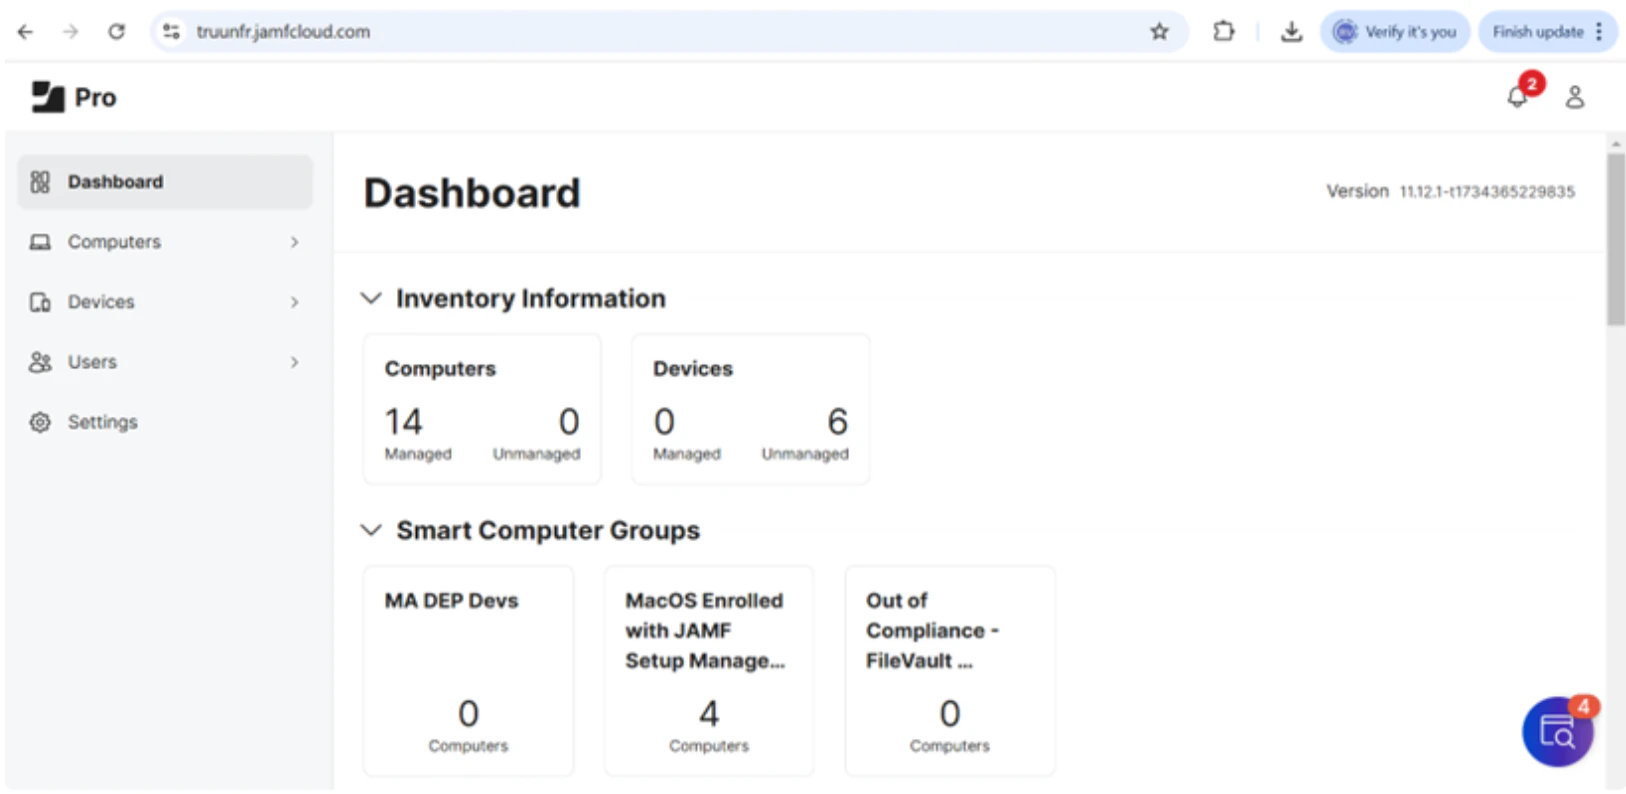
 2. Open your JAMF Pro Admin Portal
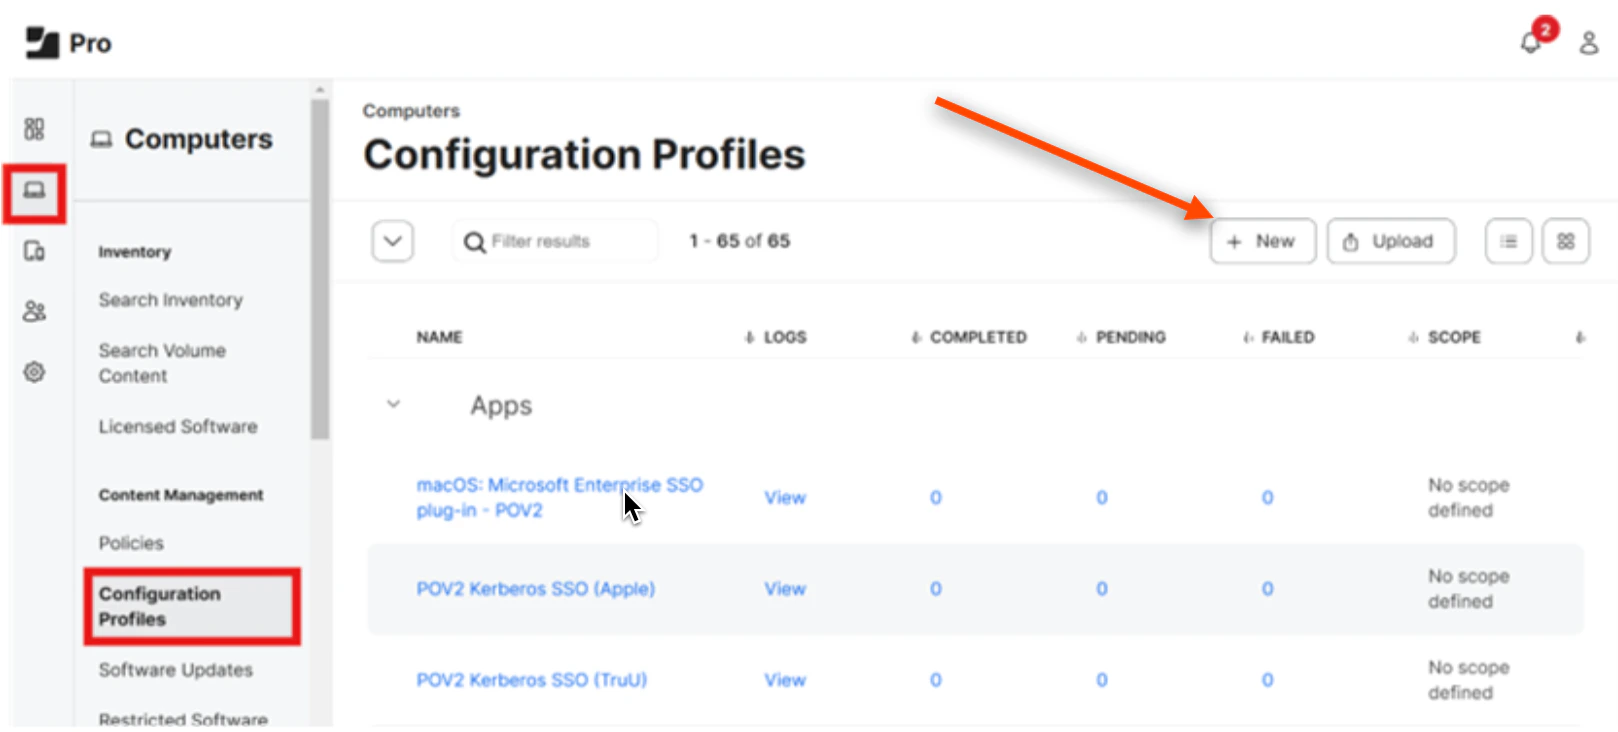
 3. Select **Computers** and then click **Configuration Profiles** and select **New**
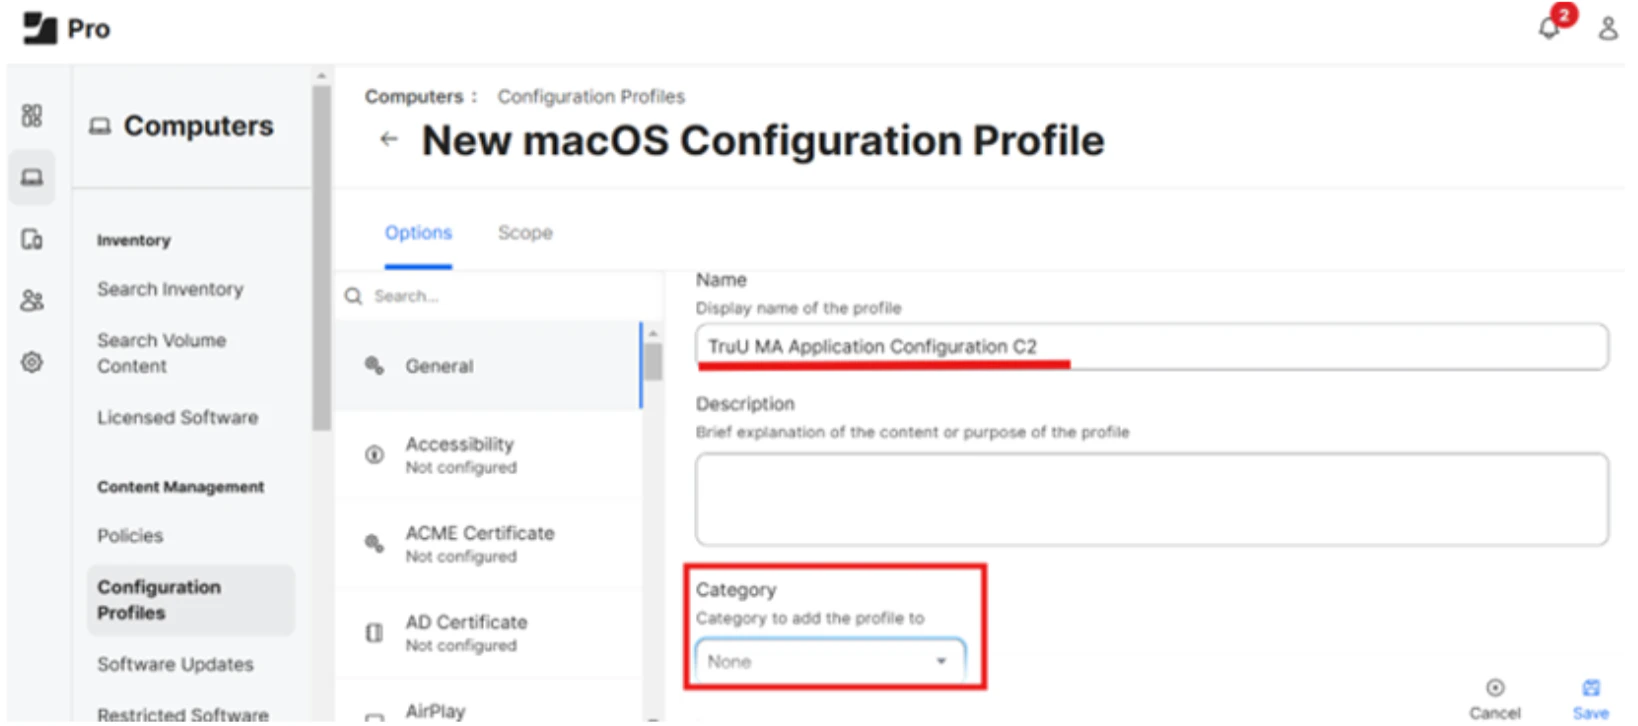
 4. Under "General", add a *name* and select the appropriate **Category**
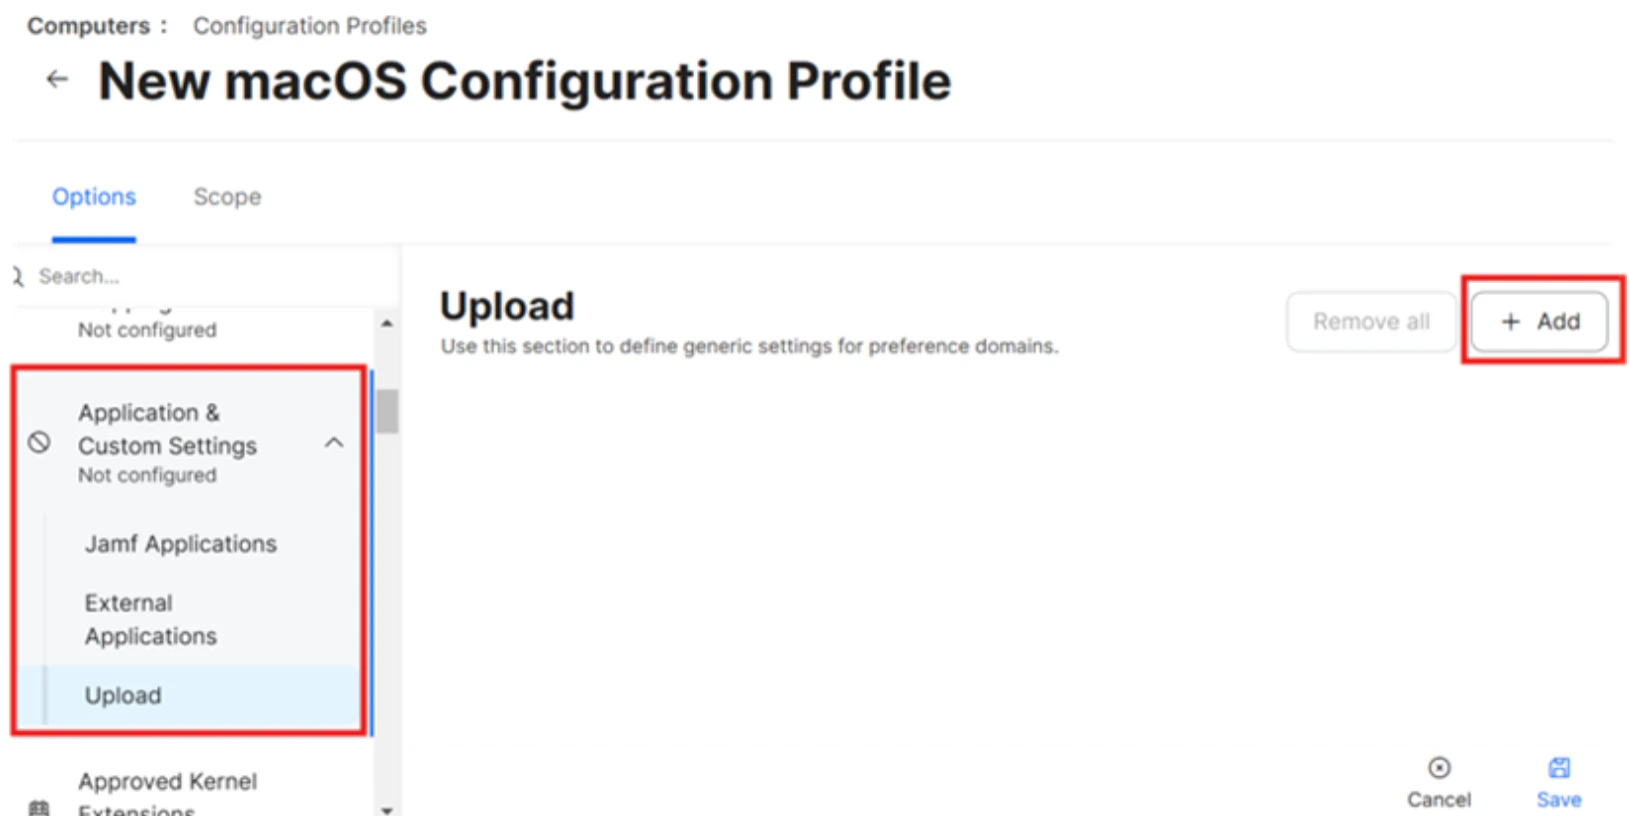
 5. In the left menu, select **Application and Custom Settings**. Then, click **Upload**
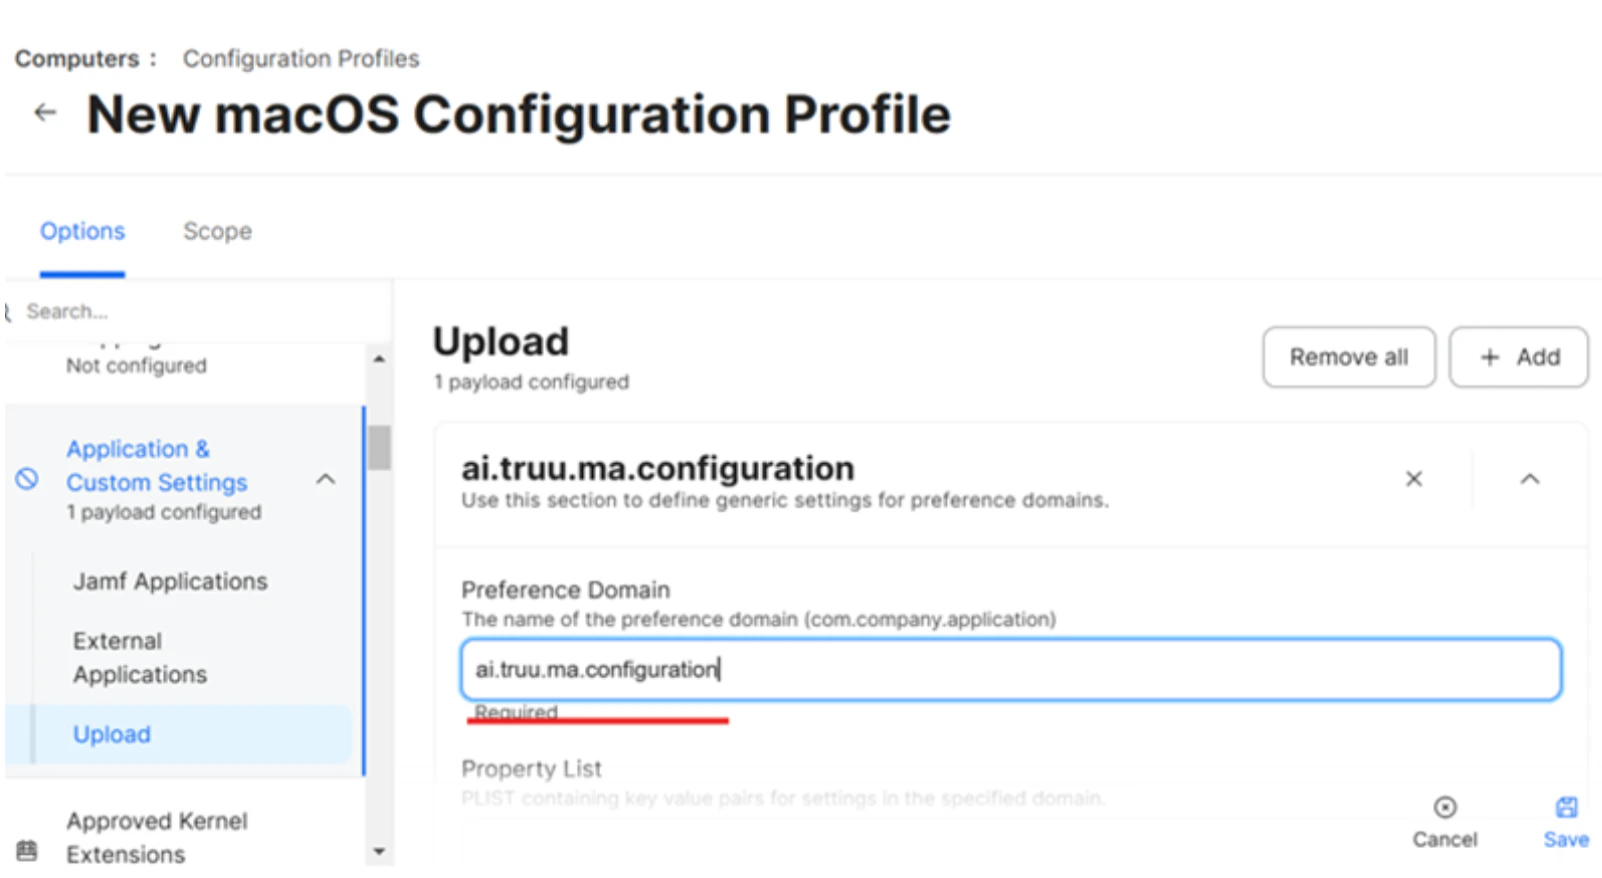
 6. Click **Add** and add *ai.truu.ma.configuration* as the custom domain
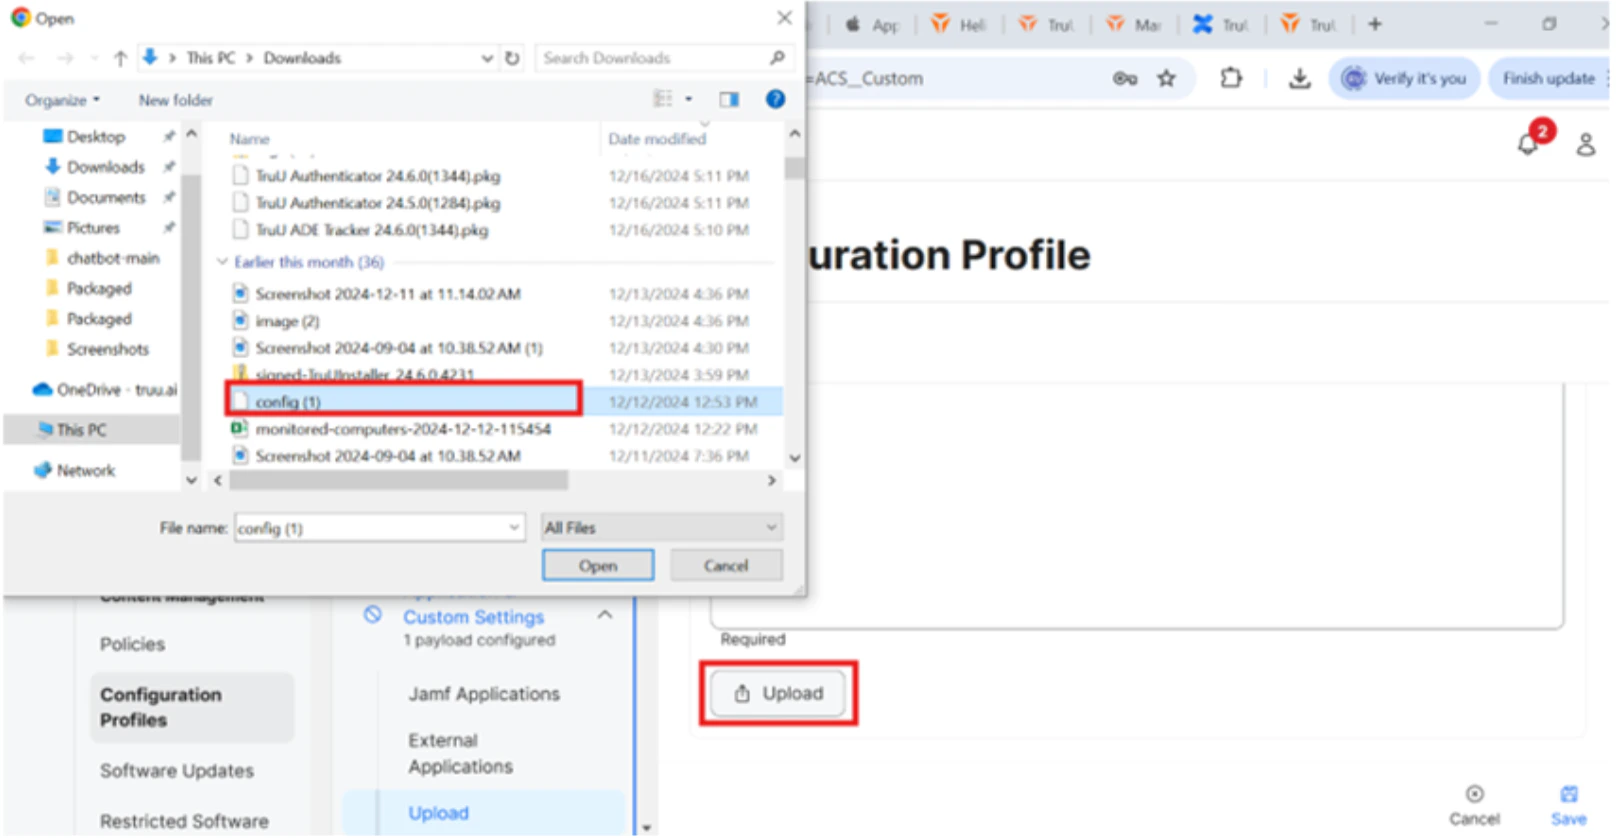
 7. Scroll down and select **Upload**. Then, select the plist config file and click **Open**
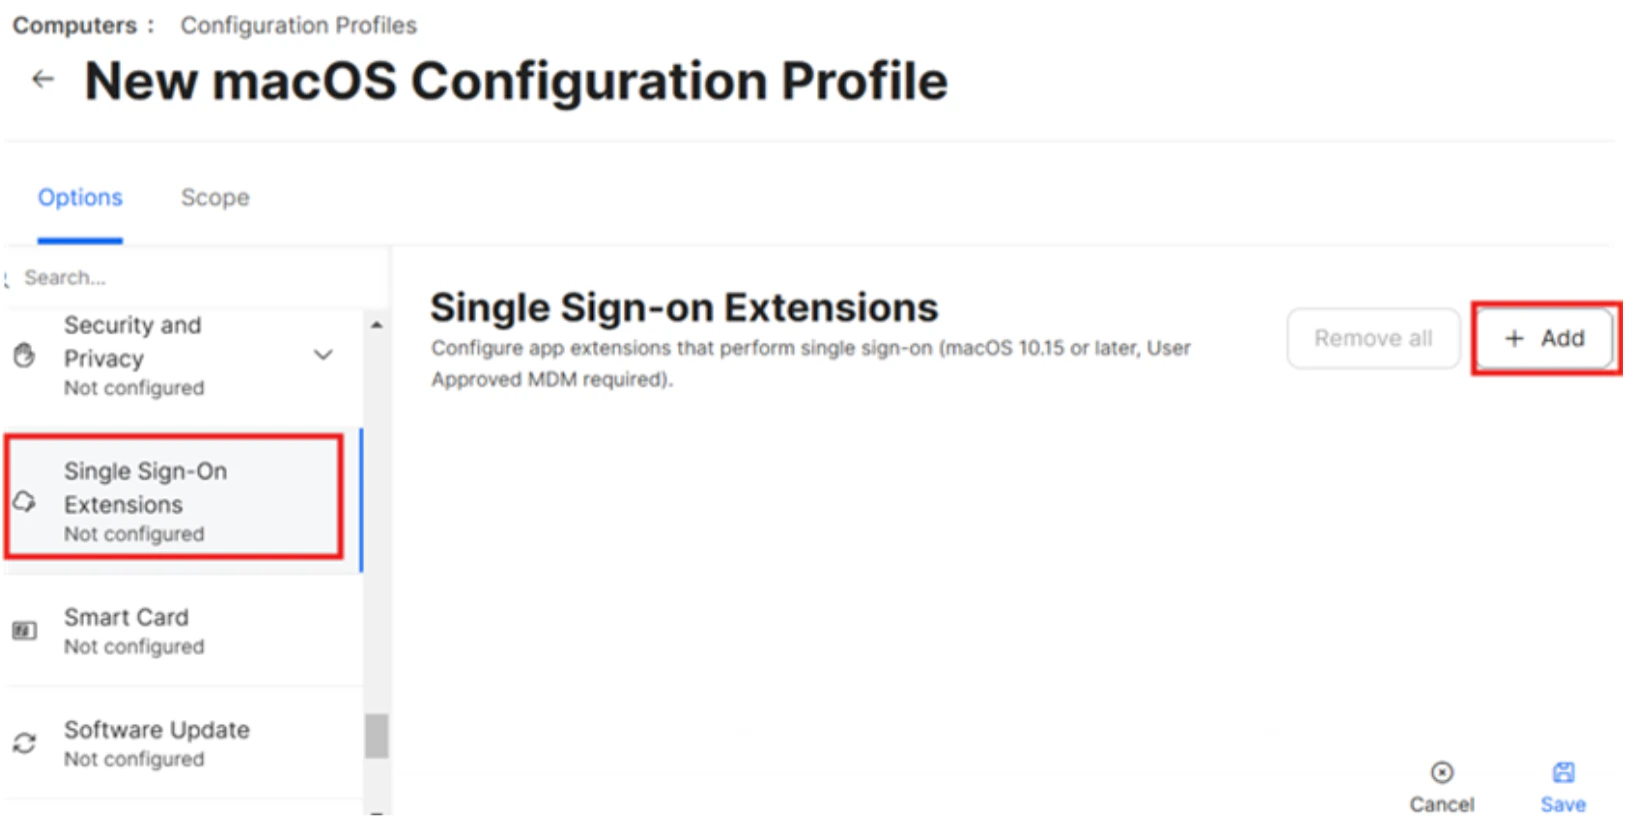
 8. Select **Single Sign-On Extensions** and click **Add**
 9. Select the "Payload Type" as **SSO**
10. Add the "Extension Identifier as *com.truu.LoginHost.SSO*
11. Add the "Team Identifier" as *VGJPA2G633*
12. Select "Sign-On Type" as **Credential**
13. Add the "Realm" as *corp.truu.ai*
14. Add the "Hosts" as *corp.truu.ai*
## Configure the PreStage Enrollment using Jamf Setup Manager
In this section, we will finalize the setup by editing the PreStage enrollment from Section 1 and configuring all necessary settings. We will demonstrate how the minimum macOS version requirement is enforced during the enrollment process with Jamf Setup Manager, as well as ensure FileVault is automatically enabled. We will test the entire workflow to verify everything functions as expected, including PreStage enrollment, package deployment, macOS version compliance, and FileVault enablement.
The minimum macOS version feature in Jamf Pro 11.9 requires macOS 14.4 or later
1. Click **Computers**
2. Click **PreStage Enrollments**
3. Click on **Jamf Setup Manager**
This guide will only focus on configuring the minimum required macOS Version, FileVault Enablement, Configuration Profiles and Enrollment packages.
4. On the bottom-right, click **Edit**
5. In the General payload, scroll down to "Minimum required macOS version"
6. From the menu, select **Latest version based on computer eligibility**. This will verify that the device is on the latest macOS based on Mac eligibility before going through Automated Device Enrollment.
9. Select the "Payload Type" as **SSO**
10. Add the "Extension Identifier as *com.truu.LoginHost.SSO*
11. Add the "Team Identifier" as *VGJPA2G633*
12. Select "Sign-On Type" as **Credential**
13. Add the "Realm" as *corp.truu.ai*
14. Add the "Hosts" as *corp.truu.ai*
## Configure the PreStage Enrollment using Jamf Setup Manager
In this section, we will finalize the setup by editing the PreStage enrollment from Section 1 and configuring all necessary settings. We will demonstrate how the minimum macOS version requirement is enforced during the enrollment process with Jamf Setup Manager, as well as ensure FileVault is automatically enabled. We will test the entire workflow to verify everything functions as expected, including PreStage enrollment, package deployment, macOS version compliance, and FileVault enablement.
The minimum macOS version feature in Jamf Pro 11.9 requires macOS 14.4 or later
1. Click **Computers**
2. Click **PreStage Enrollments**
3. Click on **Jamf Setup Manager**
This guide will only focus on configuring the minimum required macOS Version, FileVault Enablement, Configuration Profiles and Enrollment packages.
4. On the bottom-right, click **Edit**
5. In the General payload, scroll down to "Minimum required macOS version"
6. From the menu, select **Latest version based on computer eligibility**. This will verify that the device is on the latest macOS based on Mac eligibility before going through Automated Device Enrollment.
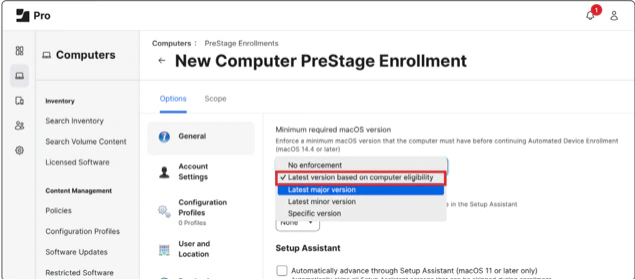 NOTE: The minimum macOS version requirement for this feature is macOS 14.4 or later
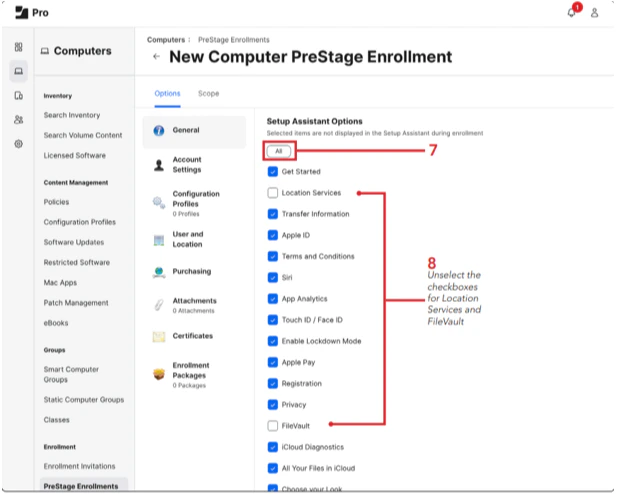
7. Scroll down to Setup Assistant Options, click **All** to select everything
8. Deselect the box for Location Services and FileVault. We’ll leave these unselected so FileVault will automatically enable with a configuration profile during the setup and the user will be prompted to enable Location Services during setup assistant
NOTE: The minimum macOS version requirement for this feature is macOS 14.4 or later
7. Scroll down to Setup Assistant Options, click **All** to select everything
8. Deselect the box for Location Services and FileVault. We’ll leave these unselected so FileVault will automatically enable with a configuration profile during the setup and the user will be prompted to enable Location Services during setup assistant
 9. Click on the **Configuration Profile** payload
10. Click **Configure**
11. Select FileVault Enablement for ADE and Jamf Setup Manager profile
12. Click **Enrollment Packages**
13. Click **Configure**
14. Click **Add** for Setup.Manager.1.0-368.pkg
15. Select the radio button for Cloud Distribution Point (Jamf Cloud)
16. Click **Scope**
17. Select a Mac to use for testing with Jamf Setup Manager
18. Click **Save**
***
[Deploying TruU using JAMF](/docs/jamf-setup)
[Importing TruU Packages for JAMF Setup](/docs/importing-truu-packages-for-jamf-setup)
9. Click on the **Configuration Profile** payload
10. Click **Configure**
11. Select FileVault Enablement for ADE and Jamf Setup Manager profile
12. Click **Enrollment Packages**
13. Click **Configure**
14. Click **Add** for Setup.Manager.1.0-368.pkg
15. Select the radio button for Cloud Distribution Point (Jamf Cloud)
16. Click **Scope**
17. Select a Mac to use for testing with Jamf Setup Manager
18. Click **Save**
***
[Deploying TruU using JAMF](/docs/jamf-setup)
[Importing TruU Packages for JAMF Setup](/docs/importing-truu-packages-for-jamf-setup)