> ## Documentation Index
> Fetch the complete documentation index at: https://docs.truu.ai/llms.txt
> Use this file to discover all available pages before exploring further.

# TruU plist JAMF Install

> Here is a step by step guide as to how one creates, and deploys, the TruU/JAMF package using plist

## Creating TruU/JAMF Package

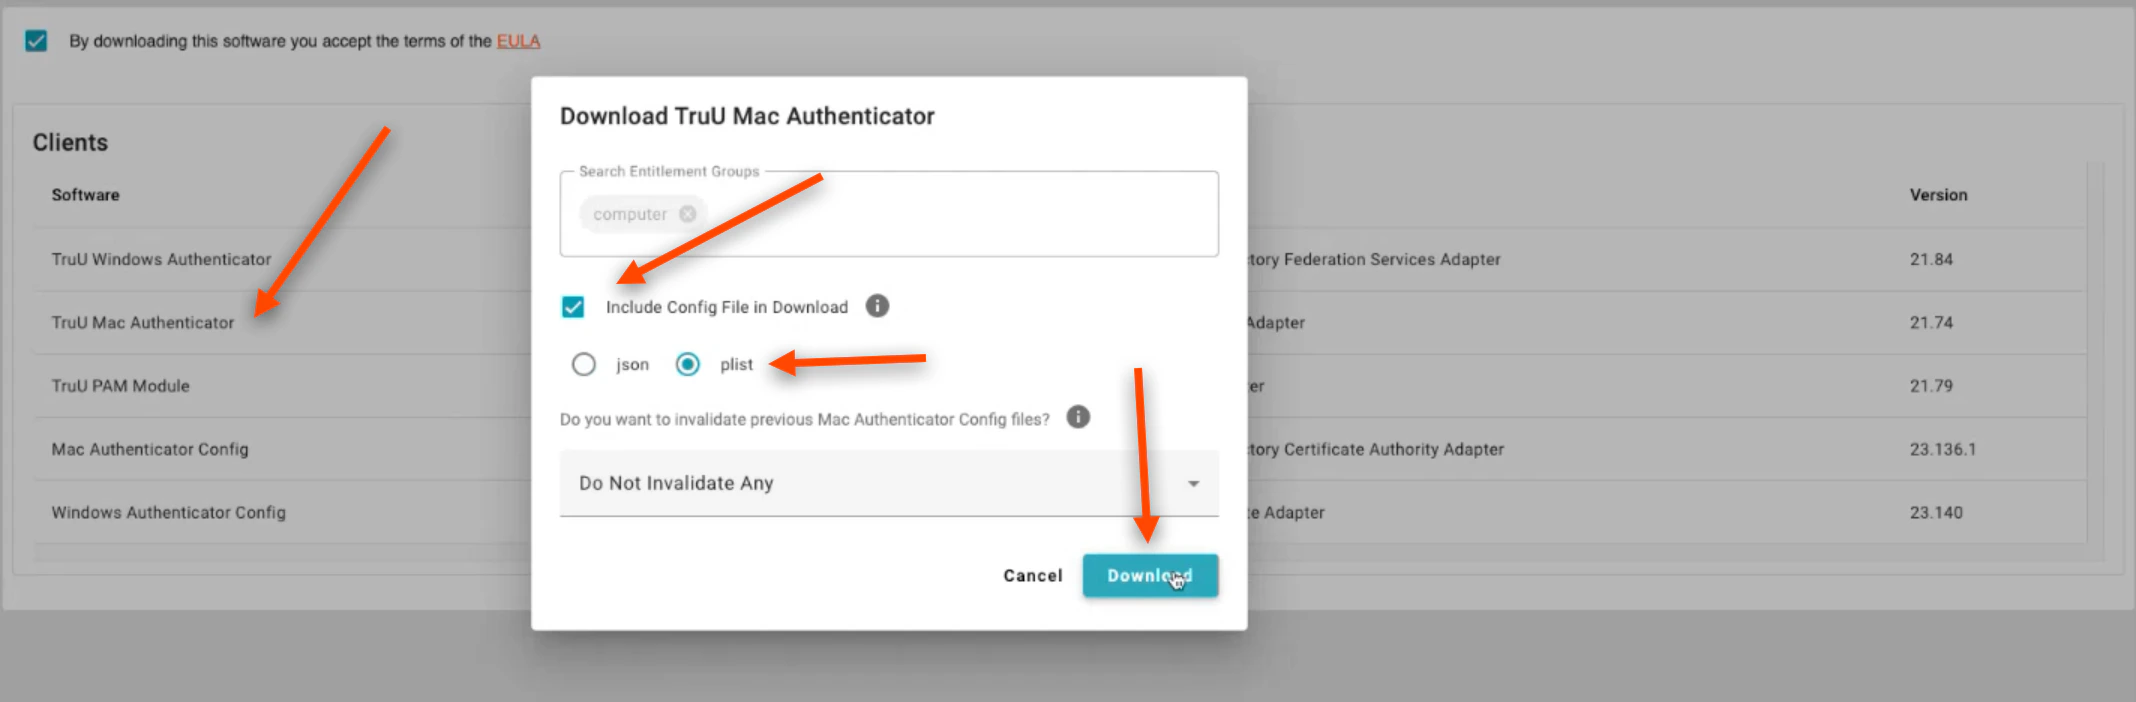
1. Download the TruU Mac Authenticator. Click the box to **Include Config File in Download**. Click **plist**, then click **Download**

   <img src="https://mintcdn.com/truu-2/E6hYbyLPrBHWbQ3m/images/docs/d4d081514d0fd1e95af1ae821b37e958b92a3b11b2f191273d72032e0c4929db-image.png?fit=max&auto=format&n=E6hYbyLPrBHWbQ3m&q=85&s=f7f4c459e25a67f626782dd09938fffe" alt="" width="2136" height="702" data-path="images/docs/d4d081514d0fd1e95af1ae821b37e958b92a3b11b2f191273d72032e0c4929db-image.png" />

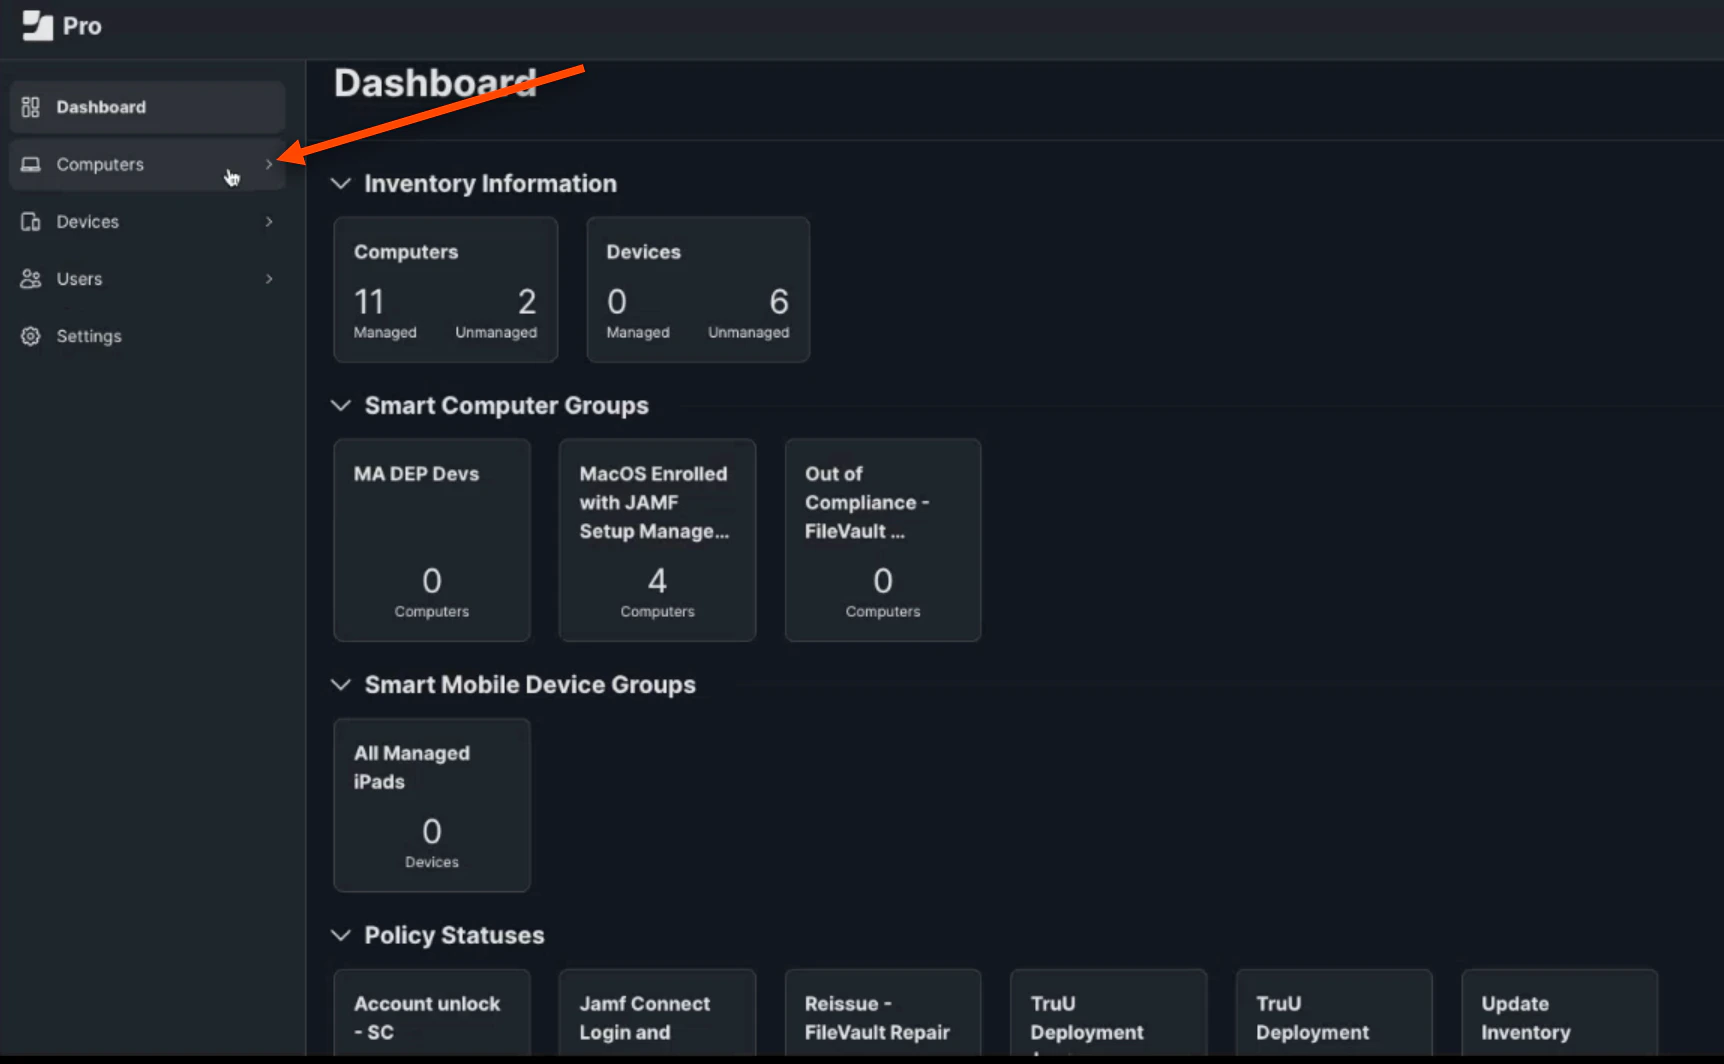
2. Login to your JAMF Admin Portal. This first step is creating a deployment profile. First, click **Computers** on the JAMF Dashboard

   <img src="https://mintcdn.com/truu-2/jMF4bYA9yOA_2TKv/images/docs/4483b1948b1a922161f7bd9465598460e0cdecbf4905f34edb05d312d53dd570-image.png?fit=max&auto=format&n=jMF4bYA9yOA_2TKv&q=85&s=3ae51e679b2f3b8764397f2429073dd9" alt="" width="1724" height="1064" data-path="images/docs/4483b1948b1a922161f7bd9465598460e0cdecbf4905f34edb05d312d53dd570-image.png" />

3. Next, Click **Configuration Profiles**. Then, Click **(+) New**

   <img src="https://mintcdn.com/truu-2/YlfY4z_3_-uDkBaP/images/docs/65889a4e7757d286c5040cea9e72dc53e62084acf543a4aadd666082943ca8e7-image.png?fit=max&auto=format&n=YlfY4z_3_-uDkBaP&q=85&s=f3ad354a5970f04deab9fd65948f39a9" alt="" width="2486" height="1054" data-path="images/docs/65889a4e7757d286c5040cea9e72dc53e62084acf543a4aadd666082943ca8e7-image.png" />

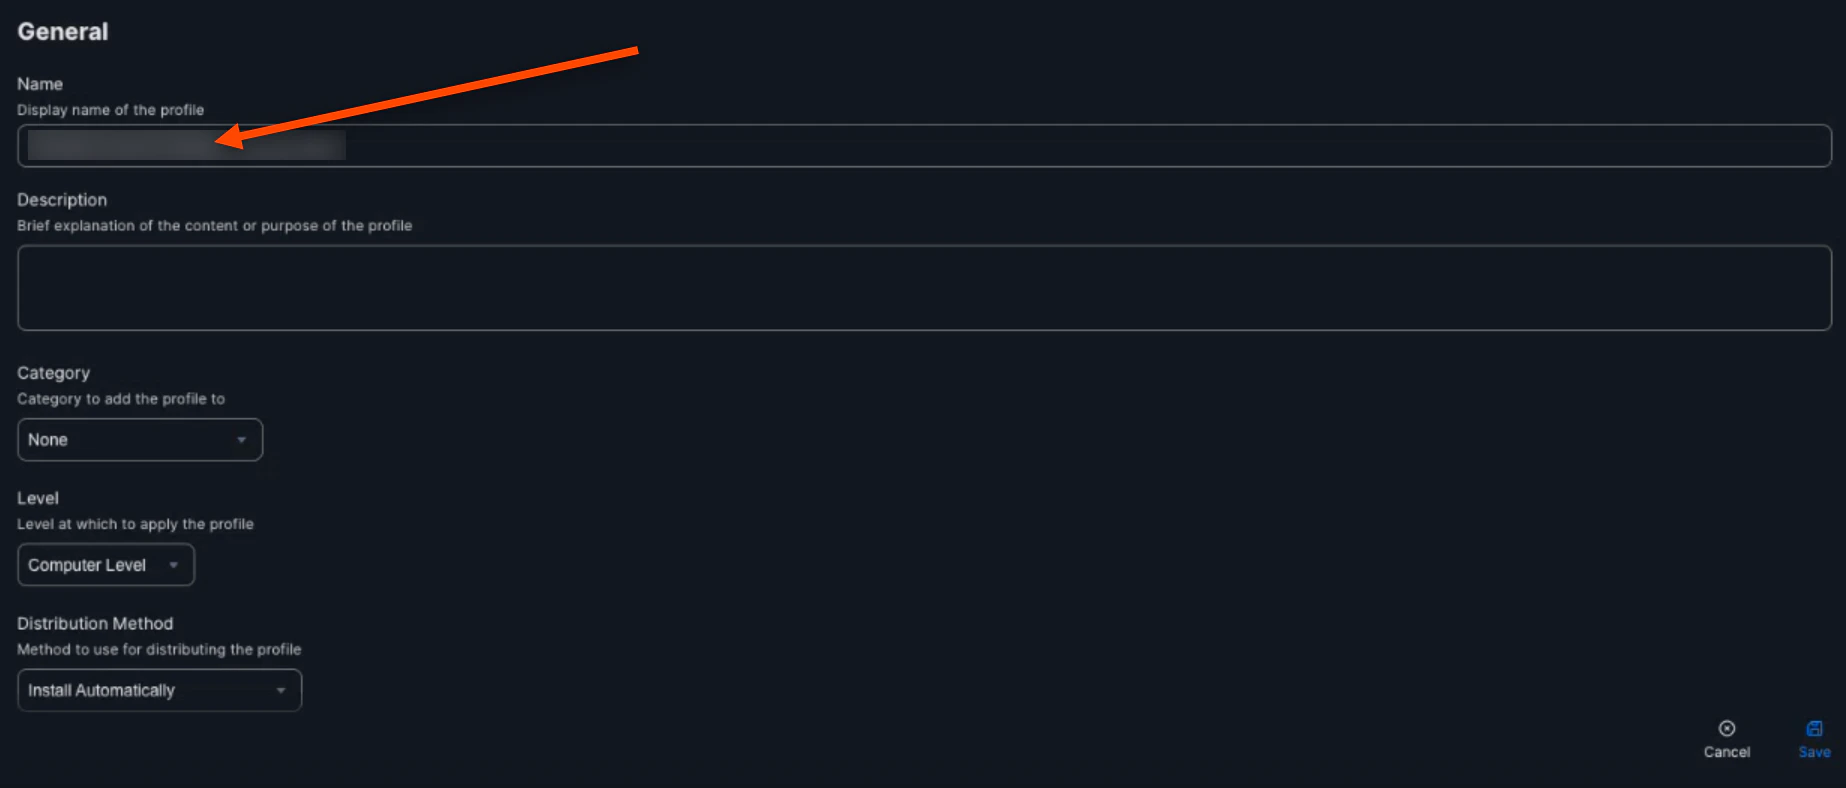
4. Name the *Profile*

   <img src="https://mintcdn.com/truu-2/rjjBxA7Z_Wk_-34G/images/docs/f45a06c788273dc999cd317d38920da0f4a01464430b93223b171075dcb926c3-image.png?fit=max&auto=format&n=rjjBxA7Z_Wk_-34G&q=85&s=516722fcd582fc0f09c300f4dbb6c90f" alt="" width="1846" height="788" data-path="images/docs/f45a06c788273dc999cd317d38920da0f4a01464430b93223b171075dcb926c3-image.png" />

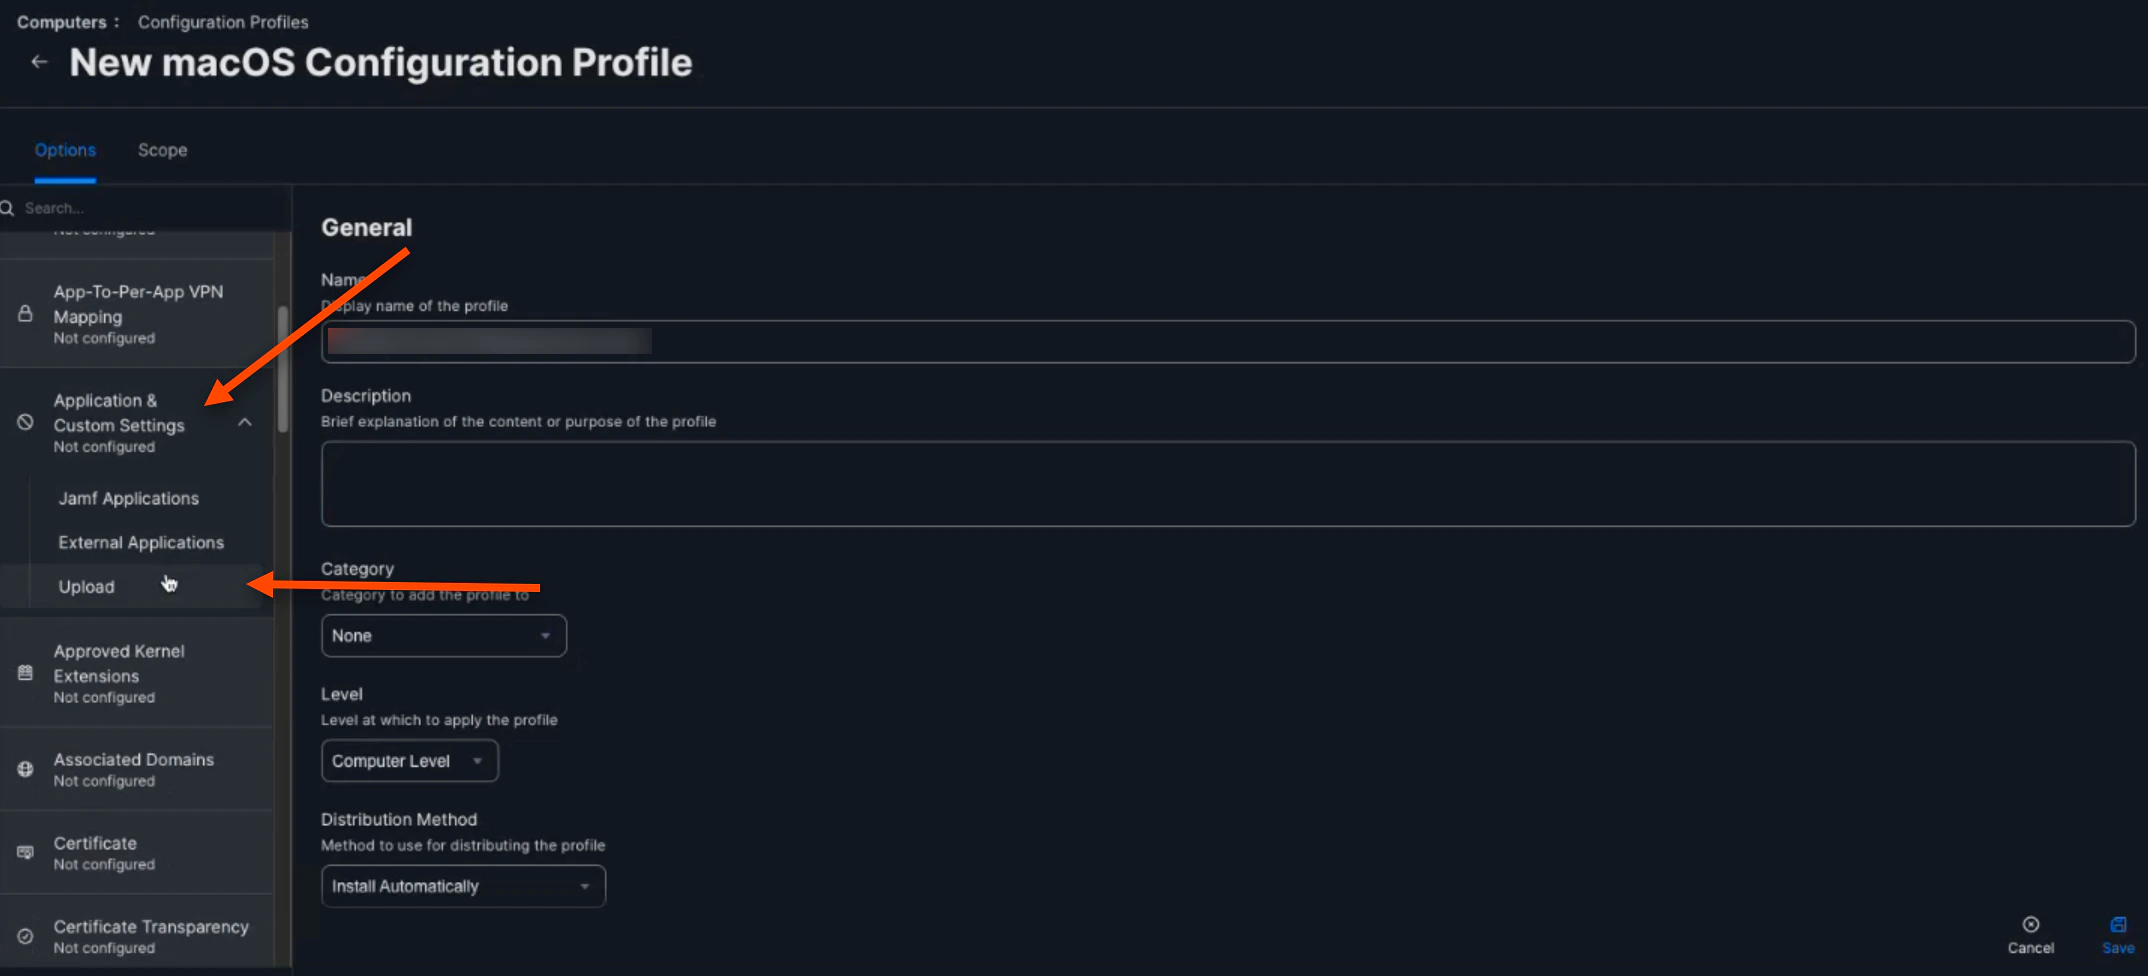
5. Next, scroll down and select **Application & Custom Settings**. Then, click **Upload**

   <img src="https://mintcdn.com/truu-2/rjjBxA7Z_Wk_-34G/images/docs/f2cbdc1b806114e034fbadffd2563d9af601761e9a6b2e01f080f3b50cae8039-image.png?fit=max&auto=format&n=rjjBxA7Z_Wk_-34G&q=85&s=0e969929f992f9a79aae8fae57b3a348" alt="" width="2148" height="976" data-path="images/docs/f2cbdc1b806114e034fbadffd2563d9af601761e9a6b2e01f080f3b50cae8039-image.png" />

6. Click **(+) Add**. Then, copy and paste your *downloaded plist from the TruU Mac Authenticator* into the Property List Box below

   <img src="https://mintcdn.com/truu-2/qCK1oWL4jNpZKJ8A/images/docs/9f3f301388e44420a0ed5d75344c81de2e89ad493c4cc80c7c322c08249be397-image.png?fit=max&auto=format&n=qCK1oWL4jNpZKJ8A&q=85&s=d455cd6959af5f152ae6a45d0d7f6b97" alt="" width="2160" height="974" data-path="images/docs/9f3f301388e44420a0ed5d75344c81de2e89ad493c4cc80c7c322c08249be397-image.png" />

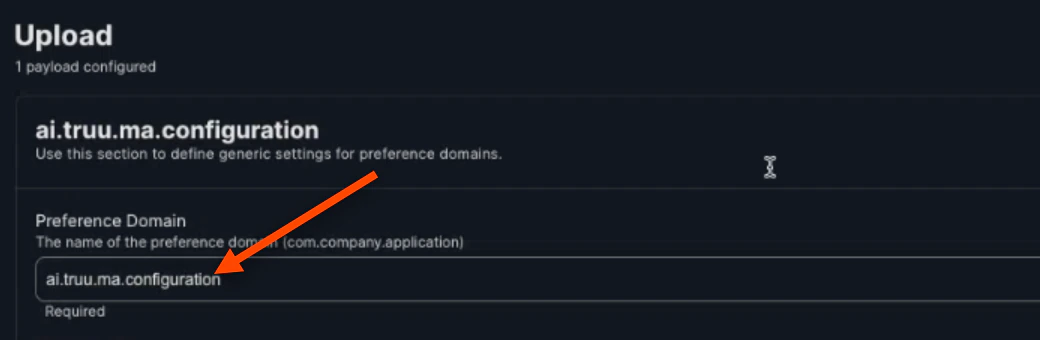
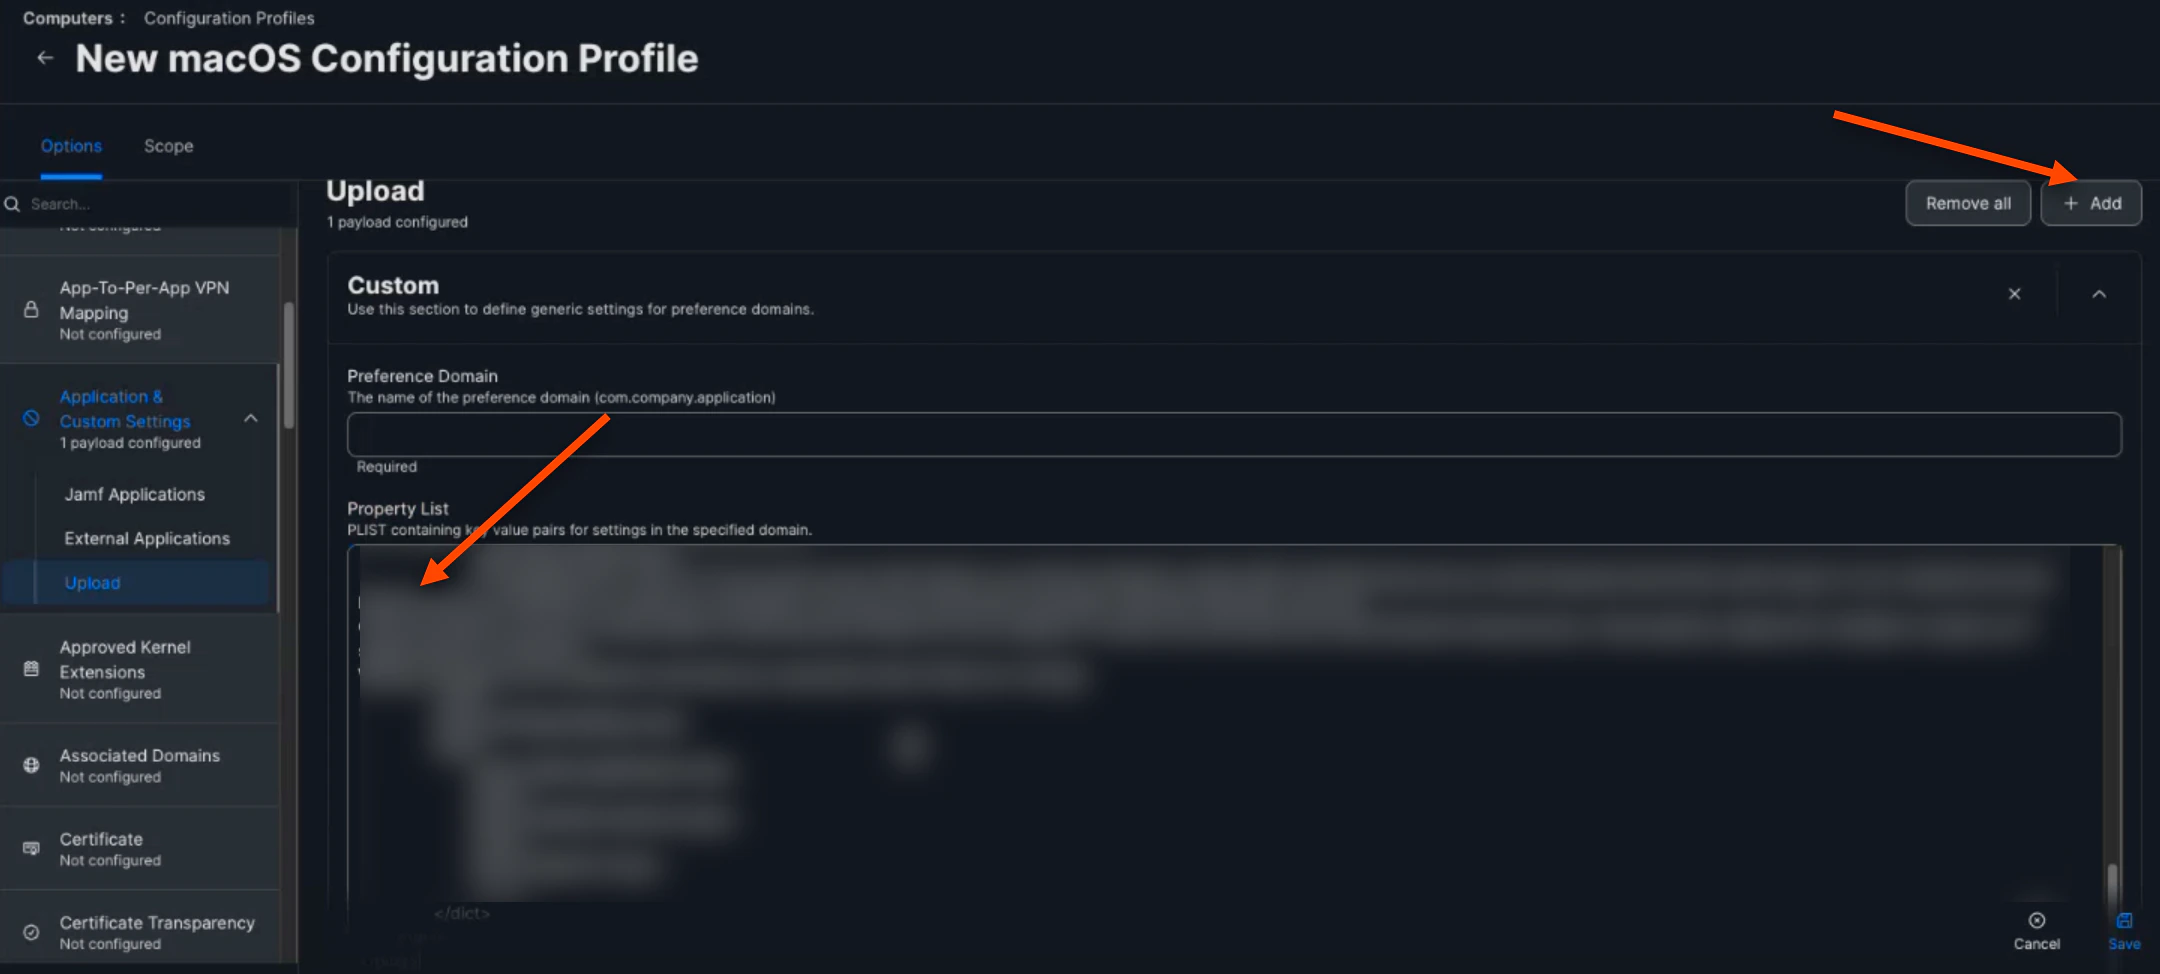
7. Then, the "Preference Domain" should be set to *ai.truu.ma.configuration*

   <img src="https://mintcdn.com/truu-2/YlfY4z_3_-uDkBaP/images/docs/5329572ec2250c66957dc2c6c7ac432562a4450a7547bec5f568431c7c6da31f-image.png?fit=max&auto=format&n=YlfY4z_3_-uDkBaP&q=85&s=ed2240b923f71f984ef3580bdce6d18c" alt="" width="1040" height="340" data-path="images/docs/5329572ec2250c66957dc2c6c7ac432562a4450a7547bec5f568431c7c6da31f-image.png" />

8. Click **Save**

   <img src="https://mintcdn.com/truu-2/m22YLP0oXSNG0U3O/images/docs/852e8198e9066d93d2474cdbc9dbfda0e9c037a09243ae22fdf74c6c8a0ee4a8-image.png?fit=max&auto=format&n=m22YLP0oXSNG0U3O&q=85&s=2c83fd17d665d57fb0d714394dce4860" alt="" width="1846" height="848" data-path="images/docs/852e8198e9066d93d2474cdbc9dbfda0e9c037a09243ae22fdf74c6c8a0ee4a8-image.png" />

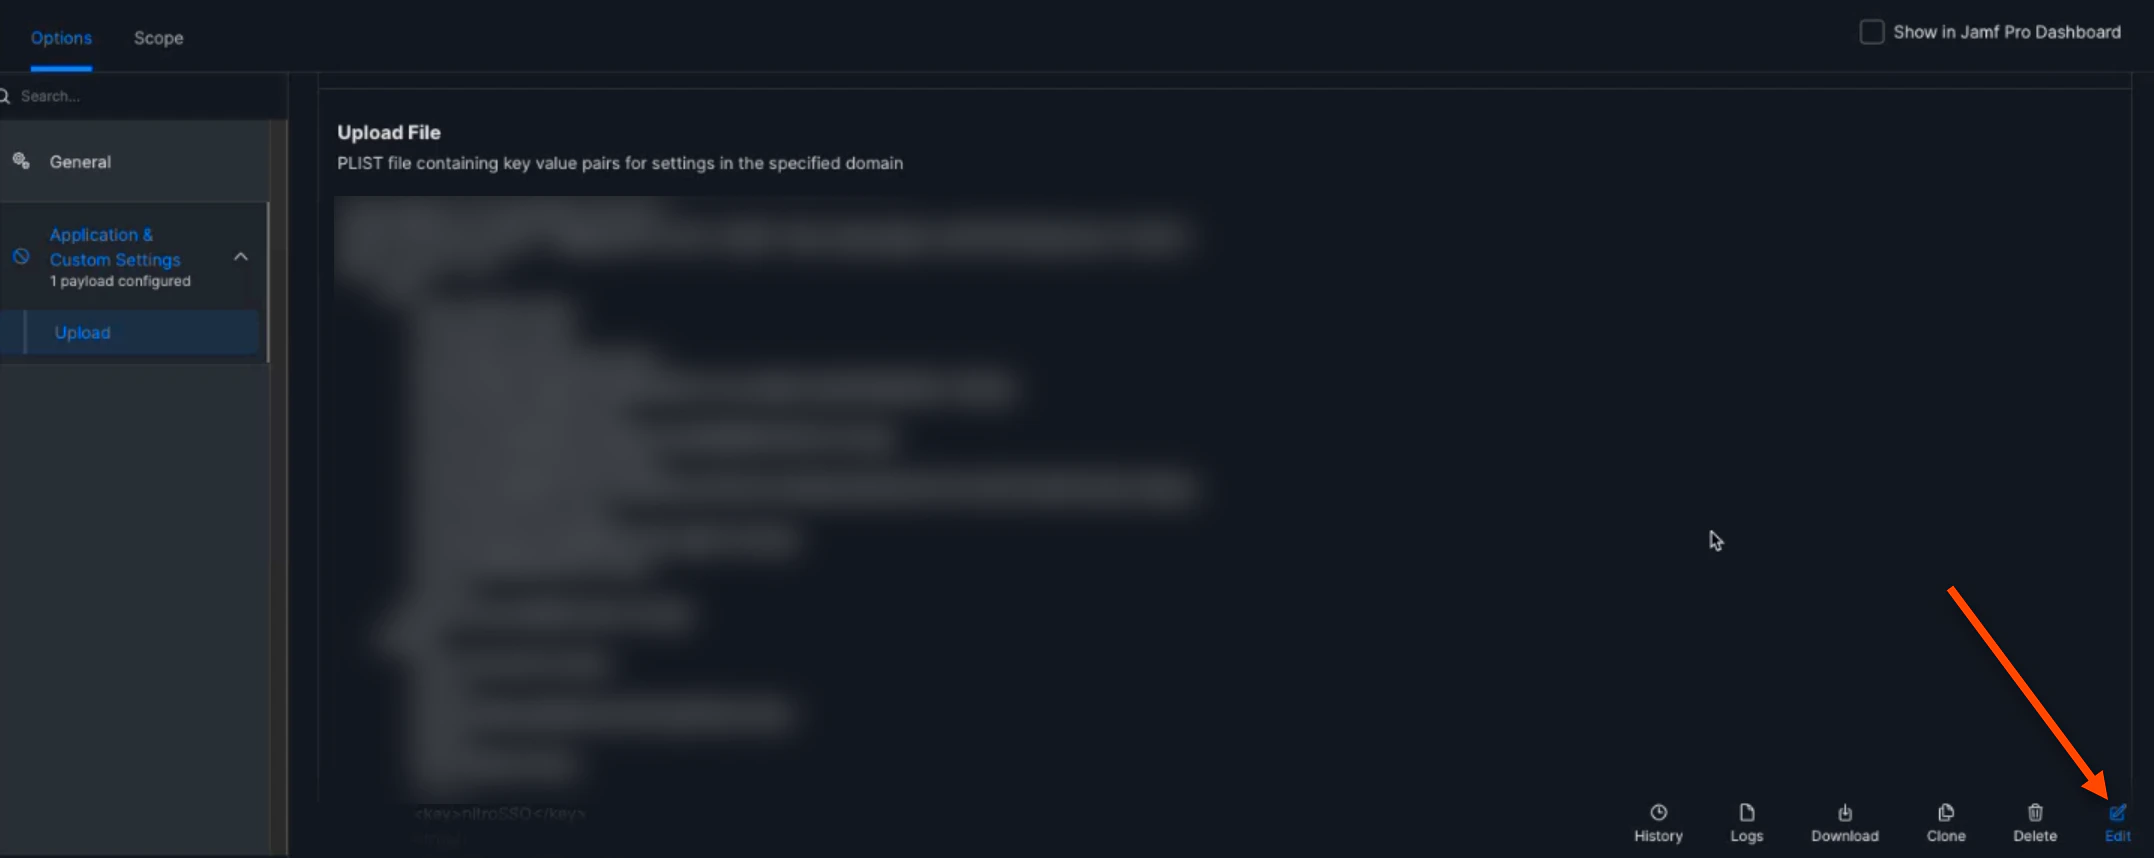
9. Next, click **Edit**

   <img src="https://mintcdn.com/truu-2/jMF4bYA9yOA_2TKv/images/docs/2d1b5fd7c6b1b88afb62a1279489d38fa3b242c3bcf64e27222d25a8d6d28b6f-image.png?fit=max&auto=format&n=jMF4bYA9yOA_2TKv&q=85&s=c8f05a4bdf839cd90d92cb729fb263df" alt="" width="2154" height="858" data-path="images/docs/2d1b5fd7c6b1b88afb62a1279489d38fa3b242c3bcf64e27222d25a8d6d28b6f-image.png" />

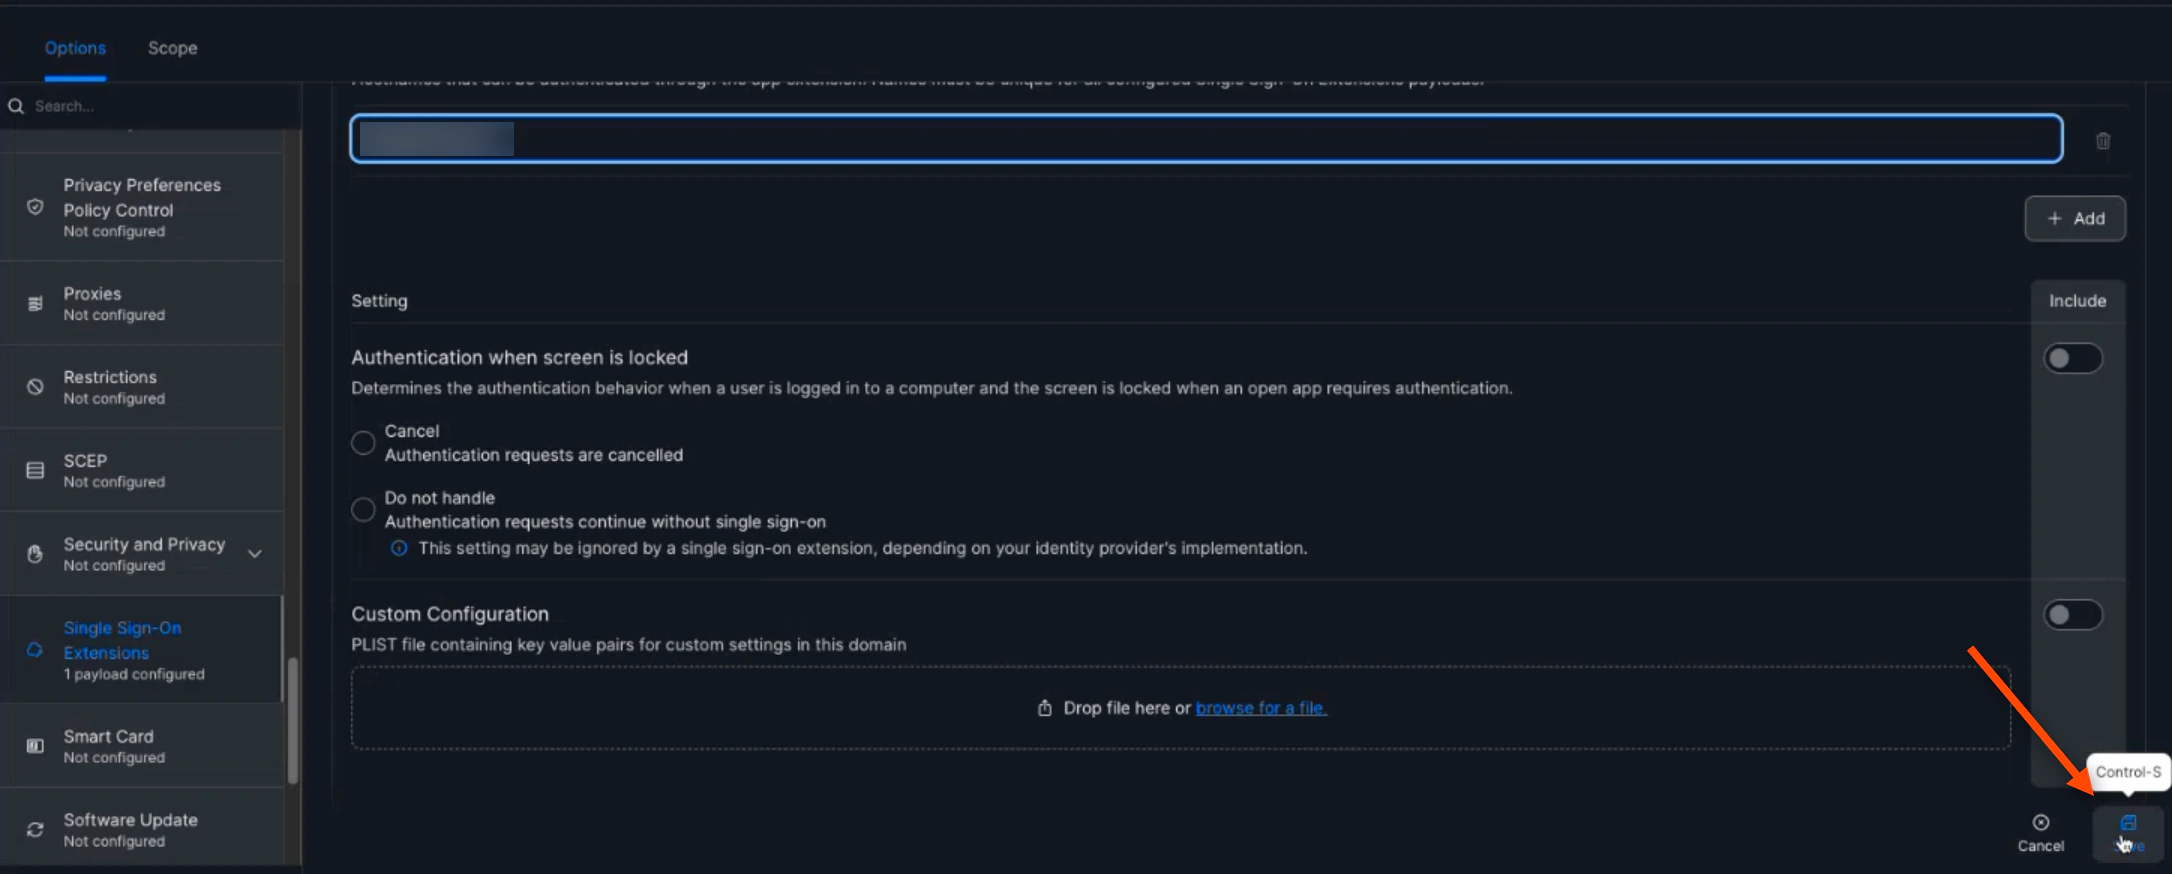
10. Then, scroll down and select **Single Sign-On Extensions**. Click **(+) Add**. Select **SSO** for the Payload Type. Then, enter *com.truu.LoginHost.SSO* for the "Extension Identifier". Next, enter *VGJPA2G633* for the "Team Identifier". Then, ensure that the "Sign-On Type" is **Credential**

    <img src="https://mintcdn.com/truu-2/ehCBQgFdl_pQd0MN/images/docs/ab3db013b1866baa677049626170177ae452f389d2222c6e8fe6c7b53b6800a1-image.png?fit=max&auto=format&n=ehCBQgFdl_pQd0MN&q=85&s=cc63b5ec6e3634c24e7cd04181a46916" alt="" width="2154" height="868" data-path="images/docs/ab3db013b1866baa677049626170177ae452f389d2222c6e8fe6c7b53b6800a1-image.png" />

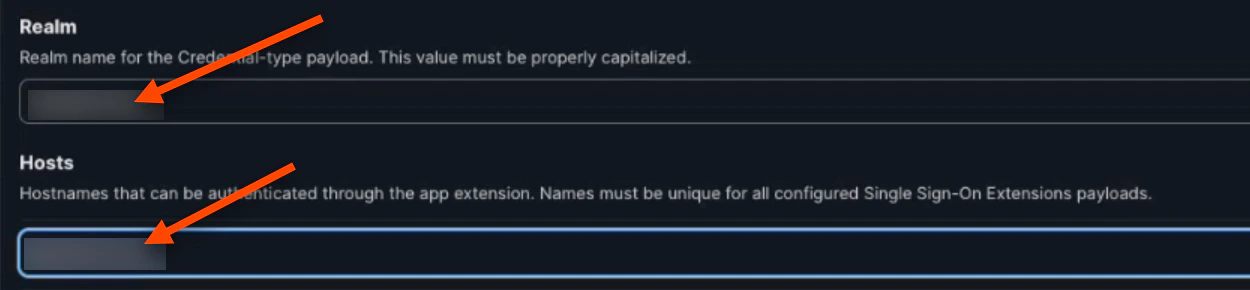
11. Enter your Kerberos Realm for both the "Realm" and "Hosts" values. They will be the same and you can find this name by contacting your Active Directory Admin

    <img src="https://mintcdn.com/truu-2/m22YLP0oXSNG0U3O/images/docs/7f1f3b98f7c939346e43a5d51681355670ef735705331a9e1d0278345746d4fd-image.png?fit=max&auto=format&n=m22YLP0oXSNG0U3O&q=85&s=fcba8029906aeacc44ef27095bdc6b75" alt="" width="1250" height="290" data-path="images/docs/7f1f3b98f7c939346e43a5d51681355670ef735705331a9e1d0278345746d4fd-image.png" />

12. Click **Save**

    <img src="https://mintcdn.com/truu-2/m22YLP0oXSNG0U3O/images/docs/7133320fb8c62441d2581b88b258c4f6104eb198de45c9ca33a85d328d7acbc1-image.png?fit=max&auto=format&n=m22YLP0oXSNG0U3O&q=85&s=df43d2aab0d7a4a646589ed98505bd4b" alt="" width="2172" height="874" data-path="images/docs/7133320fb8c62441d2581b88b258c4f6104eb198de45c9ca33a85d328d7acbc1-image.png" />

NOTE: If you do not want to use TruU to get your Kerberos ticket, you do not need to set up the Single Sign-On Extension

13. Next, navigate back to the "Settings" tab and search *Packages*. Click on the **Package**

    <img src="https://mintcdn.com/truu-2/L38yxuvvUa8uAW5I/images/docs/0cbdeb011bfb790036947def1cdb54667f2ae4d9261e63737ab54463d294dd0e-image.png?fit=max&auto=format&n=L38yxuvvUa8uAW5I&q=85&s=f28b845b14b6d12c97f9246857fad6fc" alt="" width="2494" height="796" data-path="images/docs/0cbdeb011bfb790036947def1cdb54667f2ae4d9261e63737ab54463d294dd0e-image.png" />

14. Click the **(+) New** button to create a new package

    <img src="https://mintcdn.com/truu-2/rjjBxA7Z_Wk_-34G/images/docs/f0321923baba0352aab51881002bc9d769e1230abb8a19ec773b9b60aa7bb50f-image.png?fit=max&auto=format&n=rjjBxA7Z_Wk_-34G&q=85&s=224105aff9b479d76a755972386e80e9" alt="" width="2166" height="162" data-path="images/docs/f0321923baba0352aab51881002bc9d769e1230abb8a19ec773b9b60aa7bb50f-image.png" />

15. Name your new package

    <img src="https://mintcdn.com/truu-2/rjjBxA7Z_Wk_-34G/images/docs/e6c4a0c1389205bac566aa942d85a65ada84972b6454393740f5fbe7acac06de-image.png?fit=max&auto=format&n=rjjBxA7Z_Wk_-34G&q=85&s=d506db8e8f69c964b725a0679617783f" alt="" width="2152" height="984" data-path="images/docs/e6c4a0c1389205bac566aa942d85a65ada84972b6454393740f5fbe7acac06de-image.png" />

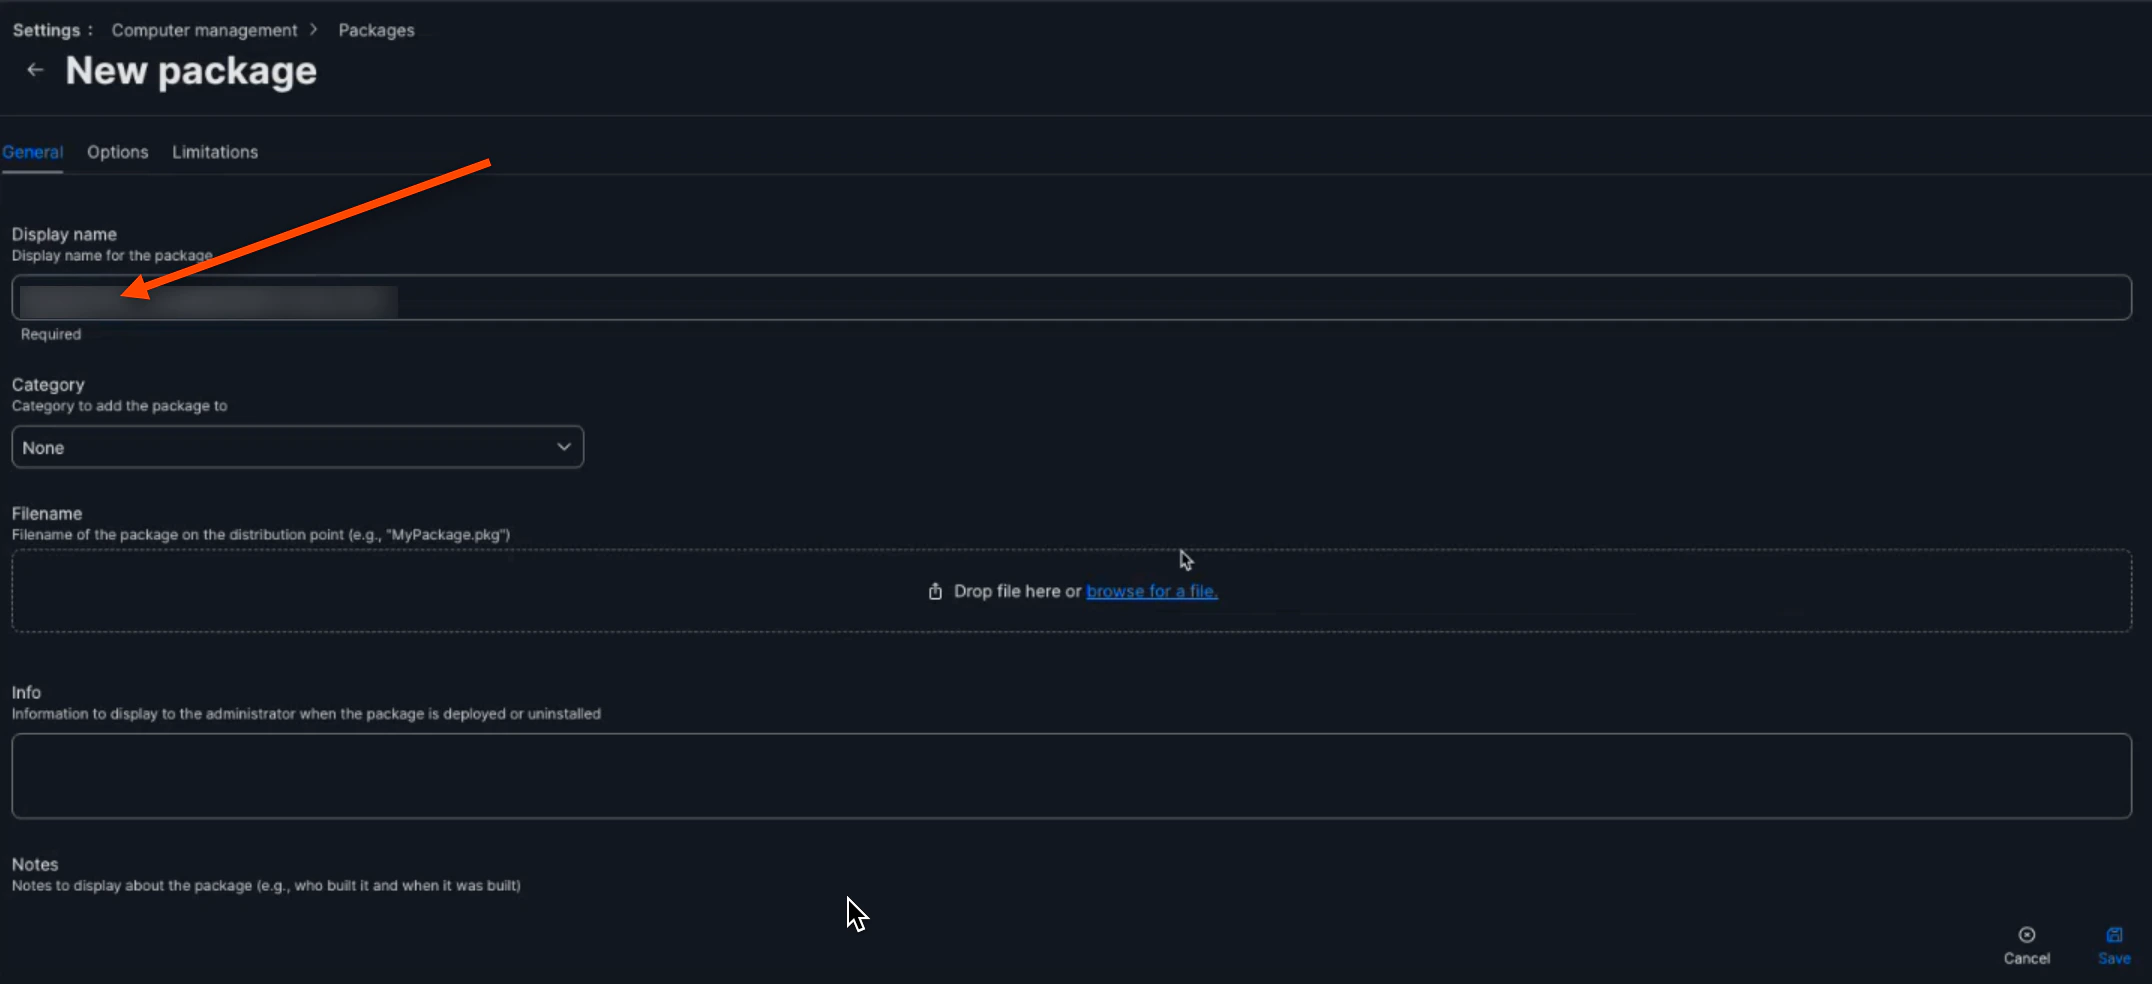
16. Then, click the **browse for a file** button

    <img src="https://mintcdn.com/truu-2/YlfY4z_3_-uDkBaP/images/docs/551d91fa1ae930d17c0c1b7473e6e8f933a6d6b5aae485233f473cef7a01cc1f-image.png?fit=max&auto=format&n=YlfY4z_3_-uDkBaP&q=85&s=568b19e23e60116a26de4cac39fd2c8f" alt="" width="2152" height="182" data-path="images/docs/551d91fa1ae930d17c0c1b7473e6e8f933a6d6b5aae485233f473cef7a01cc1f-image.png" />

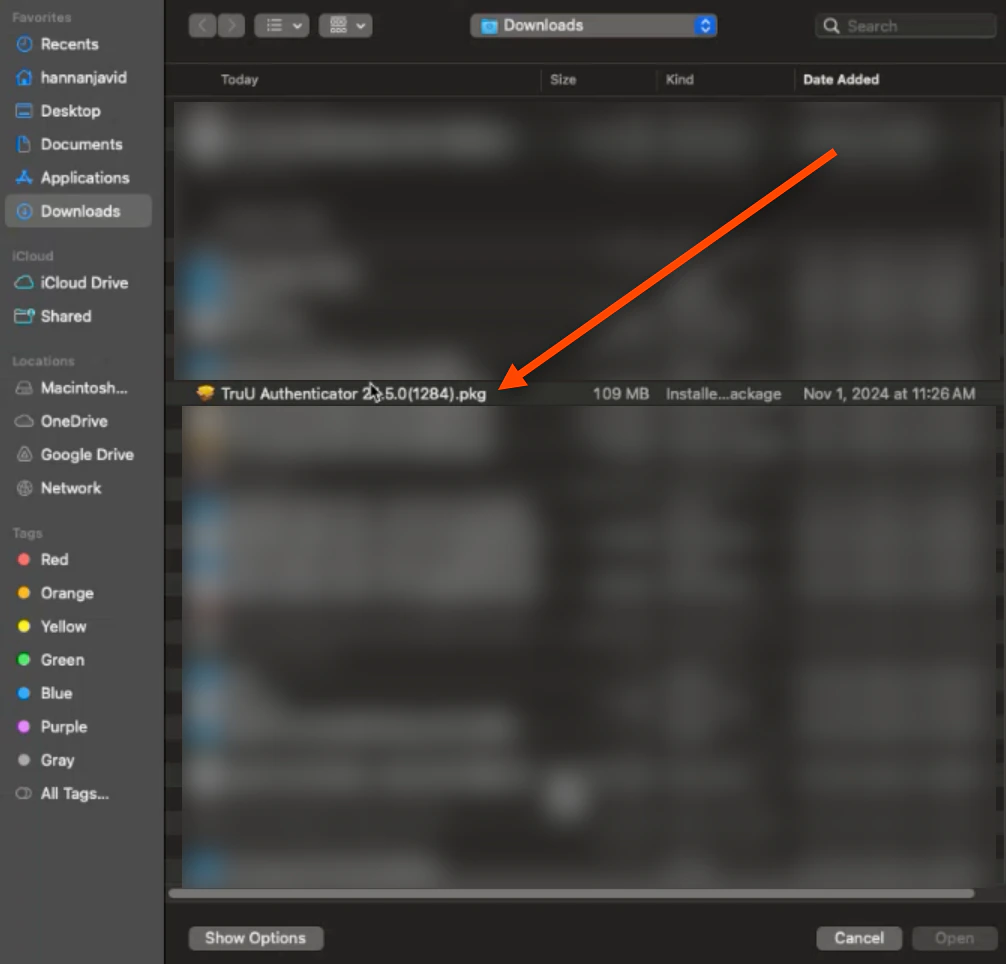
17. Select the downloaded **TruU Mac Authenticator package**

    <img src="https://mintcdn.com/truu-2/m22YLP0oXSNG0U3O/images/docs/84e91ef15b8a8da53ca2c761c85aea4bedc0f46a97667b6075e5baa19f909c33-image.png?fit=max&auto=format&n=m22YLP0oXSNG0U3O&q=85&s=8e52a757deb437d99cb9bd521deb2b65" alt="" width="1006" height="964" data-path="images/docs/84e91ef15b8a8da53ca2c761c85aea4bedc0f46a97667b6075e5baa19f909c33-image.png" />

18. Click **Save**

    <img src="https://mintcdn.com/truu-2/qCK1oWL4jNpZKJ8A/images/docs/8d6f6f642575d7de0a763f828040817083859c5c12ad11bfdd6ef040bfc990ac-image.png?fit=max&auto=format&n=qCK1oWL4jNpZKJ8A&q=85&s=355afd8fc267b02d864233496013cdab" alt="" width="2152" height="952" data-path="images/docs/8d6f6f642575d7de0a763f828040817083859c5c12ad11bfdd6ef040bfc990ac-image.png" />

## Deploying TruU/JAMF Package

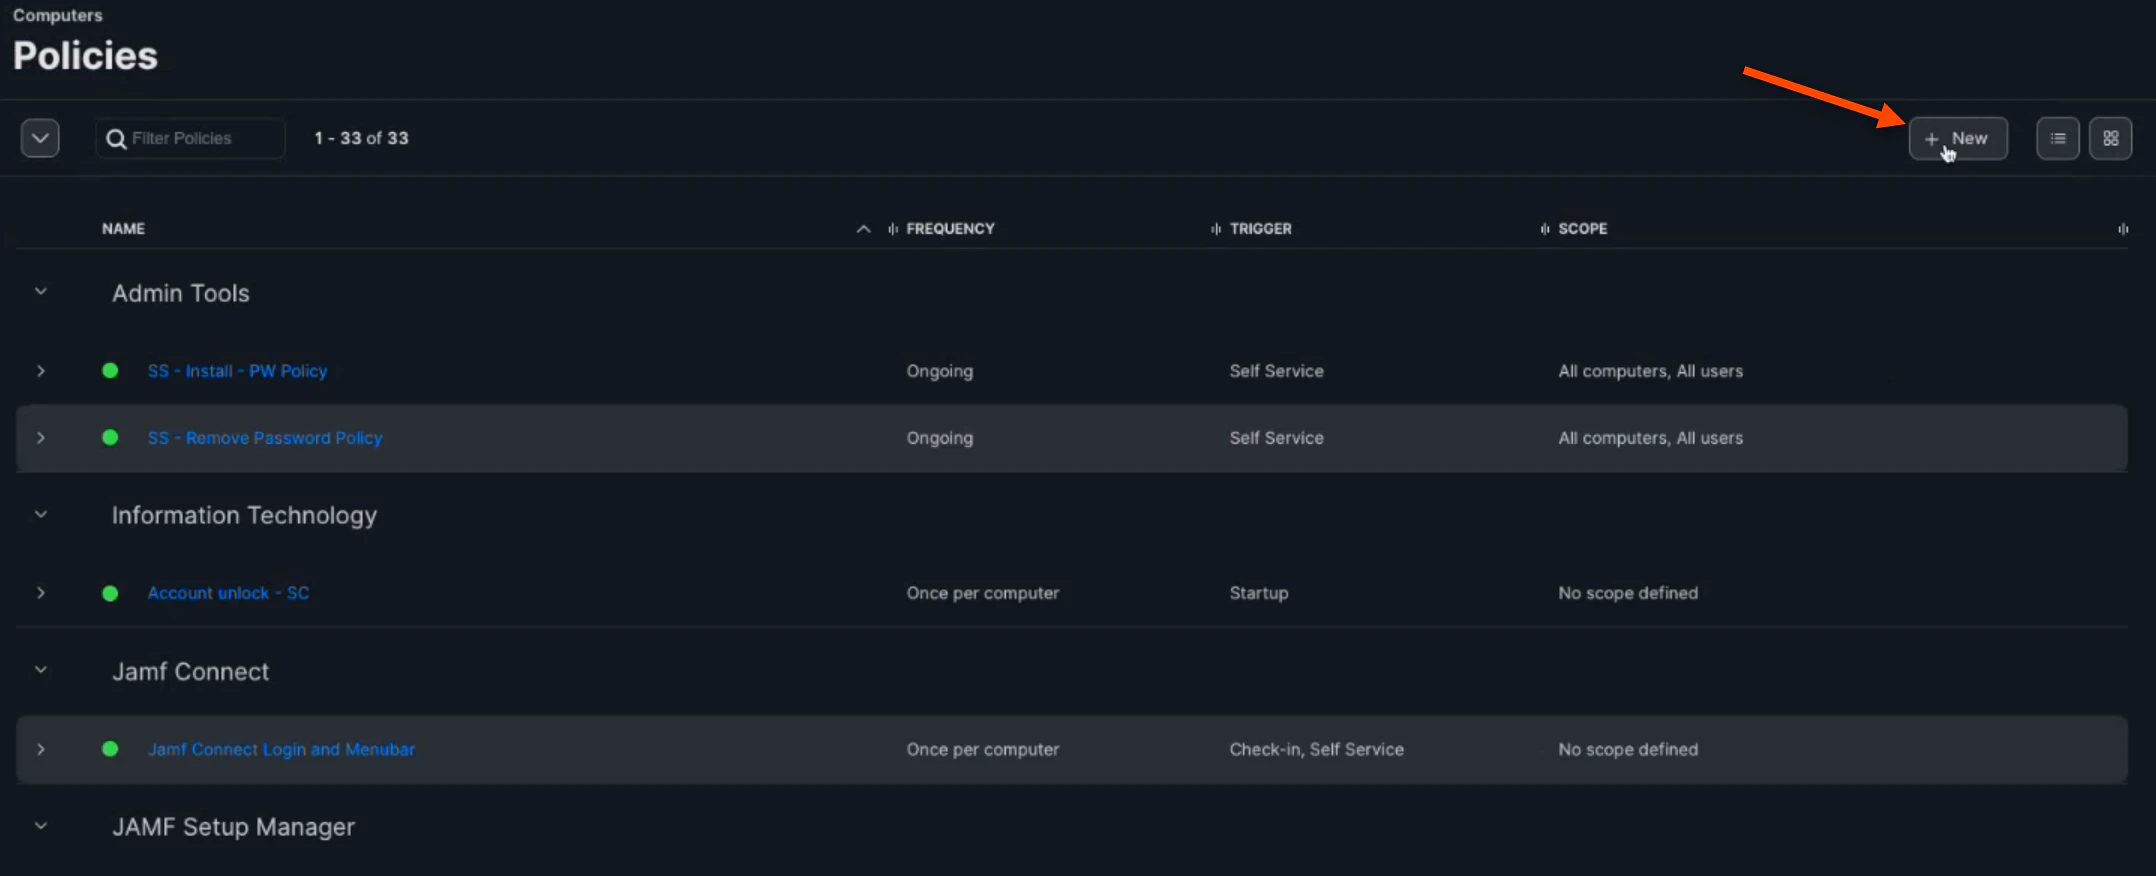
1. Navigate to the "Policies" tab and click **(+) New**

   <img src="https://mintcdn.com/truu-2/0zTsJHKKI2cGP3Gv/images/docs/ffa2631eb602ab0a55a23b0efb12ccb1d7c71284a77ab0e412bf86789d147833-image.png?fit=max&auto=format&n=0zTsJHKKI2cGP3Gv&q=85&s=9d2451ef5b4ce6e6473ffba3ee341d4c" alt="" width="2156" height="876" data-path="images/docs/ffa2631eb602ab0a55a23b0efb12ccb1d7c71284a77ab0e412bf86789d147833-image.png" />

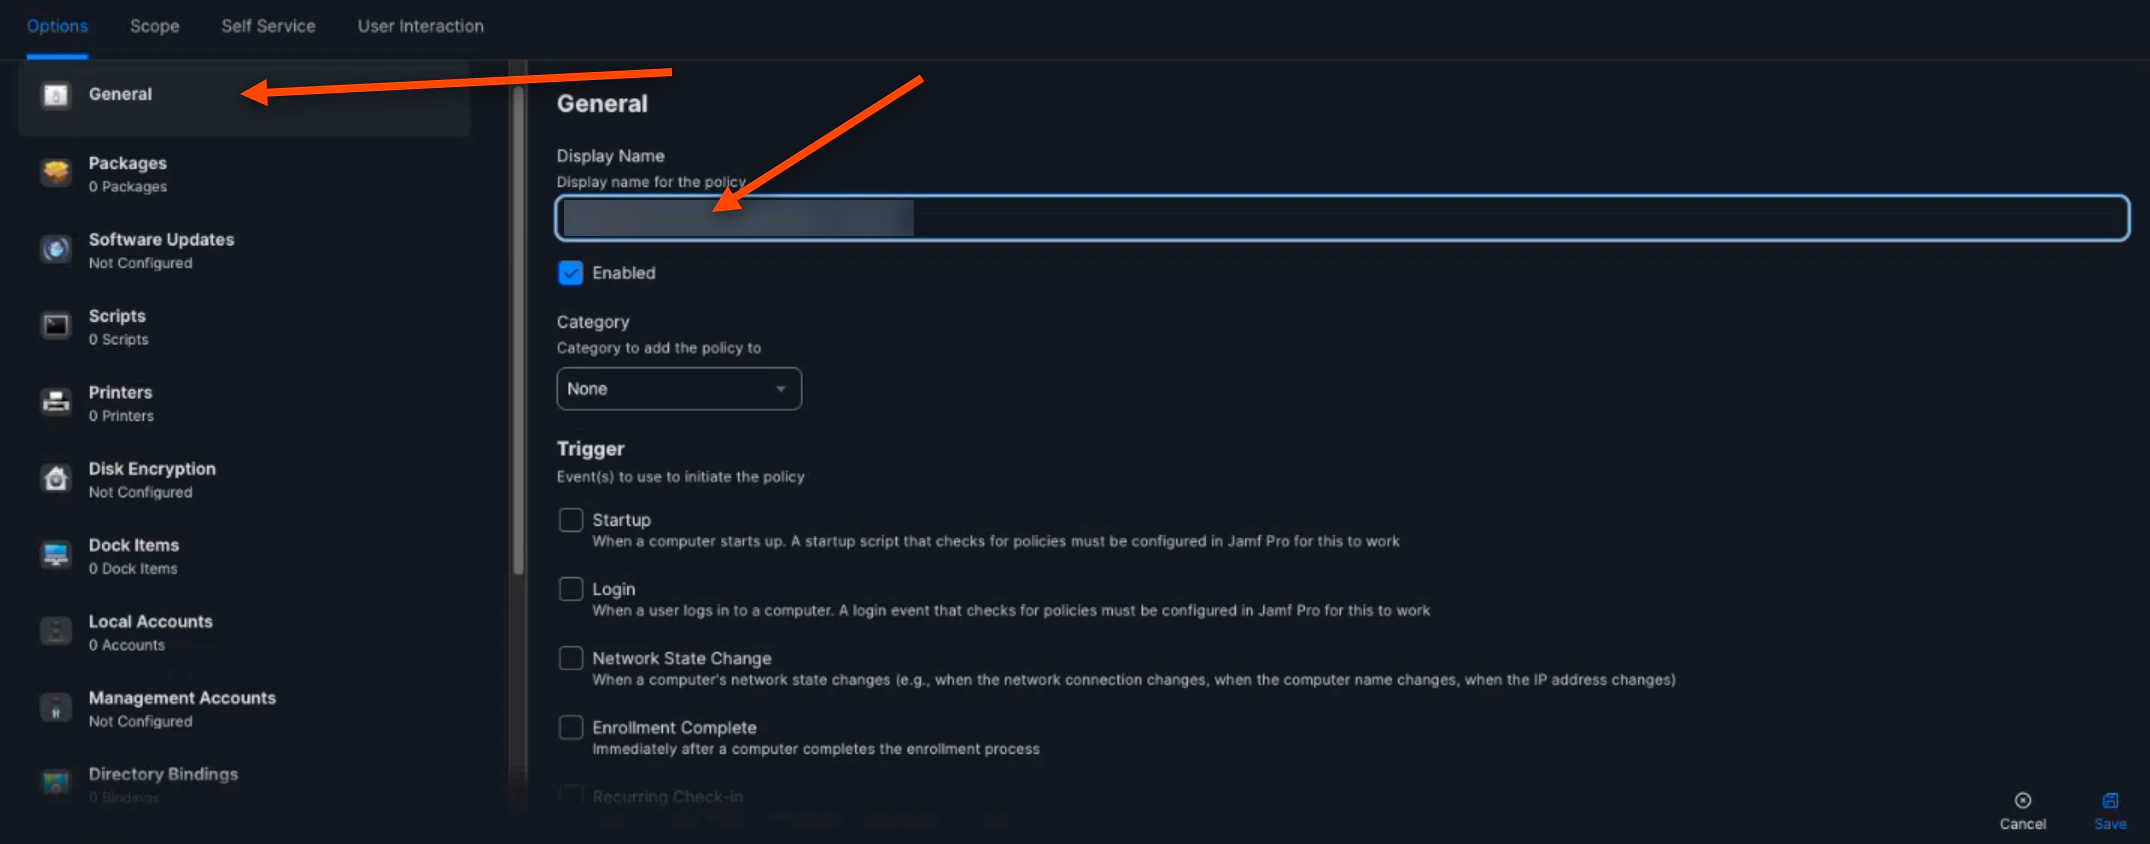
2. In "General", name your policy

   <img src="https://mintcdn.com/truu-2/YlfY4z_3_-uDkBaP/images/docs/4bbe5d89b497b7453b47ee7b592f0e5b523ae1a49a8930eee4f67d4aec7717ae-image.png?fit=max&auto=format&n=YlfY4z_3_-uDkBaP&q=85&s=5f7078069b69a0ce5292430b702ebaac" alt="" width="2150" height="844" data-path="images/docs/4bbe5d89b497b7453b47ee7b592f0e5b523ae1a49a8930eee4f67d4aec7717ae-image.png" />

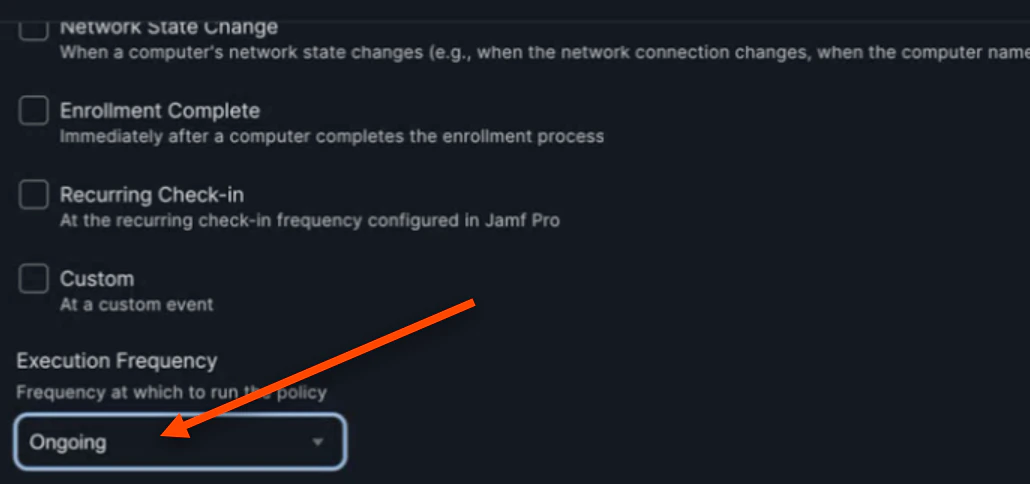
3. Set the "Execution Frequency" to **Ongoing**

   <img src="https://mintcdn.com/truu-2/jMF4bYA9yOA_2TKv/images/docs/3746f68752c4f8ef77bd34588f00e5239d6d8c486c54a20bda226f64d5bc96d0-image.png?fit=max&auto=format&n=jMF4bYA9yOA_2TKv&q=85&s=79ccf2f346e8de6d5f59be7c8d862d91" alt="" width="1030" height="484" data-path="images/docs/3746f68752c4f8ef77bd34588f00e5239d6d8c486c54a20bda226f64d5bc96d0-image.png" />

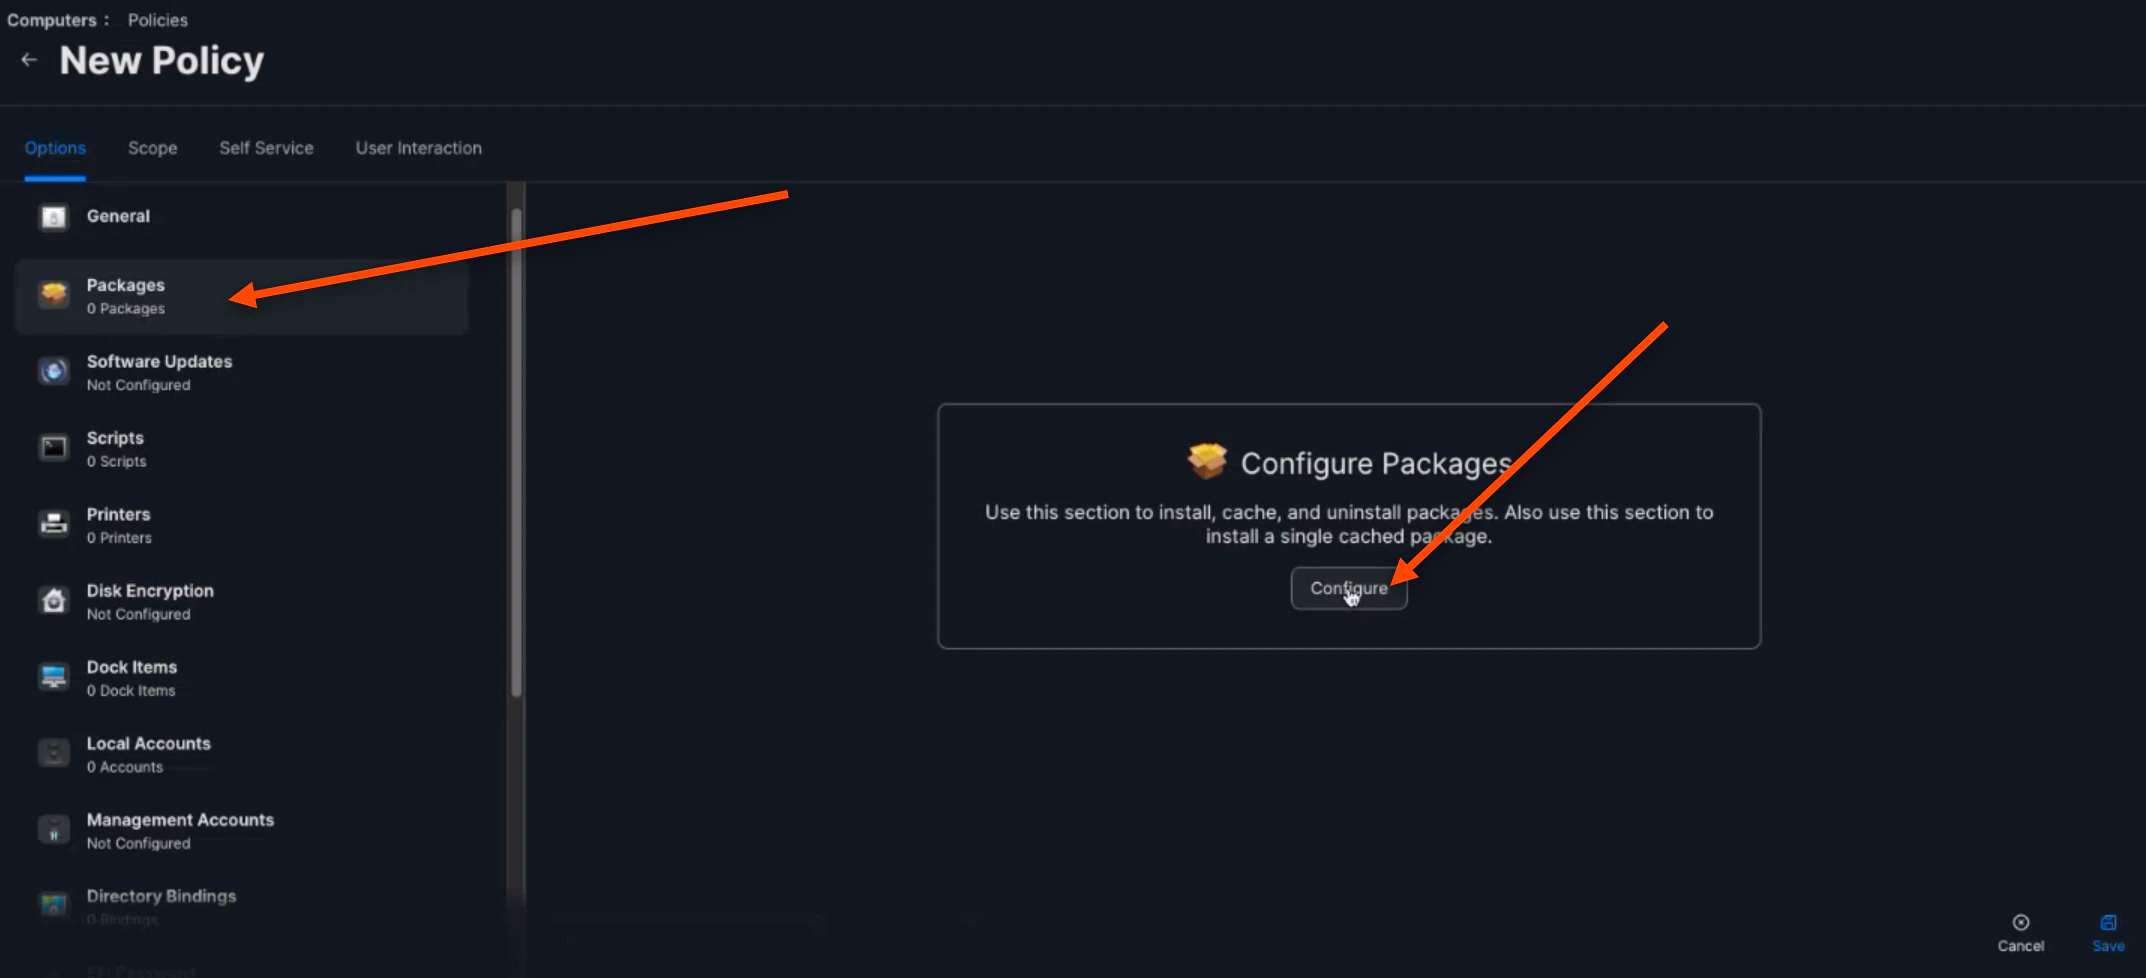
4. In "Packages", click **Configure**

   <img src="https://mintcdn.com/truu-2/qCK1oWL4jNpZKJ8A/images/docs/904ca31ca0348adbb7f2e28b6fca0dda17d708abdf7d99baa6a96f730849948f-image.png?fit=max&auto=format&n=qCK1oWL4jNpZKJ8A&q=85&s=652d0d2445612ccdb328ac1a9ee59f51" alt="" width="2146" height="978" data-path="images/docs/904ca31ca0348adbb7f2e28b6fca0dda17d708abdf7d99baa6a96f730849948f-image.png" />

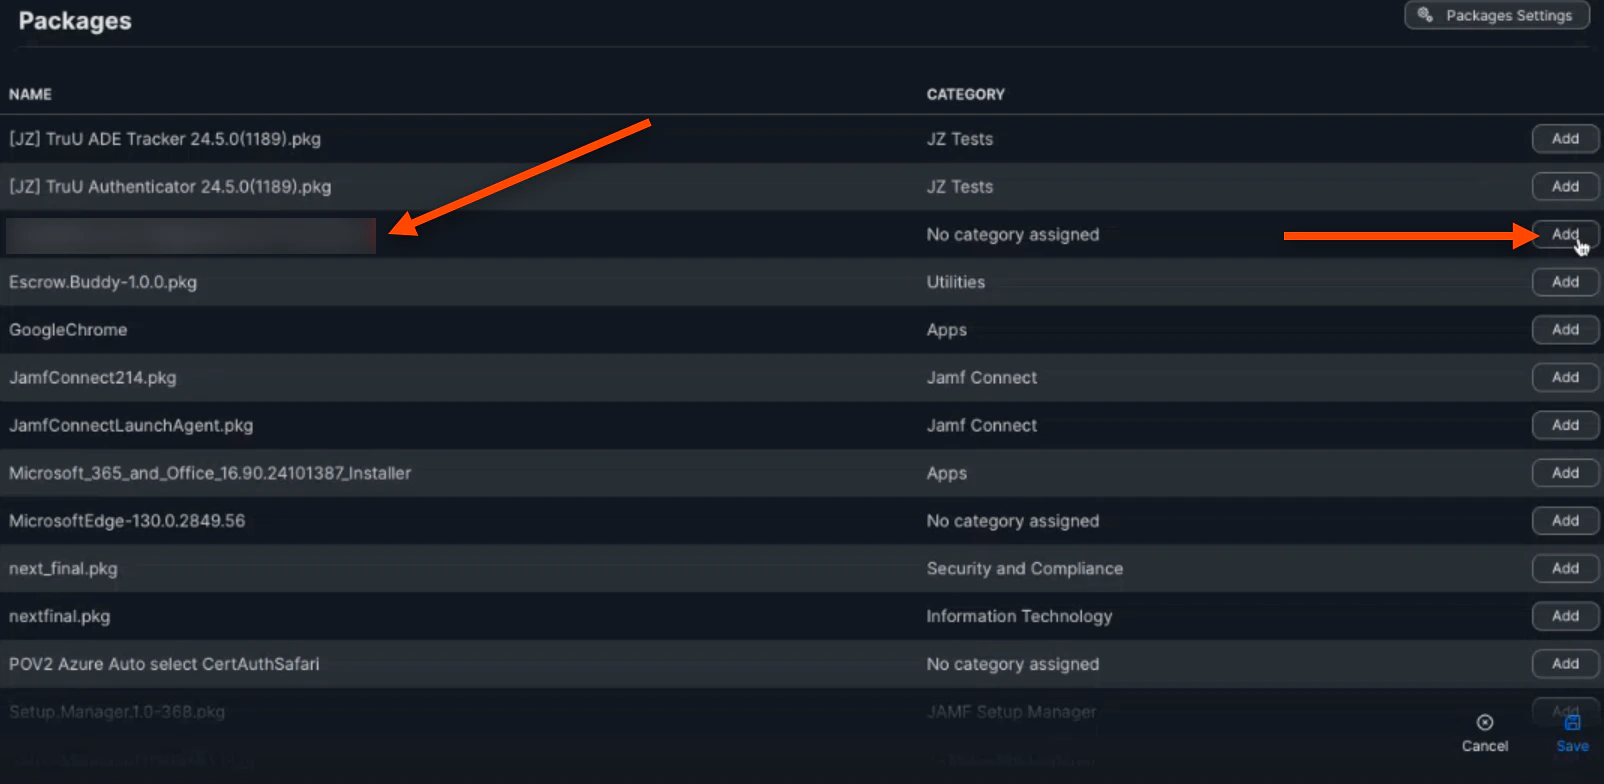
5. Click **Add** when you find your configured package
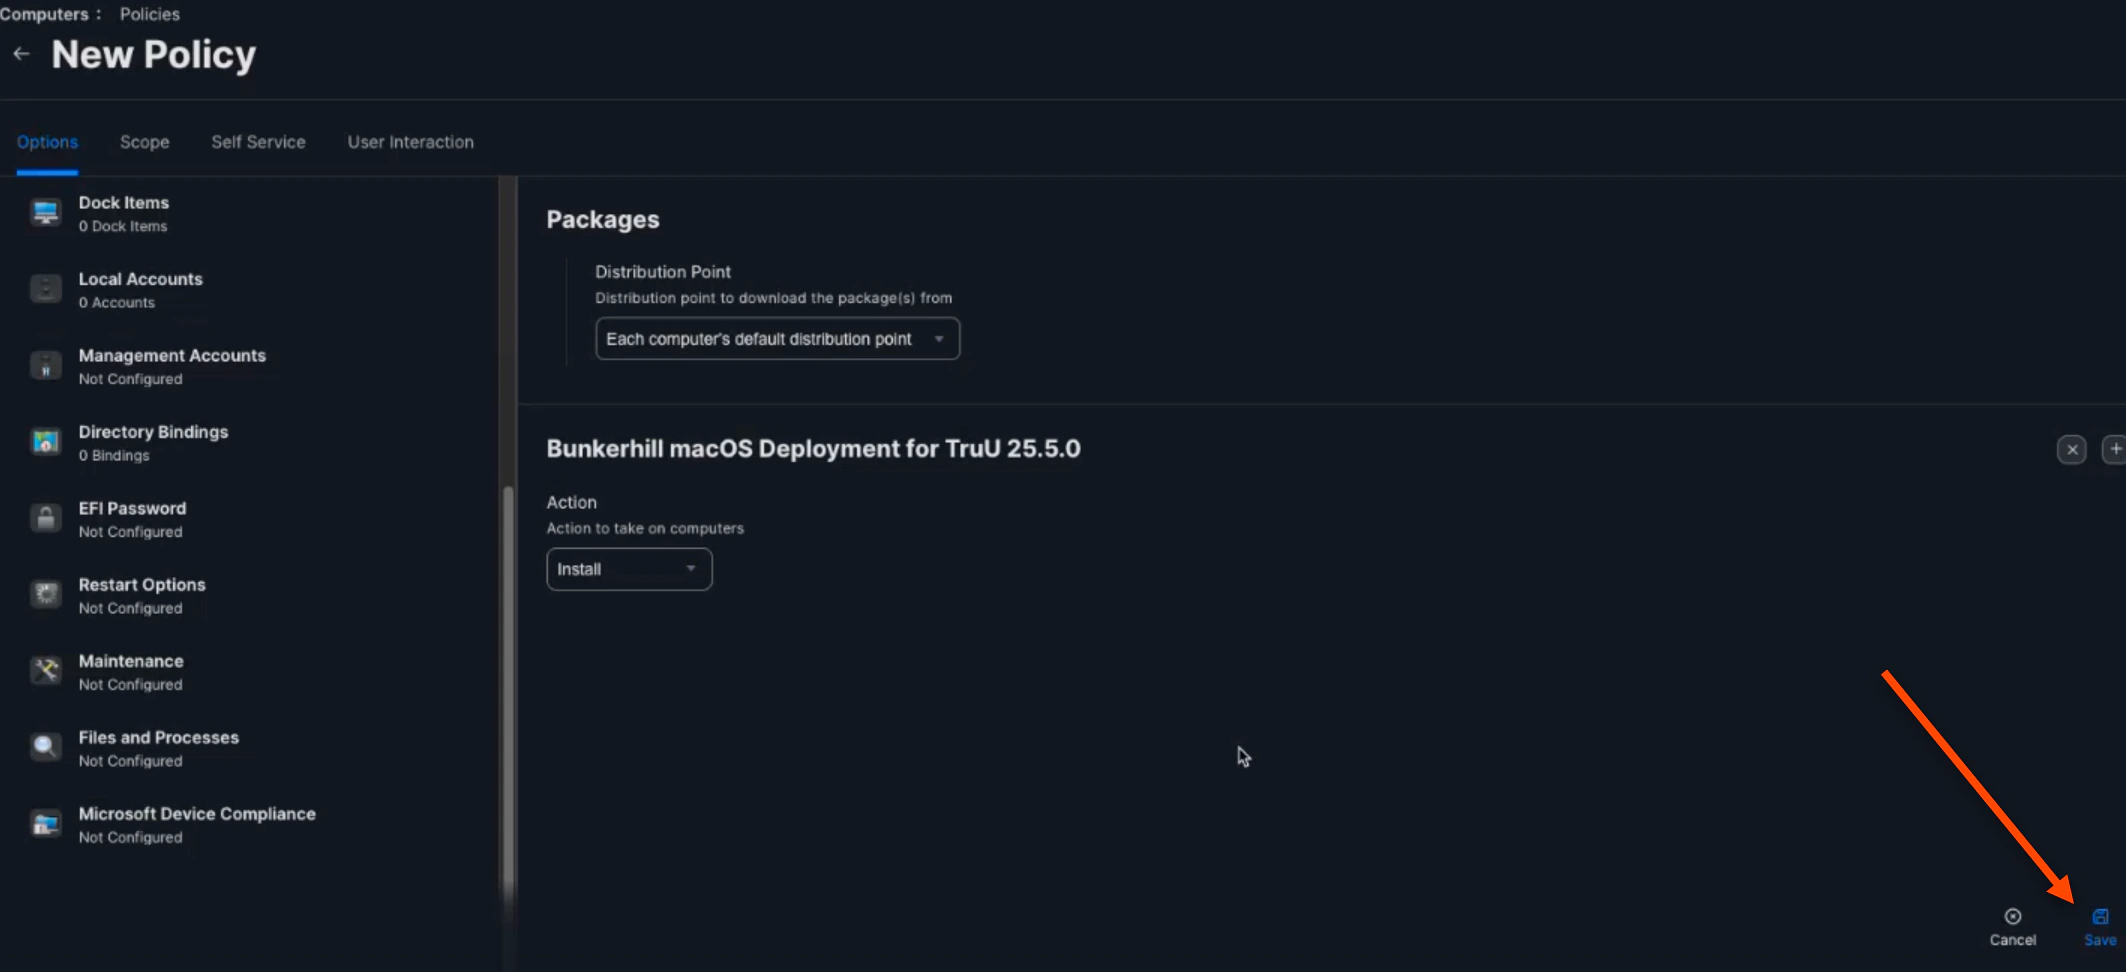
   <img src="https://mintcdn.com/truu-2/E6hYbyLPrBHWbQ3m/images/docs/cd6634904b40898c47e5c2d0c6c058e26b312805d63902ef69b5c218b08c5211-image.png?fit=max&auto=format&n=E6hYbyLPrBHWbQ3m&q=85&s=81a09b5297209f763a683469a2e85f01" alt="" width="1604" height="784" data-path="images/docs/cd6634904b40898c47e5c2d0c6c058e26b312805d63902ef69b5c218b08c5211-image.png" />

6. Click **Save**

   <img src="https://mintcdn.com/truu-2/ehCBQgFdl_pQd0MN/images/docs/ac4afe18c1f7ebbfaaf3c77956b5192bdb5707602ffb828dd5a52ffabfa6d967-image.png?fit=max&auto=format&n=ehCBQgFdl_pQd0MN&q=85&s=eea5b62bfbb8985830b9556193891757" alt="" width="2126" height="972" data-path="images/docs/ac4afe18c1f7ebbfaaf3c77956b5192bdb5707602ffb828dd5a52ffabfa6d967-image.png" />

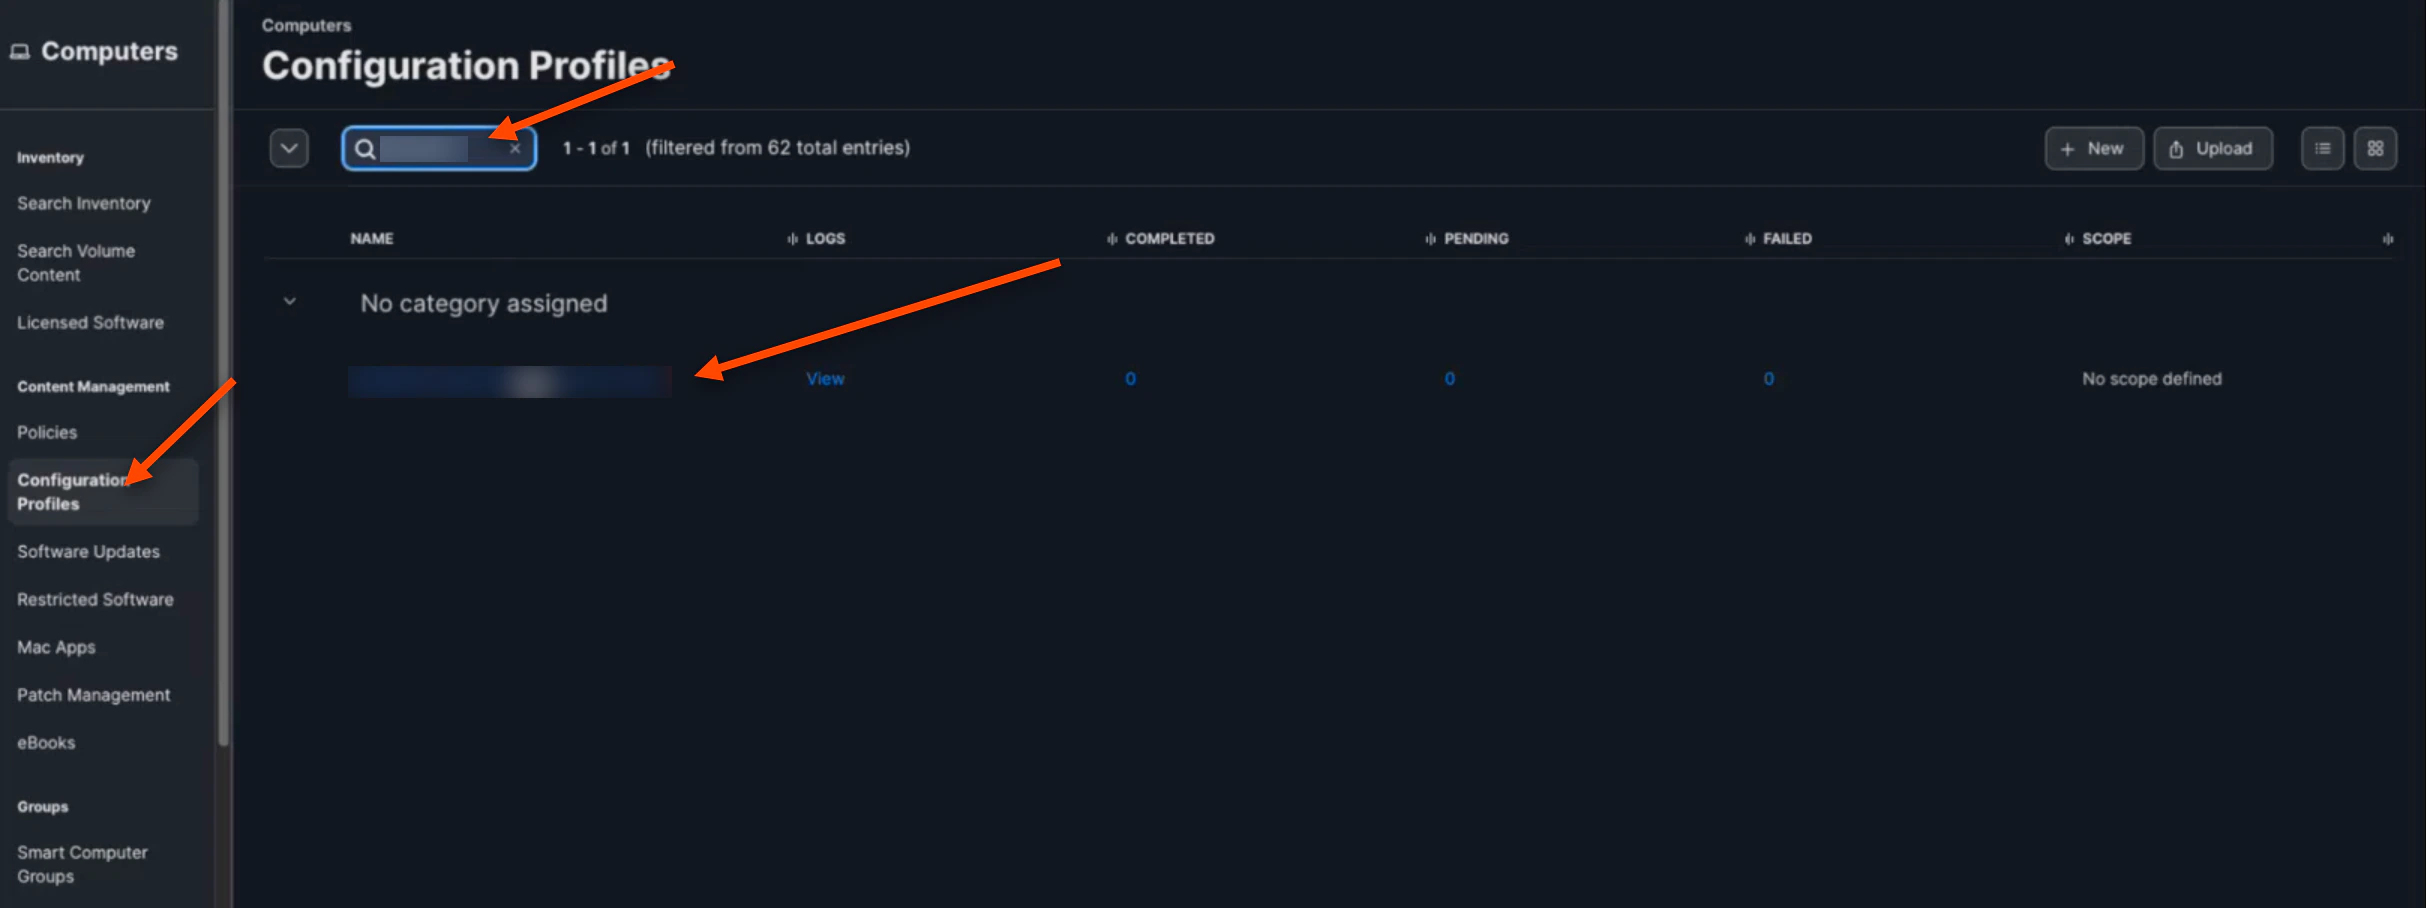
7. Navigate back to the "Configuration Profiles" tab. Search for your *named profile* and **click** on it

   <img src="https://mintcdn.com/truu-2/E6hYbyLPrBHWbQ3m/images/docs/d61f864acb61767fe948b475ad9d48da3b9cca5f51dfd2458a1a5860b0a889df-image.png?fit=max&auto=format&n=E6hYbyLPrBHWbQ3m&q=85&s=5d220283b8dd939a767b497bf20b5ac9" alt="" width="2426" height="908" data-path="images/docs/d61f864acb61767fe948b475ad9d48da3b9cca5f51dfd2458a1a5860b0a889df-image.png" />

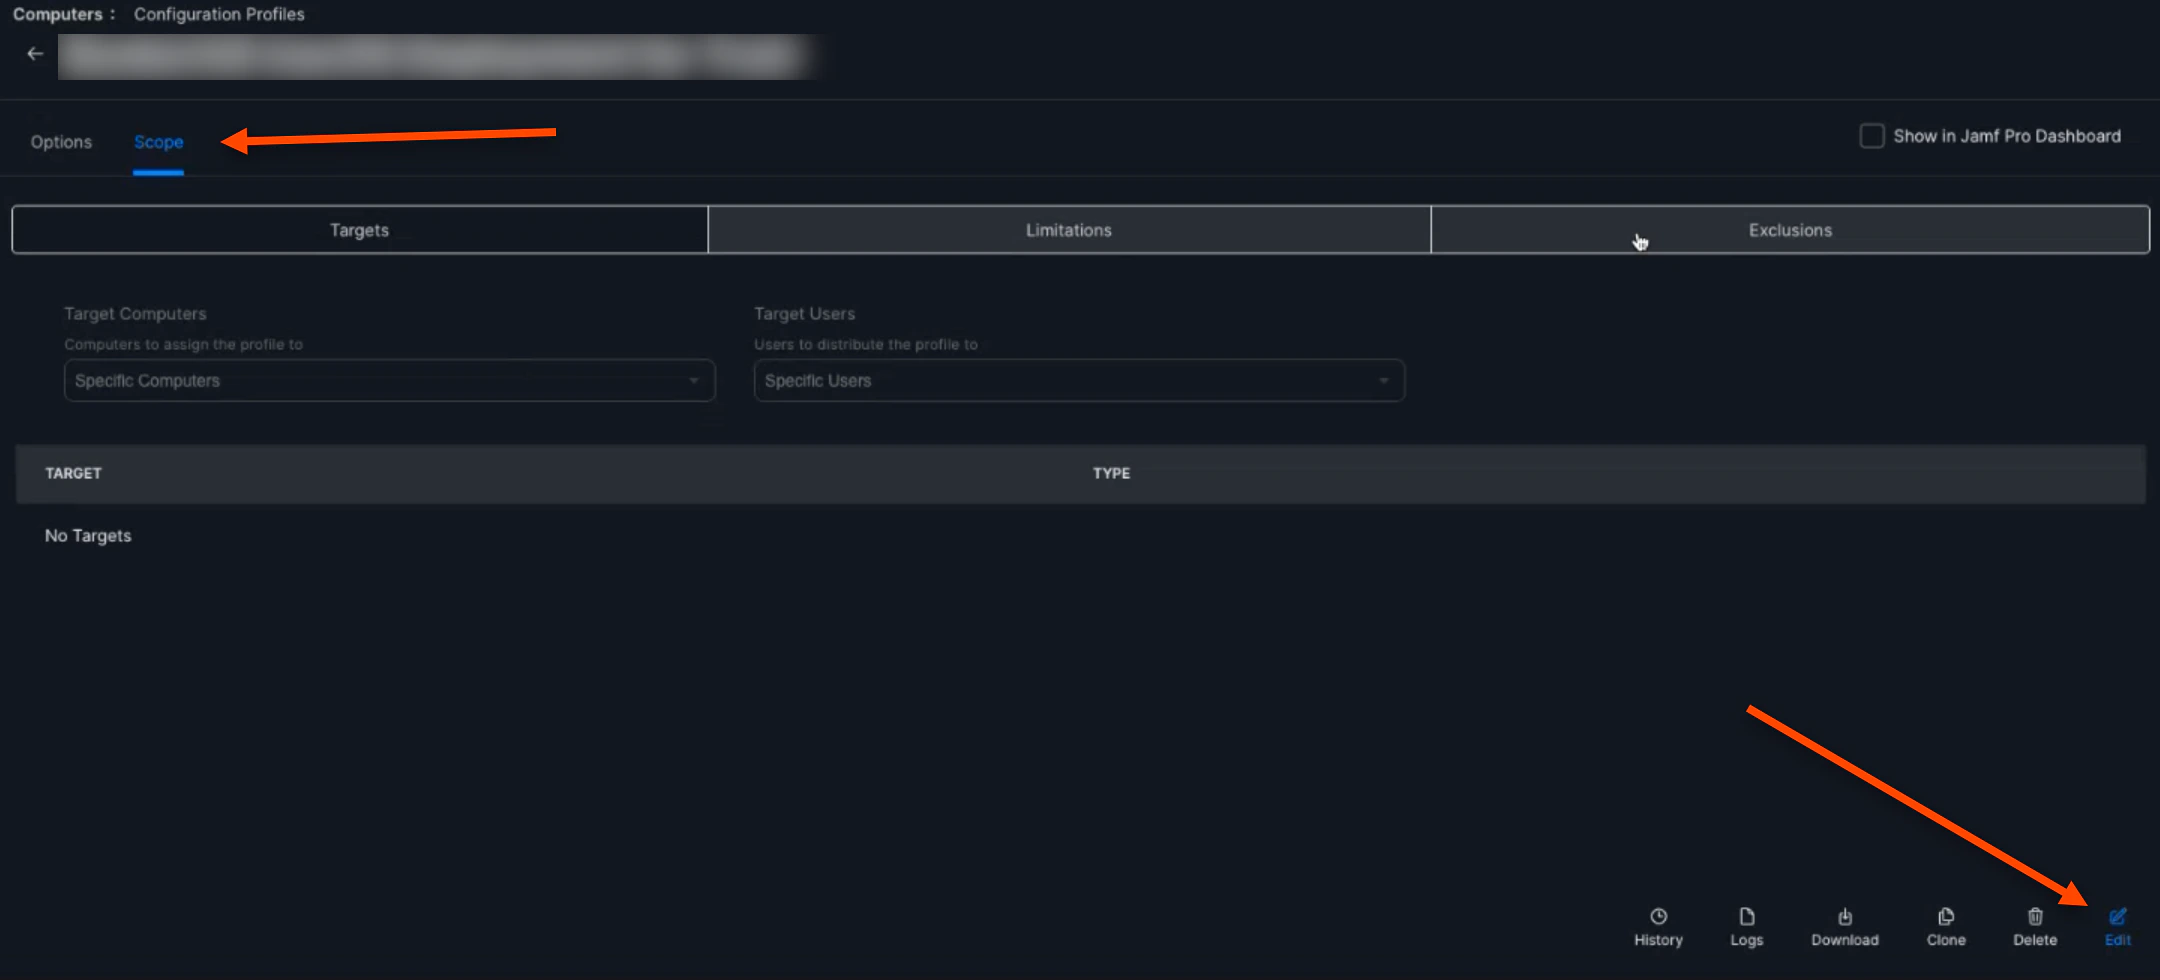
8. Click the **Scope** tab, then click **Edit**

   <img src="https://mintcdn.com/truu-2/rjjBxA7Z_Wk_-34G/images/docs/ec343a4d9547b54190753ba10b0d34b63749c7e4978c8acbbfaf40ca097344c2-image.png?fit=max&auto=format&n=rjjBxA7Z_Wk_-34G&q=85&s=3128355b7bba578169ec3649f28899c9" alt="" width="2160" height="980" data-path="images/docs/ec343a4d9547b54190753ba10b0d34b63749c7e4978c8acbbfaf40ca097344c2-image.png" />

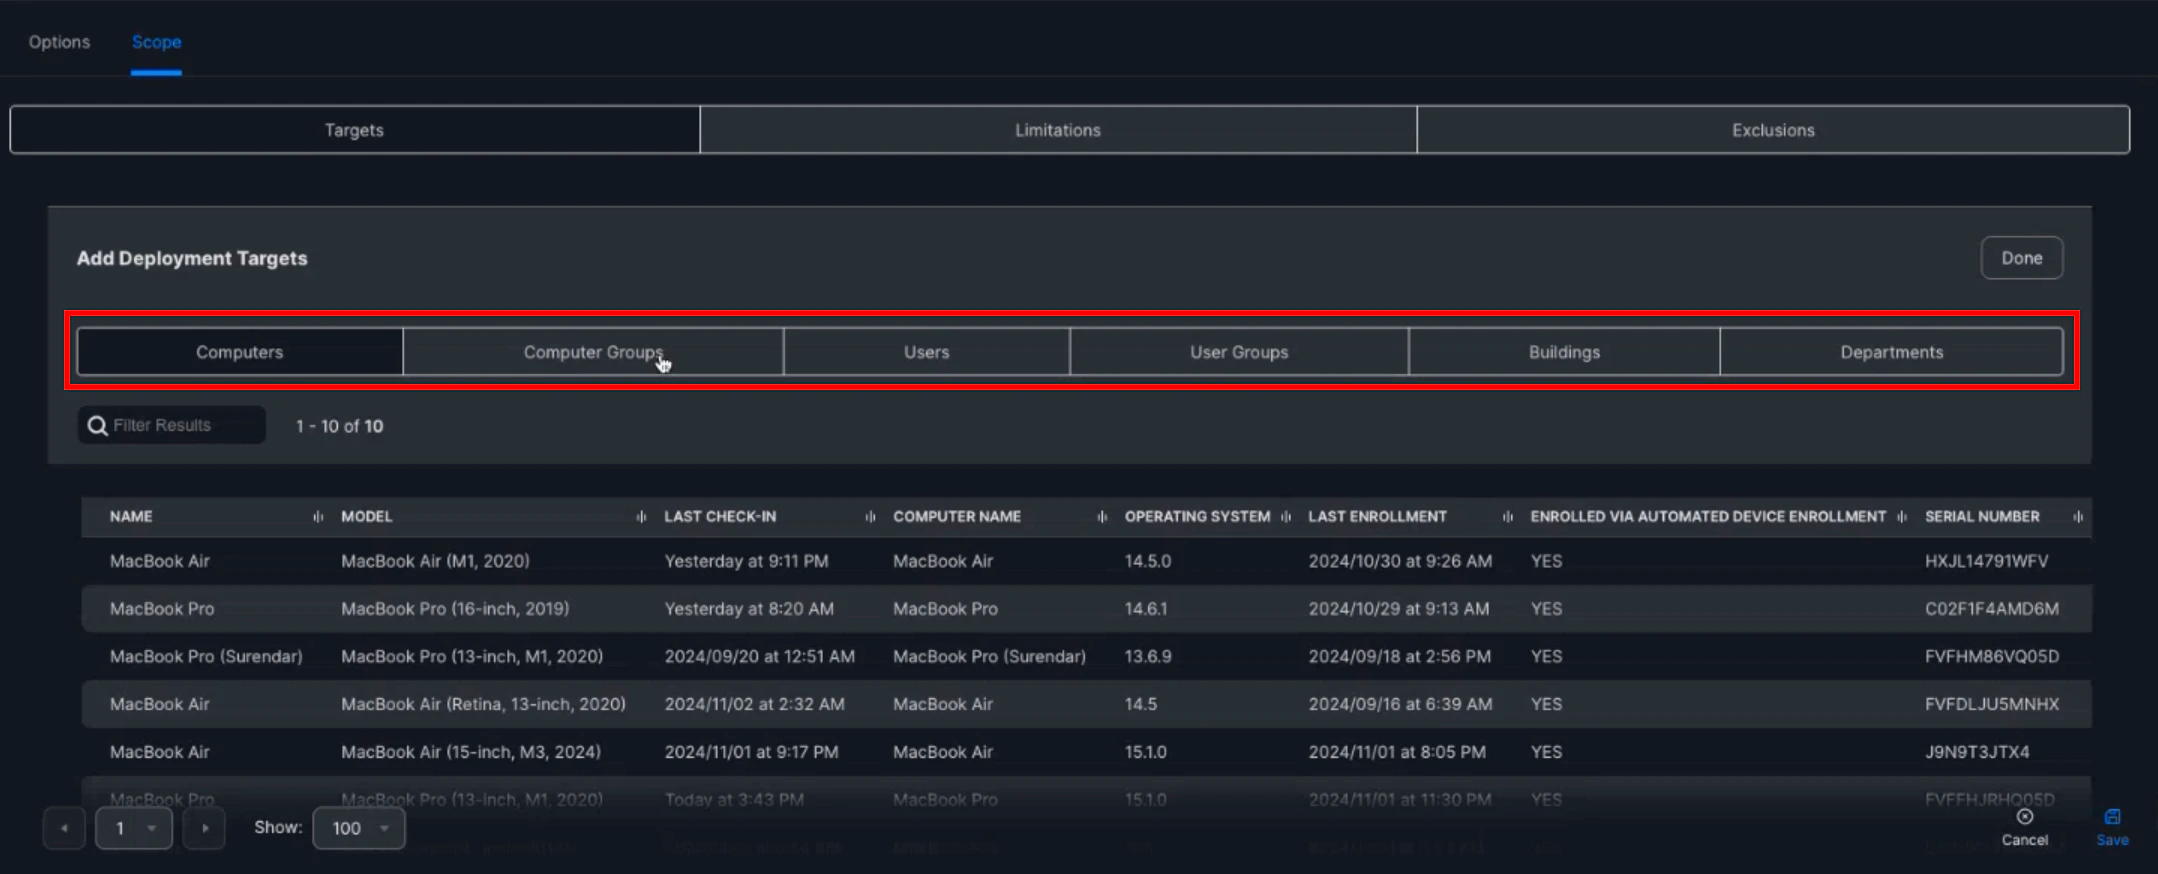
9. Select **Specific Computers** for the "Target Computers", then click **(+) Add**

   <img src="https://mintcdn.com/truu-2/ehCBQgFdl_pQd0MN/images/docs/b557f0a1c19ae7bacf67af3037a3c0a67df8da1400dcaf8b1e3aa94de91af9bd-image.png?fit=max&auto=format&n=ehCBQgFdl_pQd0MN&q=85&s=f853f5e291cba8f46e4ad64c7f4c4781" alt="" width="2192" height="874" data-path="images/docs/b557f0a1c19ae7bacf67af3037a3c0a67df8da1400dcaf8b1e3aa94de91af9bd-image.png" />

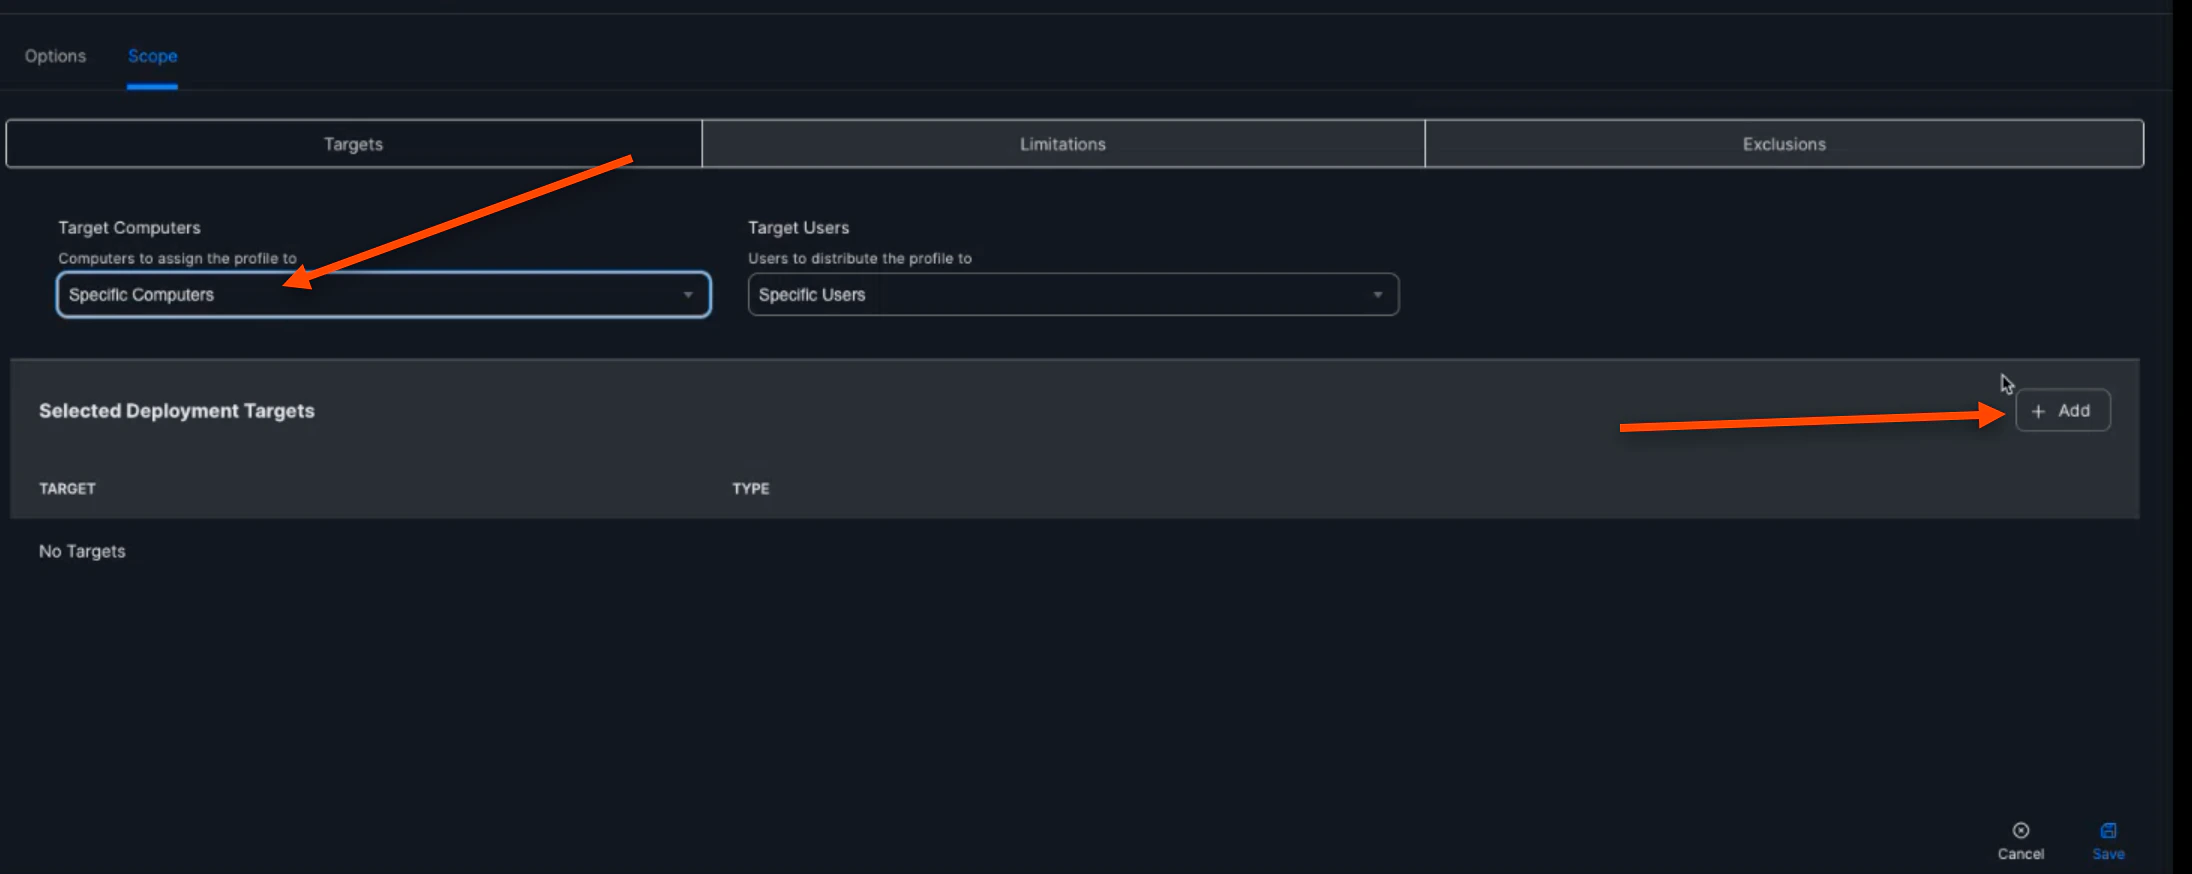
10. You are then able to scope on specific computers, specific computer groups, users, etc. to apply this policy to

    <img src="https://mintcdn.com/truu-2/rjjBxA7Z_Wk_-34G/images/docs/e703b2acd1c8cef4b5d93e8a062d67093a42694419803b0b2676eace5c0c3426-image.png?fit=max&auto=format&n=rjjBxA7Z_Wk_-34G&q=85&s=3ce70931bfaf35614b58404c5769293c" alt="" width="2158" height="874" data-path="images/docs/e703b2acd1c8cef4b5d93e8a062d67093a42694419803b0b2676eace5c0c3426-image.png" />

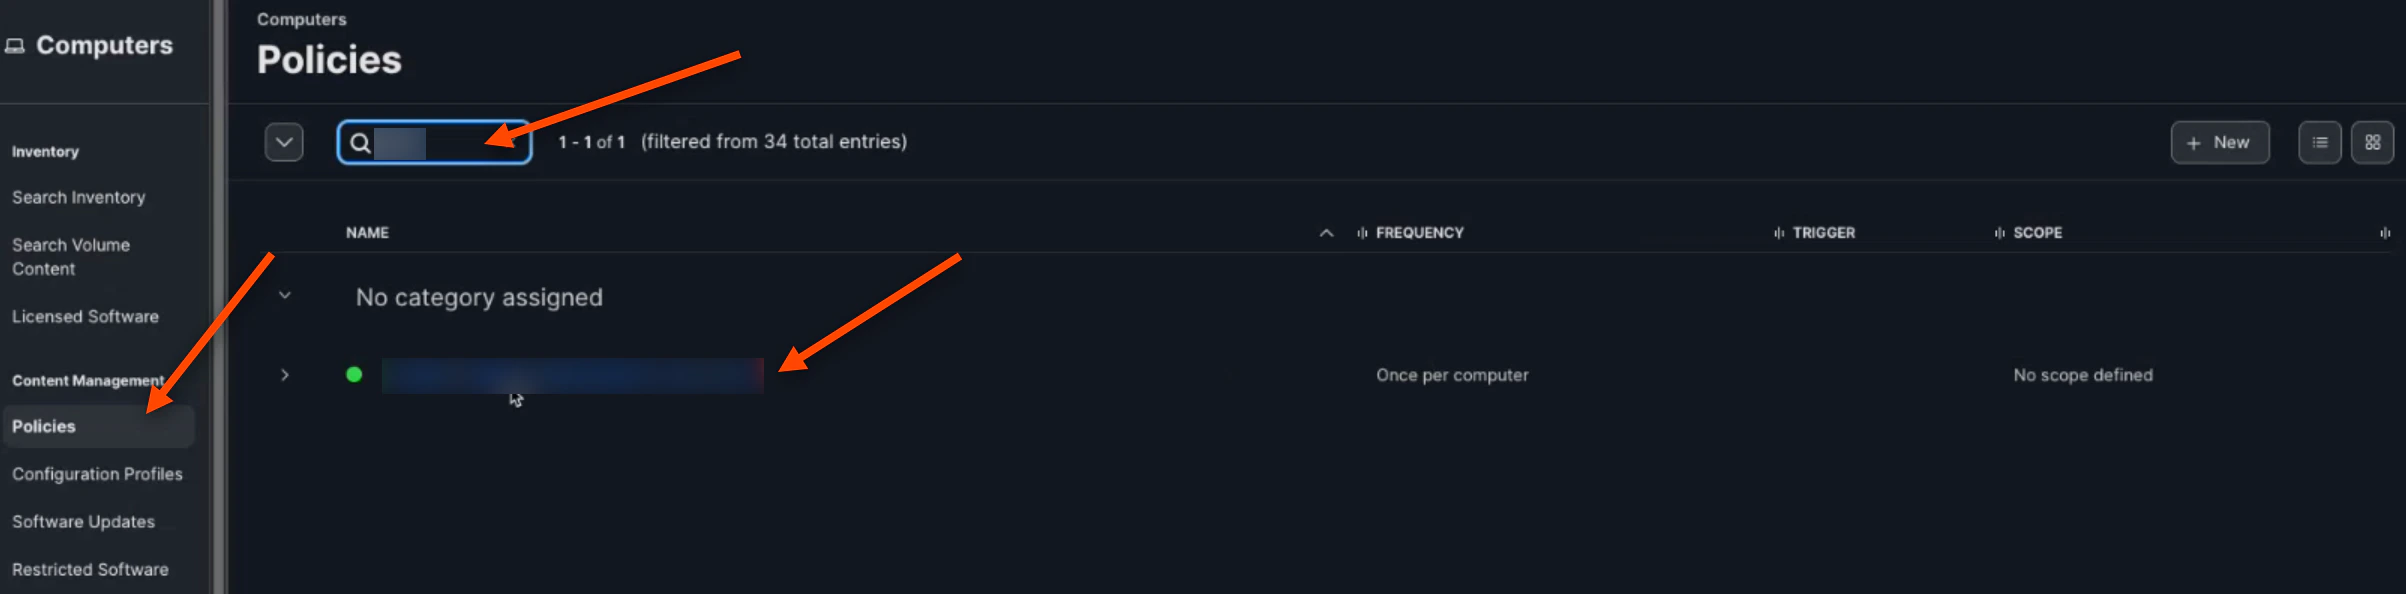
11. Now, navigate back to the "Policy" tab and search your created policy. Click on **your policy**
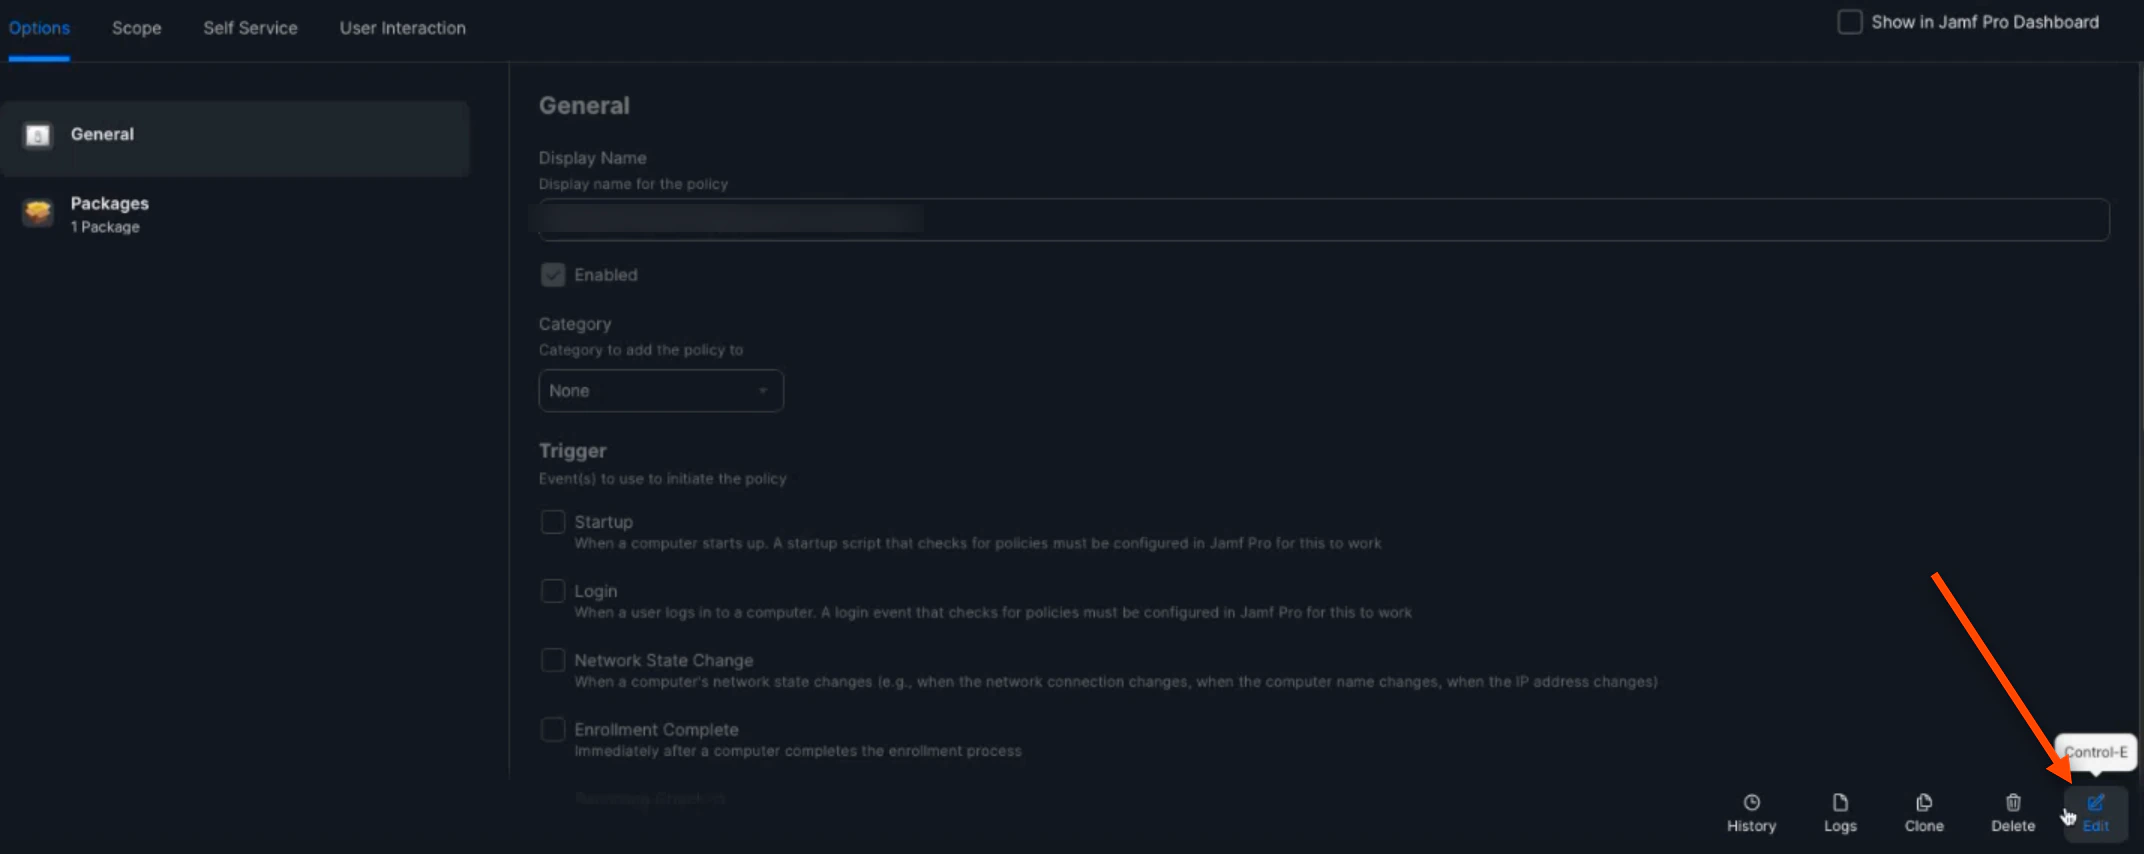
    <img src="https://mintcdn.com/truu-2/qCK1oWL4jNpZKJ8A/images/docs/9a27f13459fdf30ccee296c83507a2e141528d473e812858d1375334329a6e53-image.png?fit=max&auto=format&n=qCK1oWL4jNpZKJ8A&q=85&s=66ec5f5a70c43f673d7d0740a7de3b1f" alt="" width="2406" height="594" data-path="images/docs/9a27f13459fdf30ccee296c83507a2e141528d473e812858d1375334329a6e53-image.png" />

12. Click **Edit**

    <img src="https://mintcdn.com/truu-2/E6hYbyLPrBHWbQ3m/images/docs/c93575fd609ae4d44e1cb01d1703be6ba33d05217feb5e9a080a0bb732e0878f-image.png?fit=max&auto=format&n=E6hYbyLPrBHWbQ3m&q=85&s=3d85d8b2db7928aa3a4304851723ea61" alt="" width="2144" height="854" data-path="images/docs/c93575fd609ae4d44e1cb01d1703be6ba33d05217feb5e9a080a0bb732e0878f-image.png" />

13. Click the **Scope** tab, select **Specific Computers**, then click **(+) Add**

    <img src="https://mintcdn.com/truu-2/qCK1oWL4jNpZKJ8A/images/docs/a3ebd13a9d2049b42578a7e4c4927c148104a1d1e105ffdac43d4d28542eda9d-image.png?fit=max&auto=format&n=qCK1oWL4jNpZKJ8A&q=85&s=5994e1a4193a26faf0227d1939820eb2" alt="" width="2188" height="596" data-path="images/docs/a3ebd13a9d2049b42578a7e4c4927c148104a1d1e105ffdac43d4d28542eda9d-image.png" />

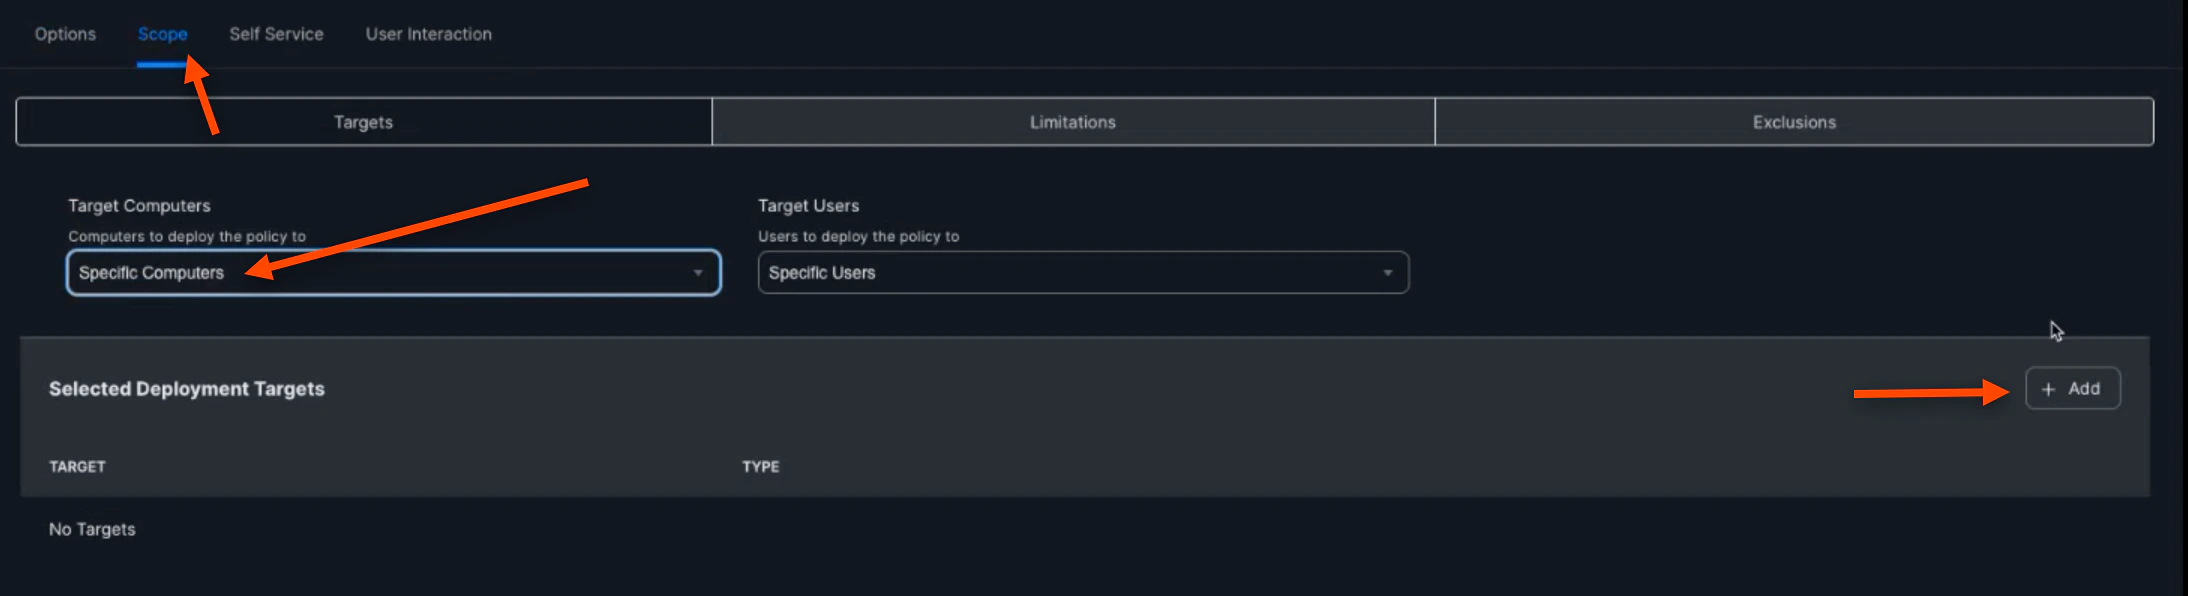
14. You are then able to scope on specific computers, specific computer groups, users, etc. to apply this policy to

    <img src="https://mintcdn.com/truu-2/L38yxuvvUa8uAW5I/images/docs/0ea7955e32f9855089f7f5bf326cef5bbed214d9efa33779f7714c15bc2aa0ec-image.png?fit=max&auto=format&n=L38yxuvvUa8uAW5I&q=85&s=2379001d17d77e868fc46f4d1815ae95" alt="" width="2158" height="874" data-path="images/docs/0ea7955e32f9855089f7f5bf326cef5bbed214d9efa33779f7714c15bc2aa0ec-image.png" />

15. Lastly, open your "Terminal" Application and enter this code to run the policy:

    ```
    sudo jamf policy
    ```

16. Once run, you will be able to begin the enrollment process

***

[Manually Adding a Device to Apple Business Manager](/docs/manually-adding-a-device-to-apple-business-manager)

[Mac Authenticator Uninstallation](/docs/mac-uninstallation)
