

Documentation Index
Fetch the complete documentation index at: https://docs.truu.ai/llms.txt
Use this file to discover all available pages before exploring further.
Prerequisites
- Domain Joined Windows Server to install CA Adapter
- Specs:
- Operating System: Windows Server 2022
- Memory: 8 GB RAM
- CPU: 2 vCPUs
- Create a service account that will be used in various locations specifically for the application of the TruU product.
Port Requirements
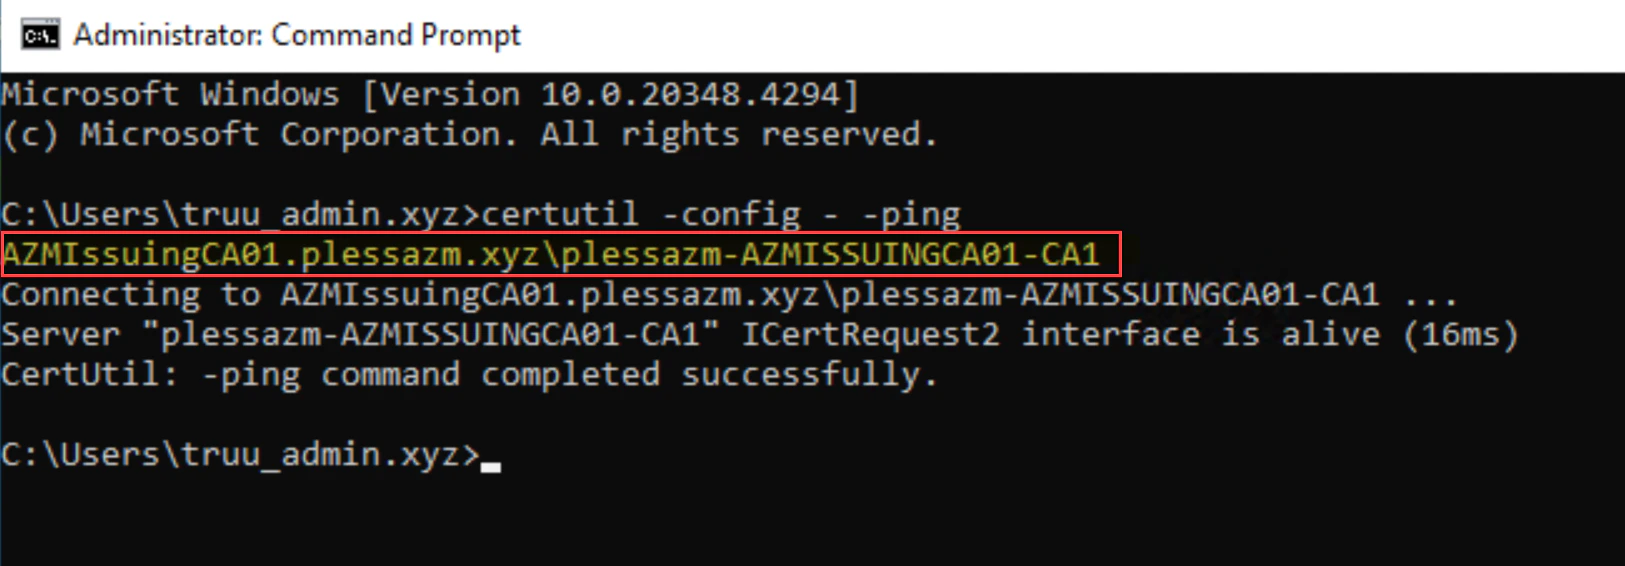
The TruU CA Adapter establishes a persistent outbound HTTPS (443) WebSocket connection to the TruU Cloud. This connection is used to validate OAuth tokens and securely communicate with the TruU Identity Platform. TruU CA Adapter also requires connectivity to the issuing CA over the DCOM/RPC protocol.| Service | Port(s) | Source | Destination | Description |
|---|---|---|---|---|
| HTTPS | 443 | TruU CA Adapter Server | TruU Cloud | Secure communication and token validation between the CA Adapter and the TruU Identity Platform. |
| DCOM / RPC | Dynamic ports above 1023 + port 135 | TruU CA Adapter Server | Microsoft CA Server | Required for standard Microsoft CA / RPC/DCOM operations. The CA Adapter server must be domain-joined. |
- https://docs.microsoft.com/en-us/archive/blogs/pki/firewall-rules-for-active-directory-certificate-services
- https://support.microsoft.com/kb/154596/en-us
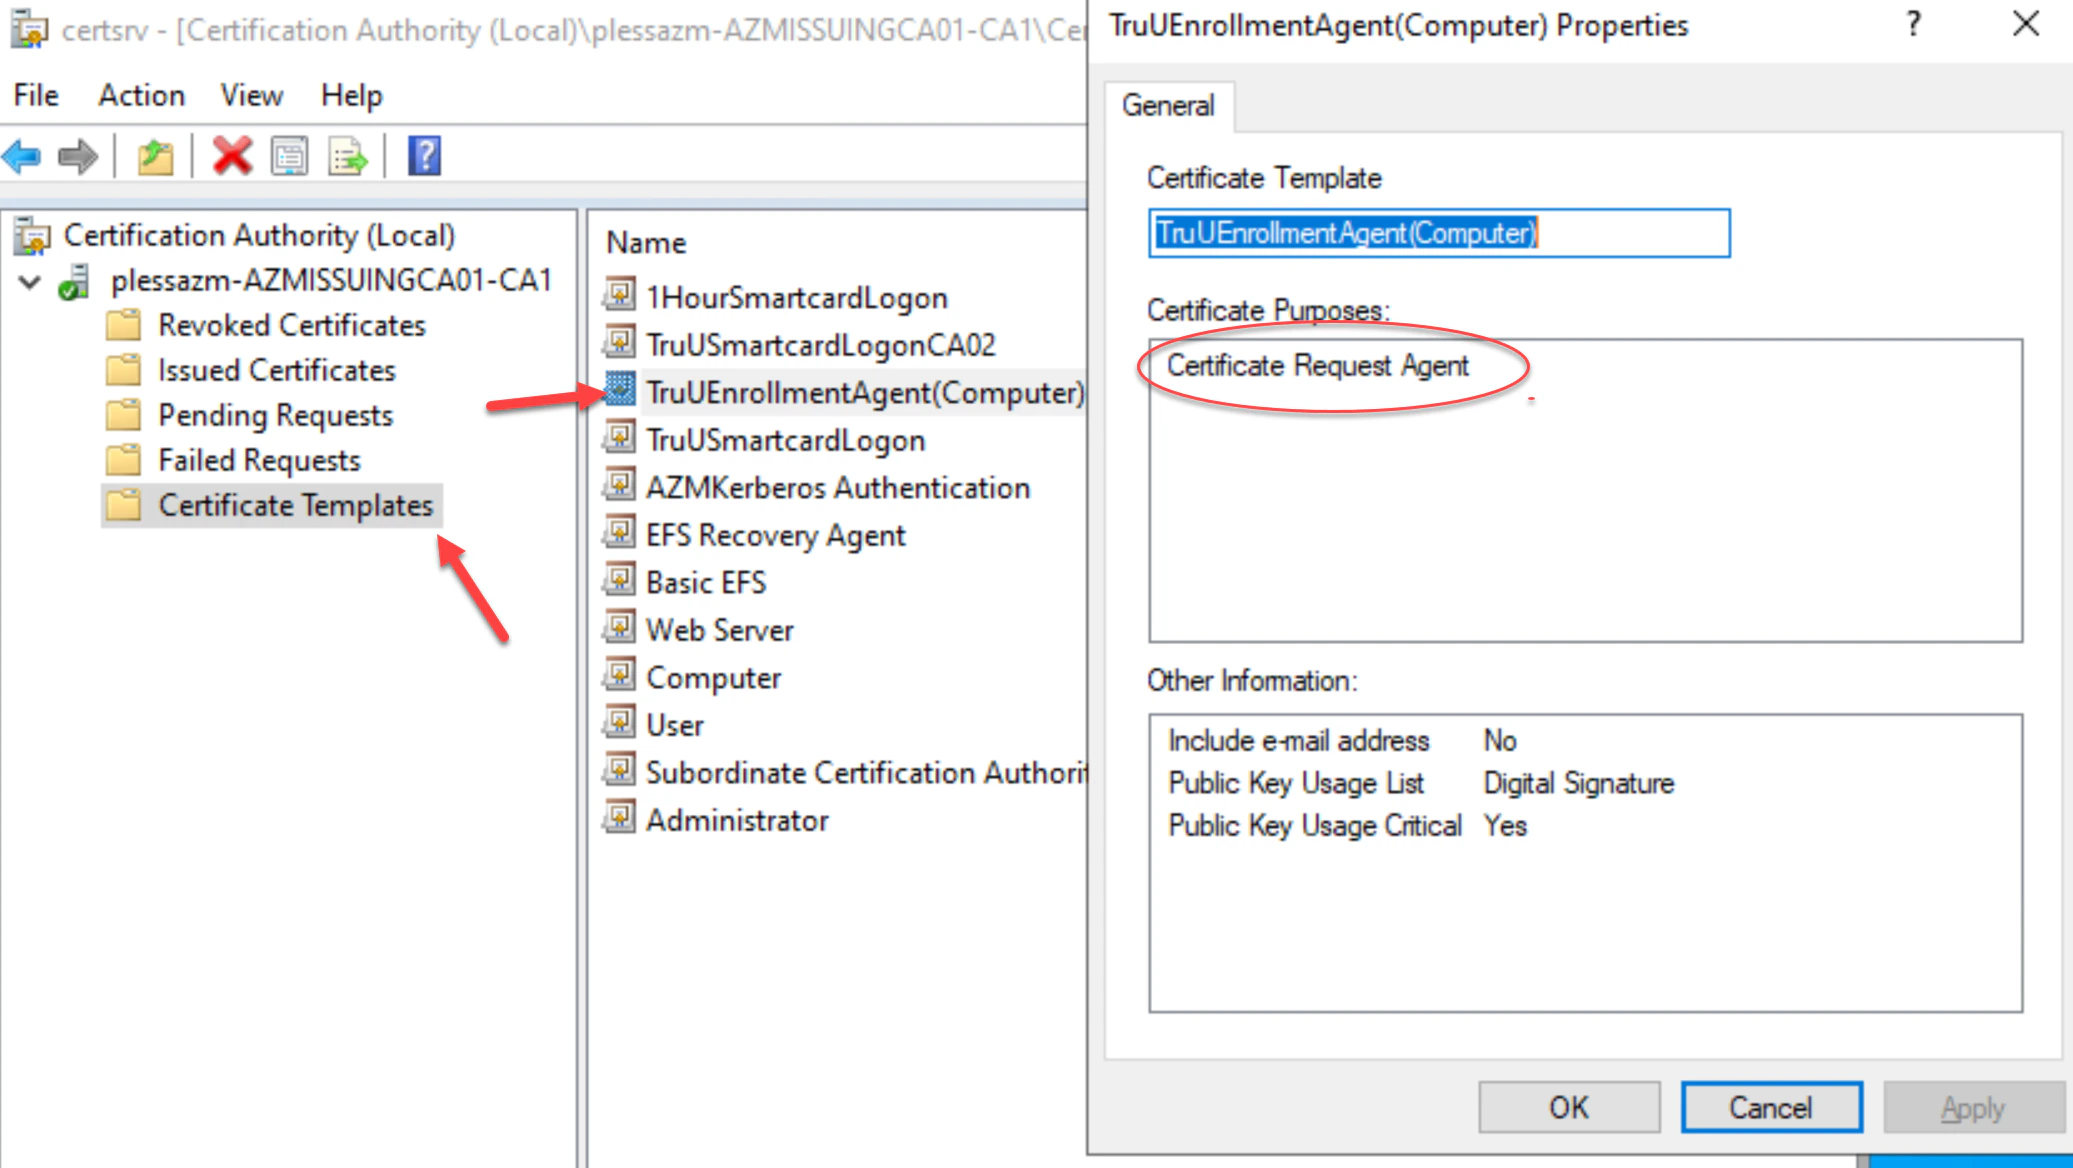
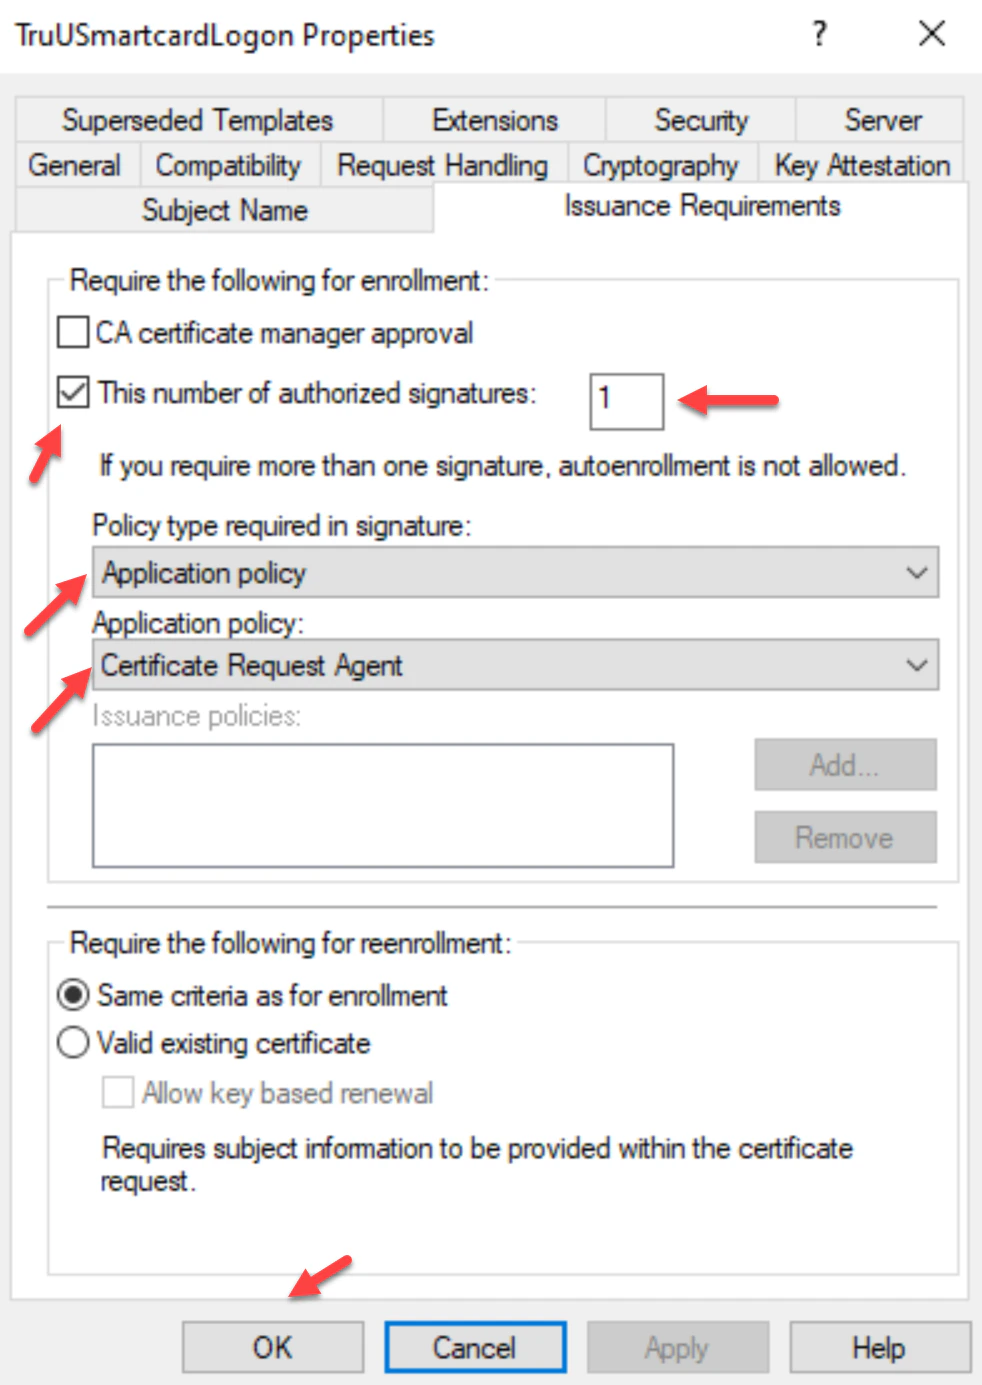
Create the Enrollment Agent(Computer) Template
Purpose: for signing the smartcard certificate.
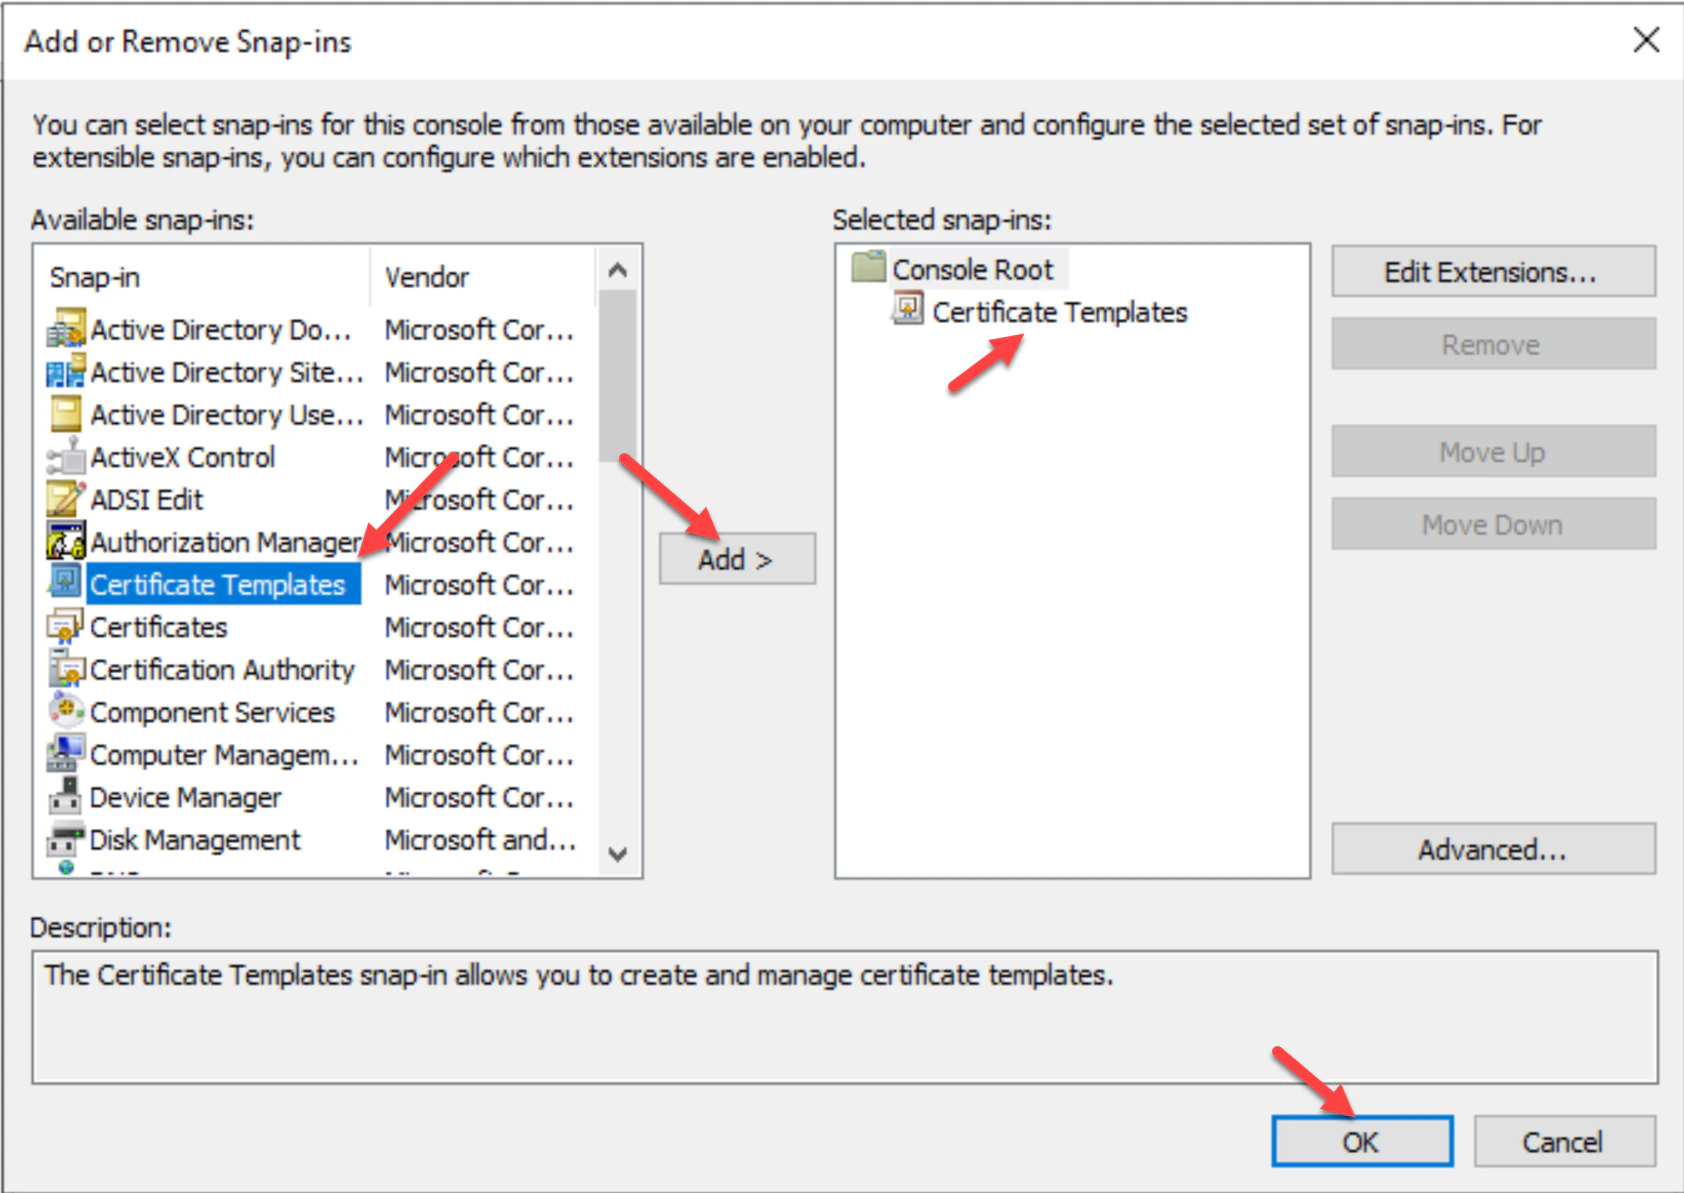
- Open the Microsoft Management Console (MMC) and click File then click Add/Remove Snap-in… to add a new snap-in.

- Click Certificate Templates, then click Add and OK.

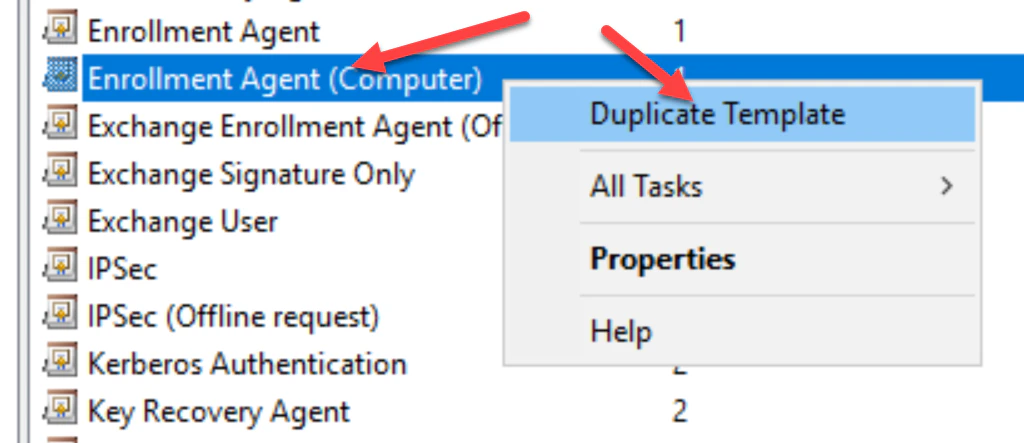
- Double-click on the Certificate Templates , then in the list of templates right-click on the Enrollment Agent (Computer) template and choose Duplicate Template.
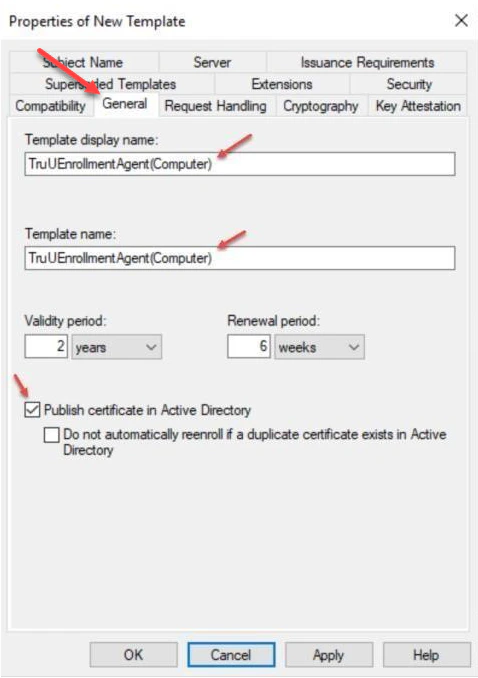
- Navigate to the General tab and provide a Template display name: for the template. I.E TruUEnrollmentAgent(Computer).
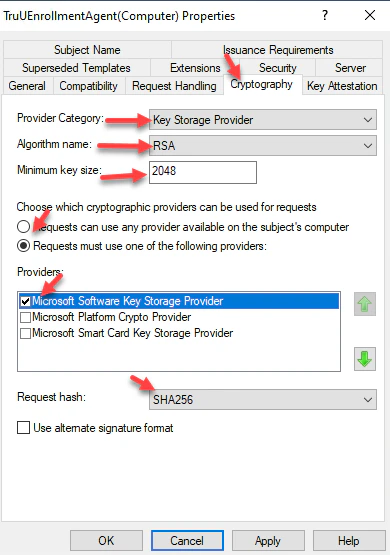
- Navigate to the Cryptography tab and set the following settings for Key Storage Provider (KSP) support:
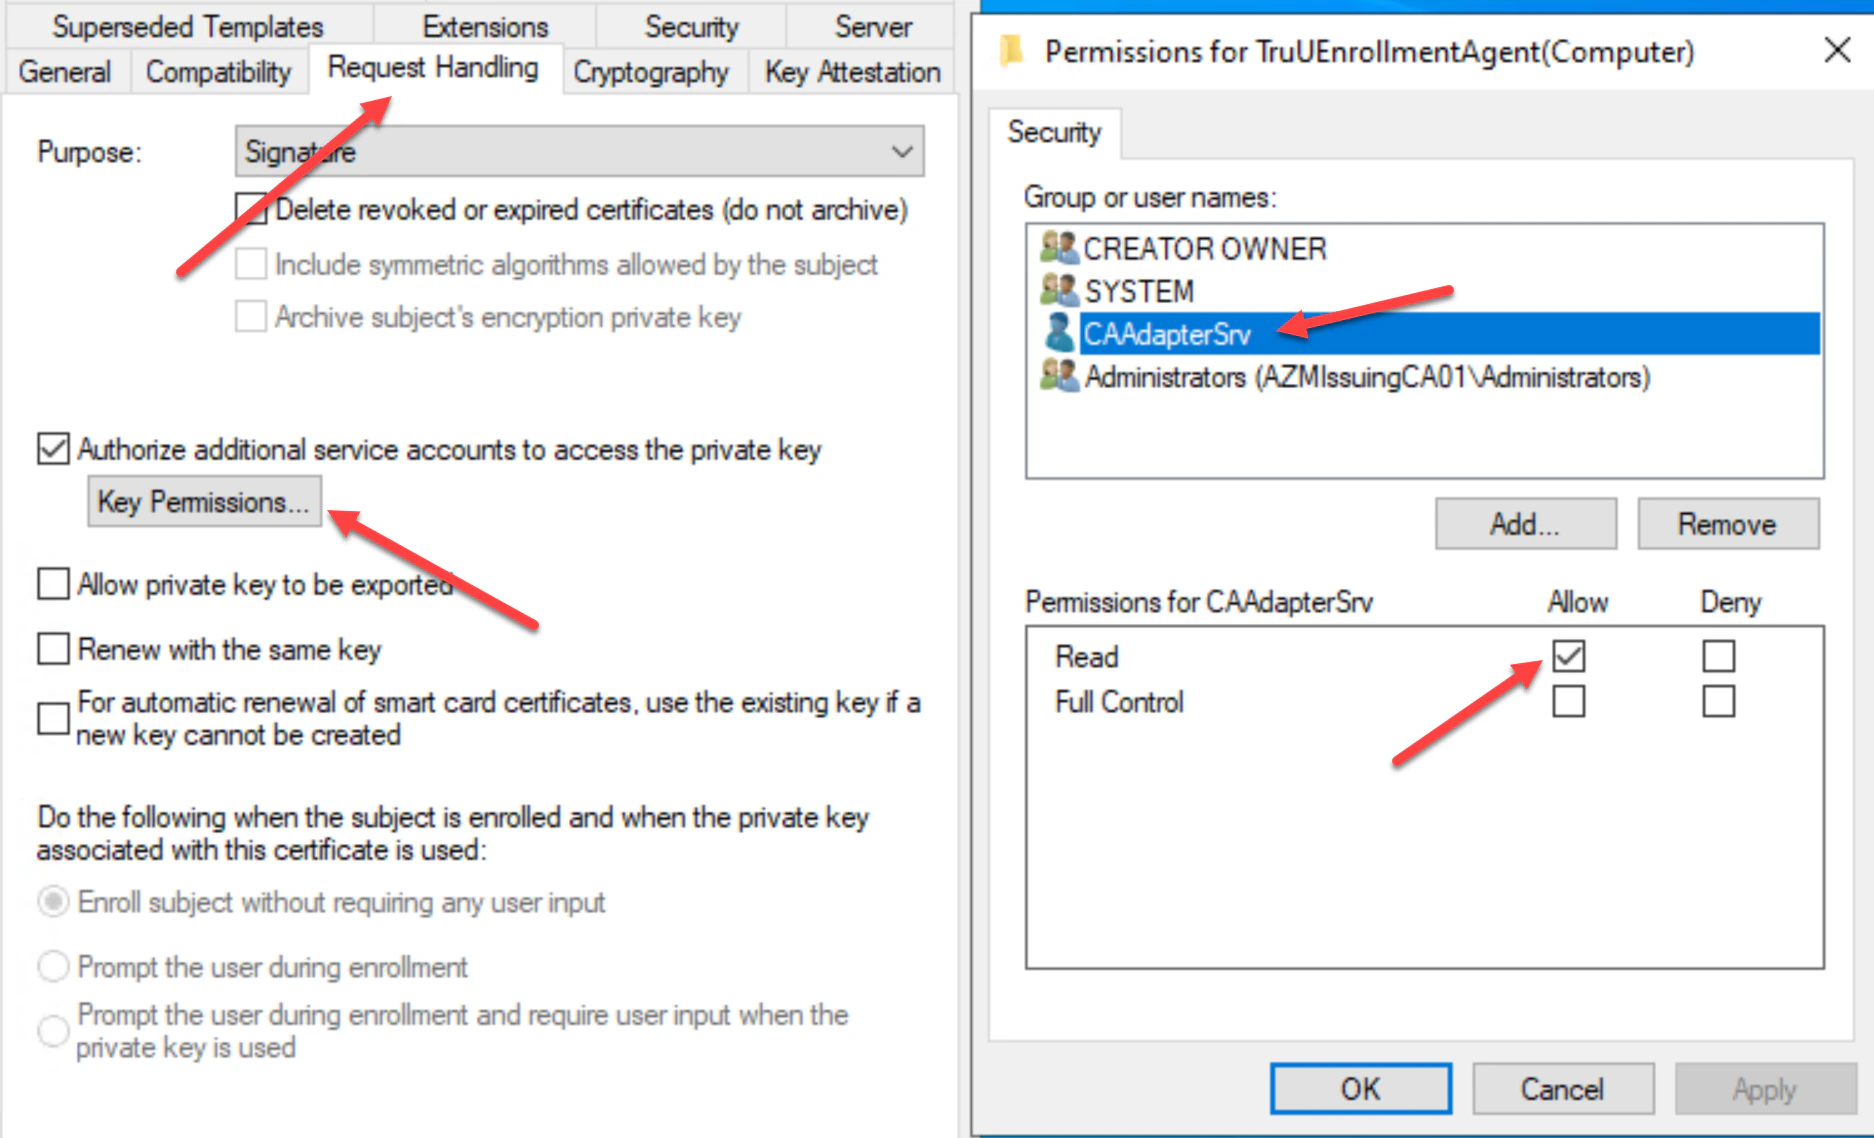
- In the Request Handling tab, select Authorize additional service accounts to access the private key, then add the TruU service account created for the CA Adapter service. Assign the TruU account Read permission, then click Apply to complete setup in this tab.
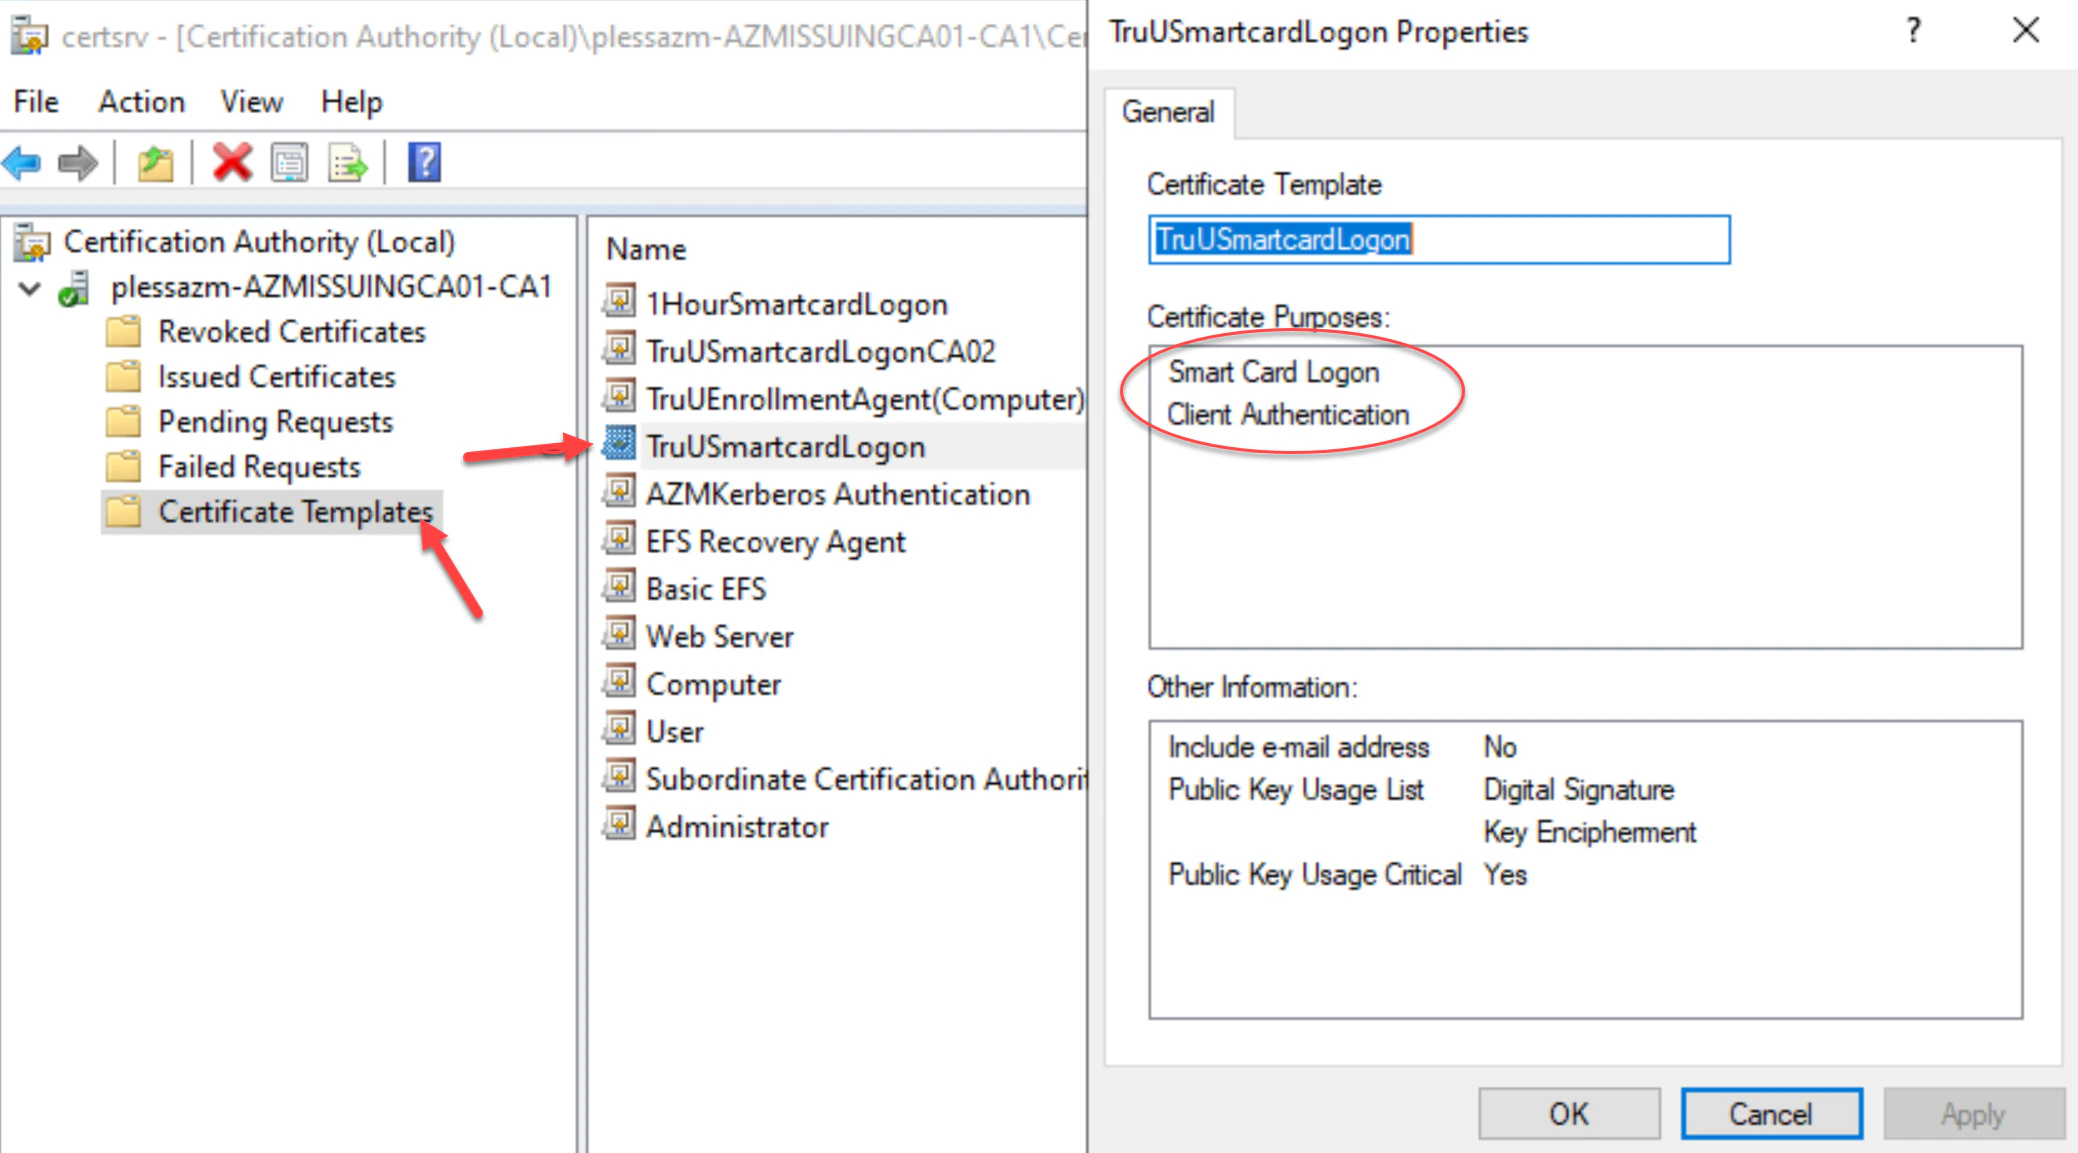
- Next, navigate to your Certificate Authority, then click the Certificate Templates folder. Right-click on the folder and choose New then, Certificate Template to Issue.
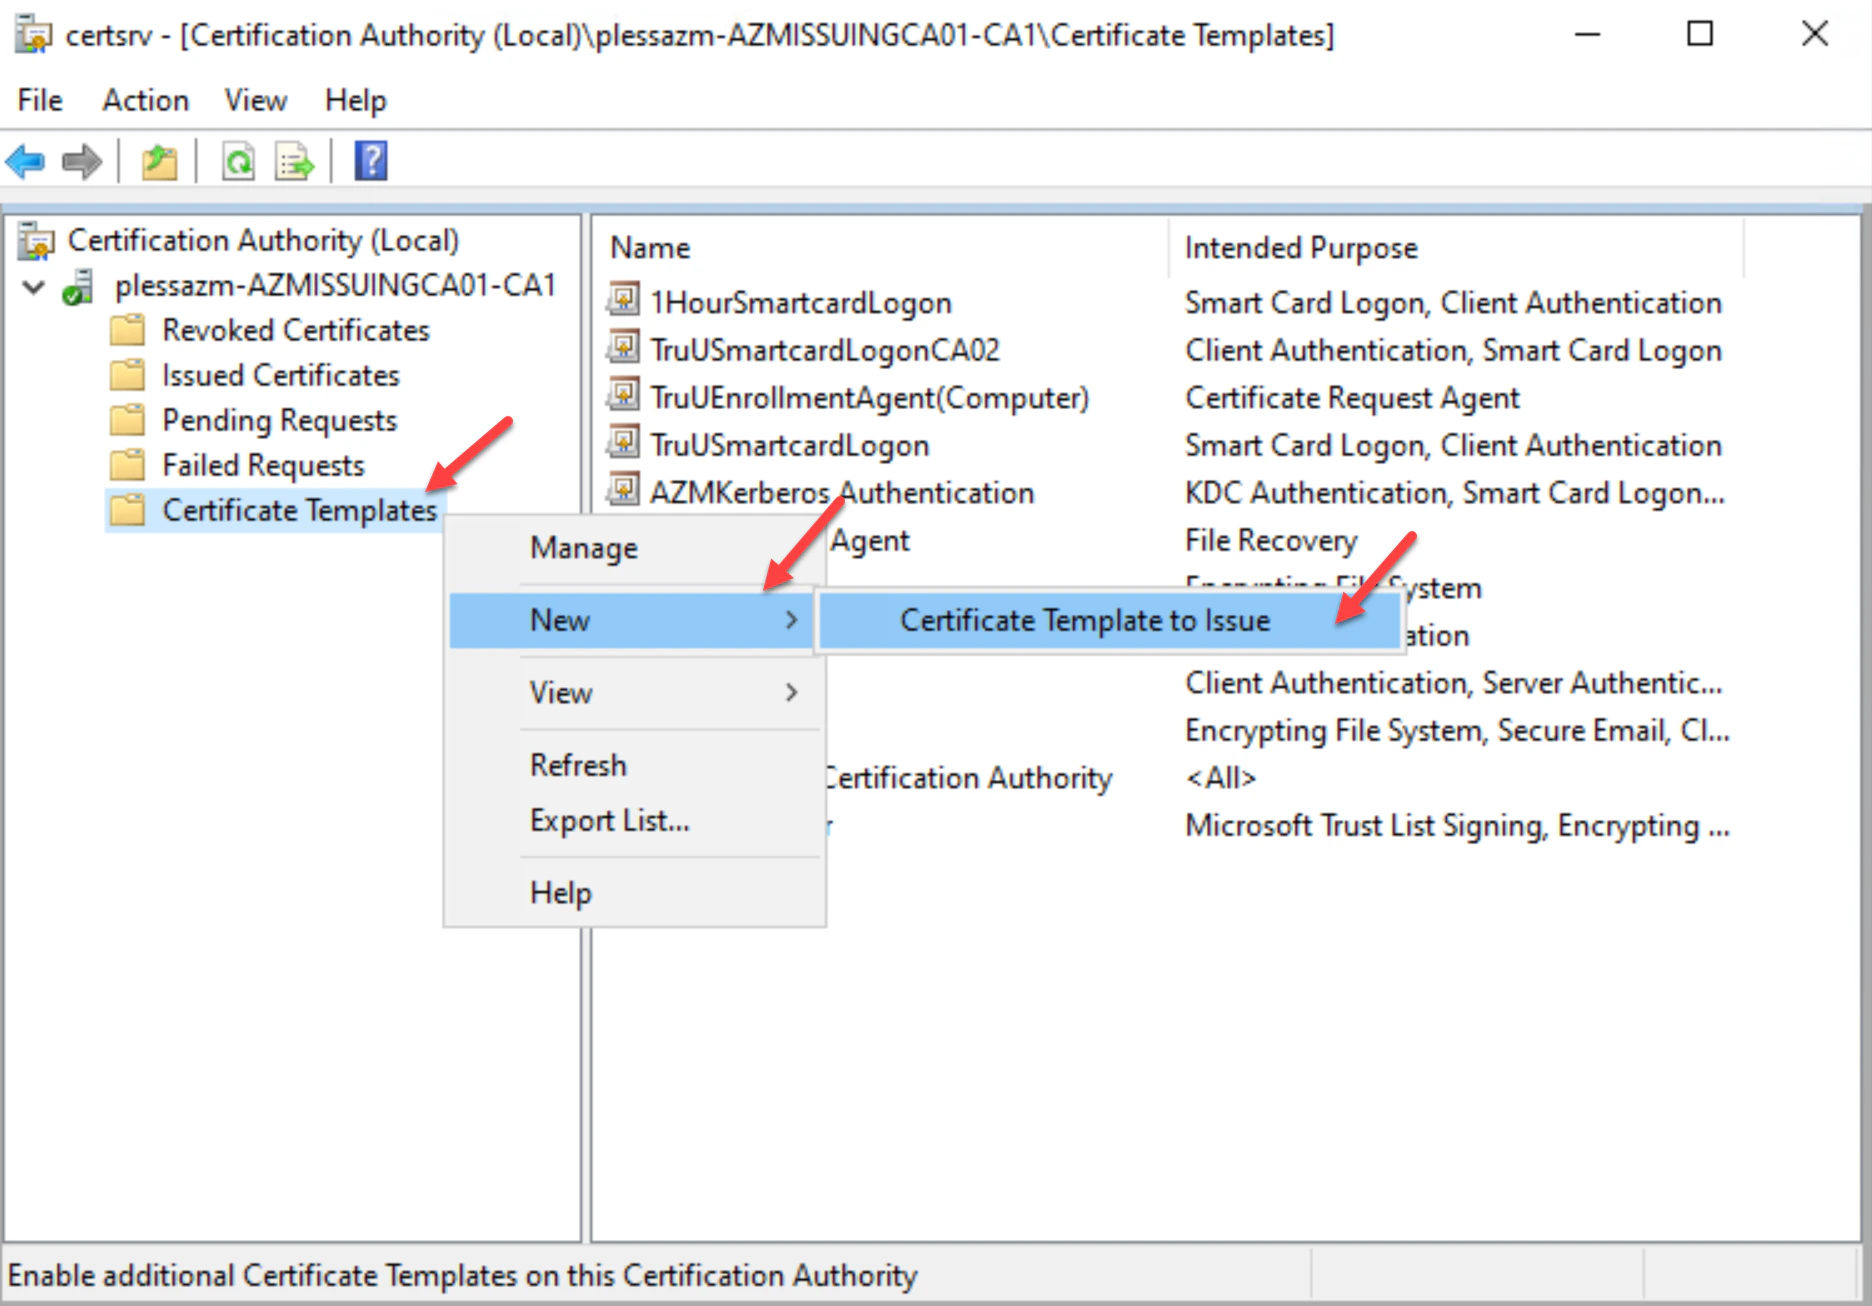
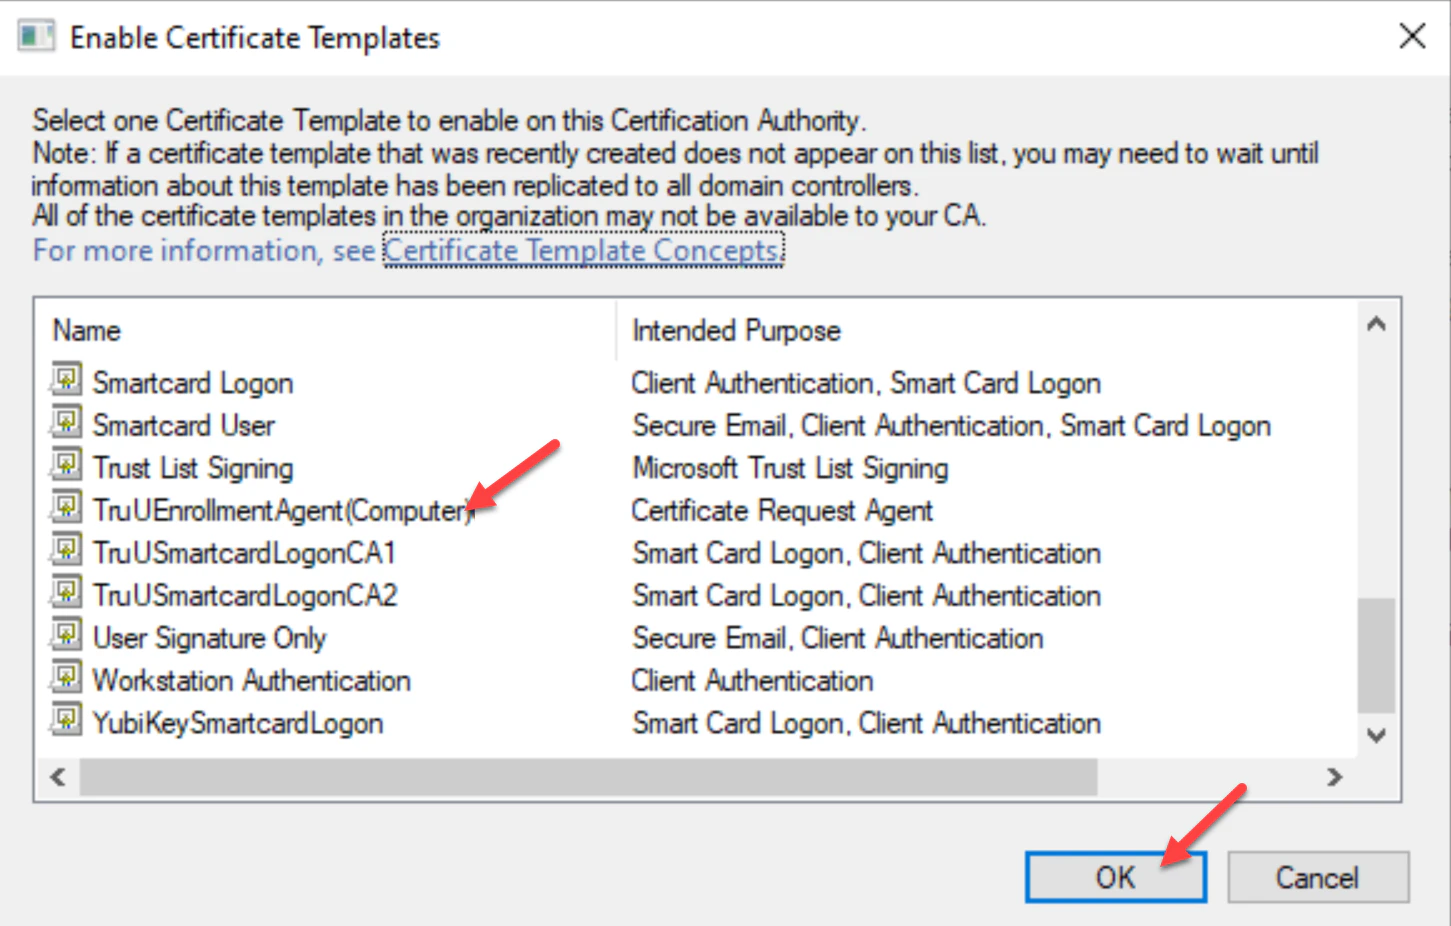
- Select the TruUEnrollmentAgent(Computer) template, then click OK.
- The new TruUEnrollmentAgent(Computer) template will appear in the list of Certificate Templates. Rightclick on the new Enrollment Agent template to verify its properties are set. Then, click OK to complete.
Creating a Smartcard Logon Template
- Log onto the certificate authority server, then launch the Microsoft Management Console (MMC) and click File then Add/Remove Snap-in.

- In the “Add or Remove Snap-ins” list, choose Certificate Templates, then click Add.
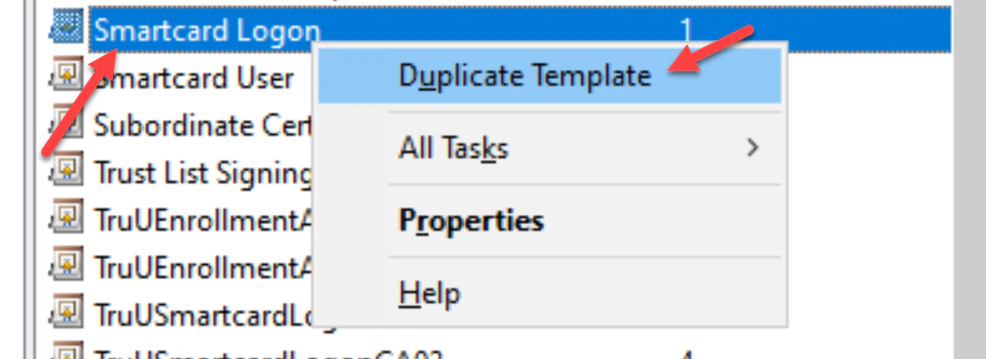
- Double-click on the Certificate Template under Selected snap-ins, then right click on the Smartcard Login template. Choose Duplicate Template.
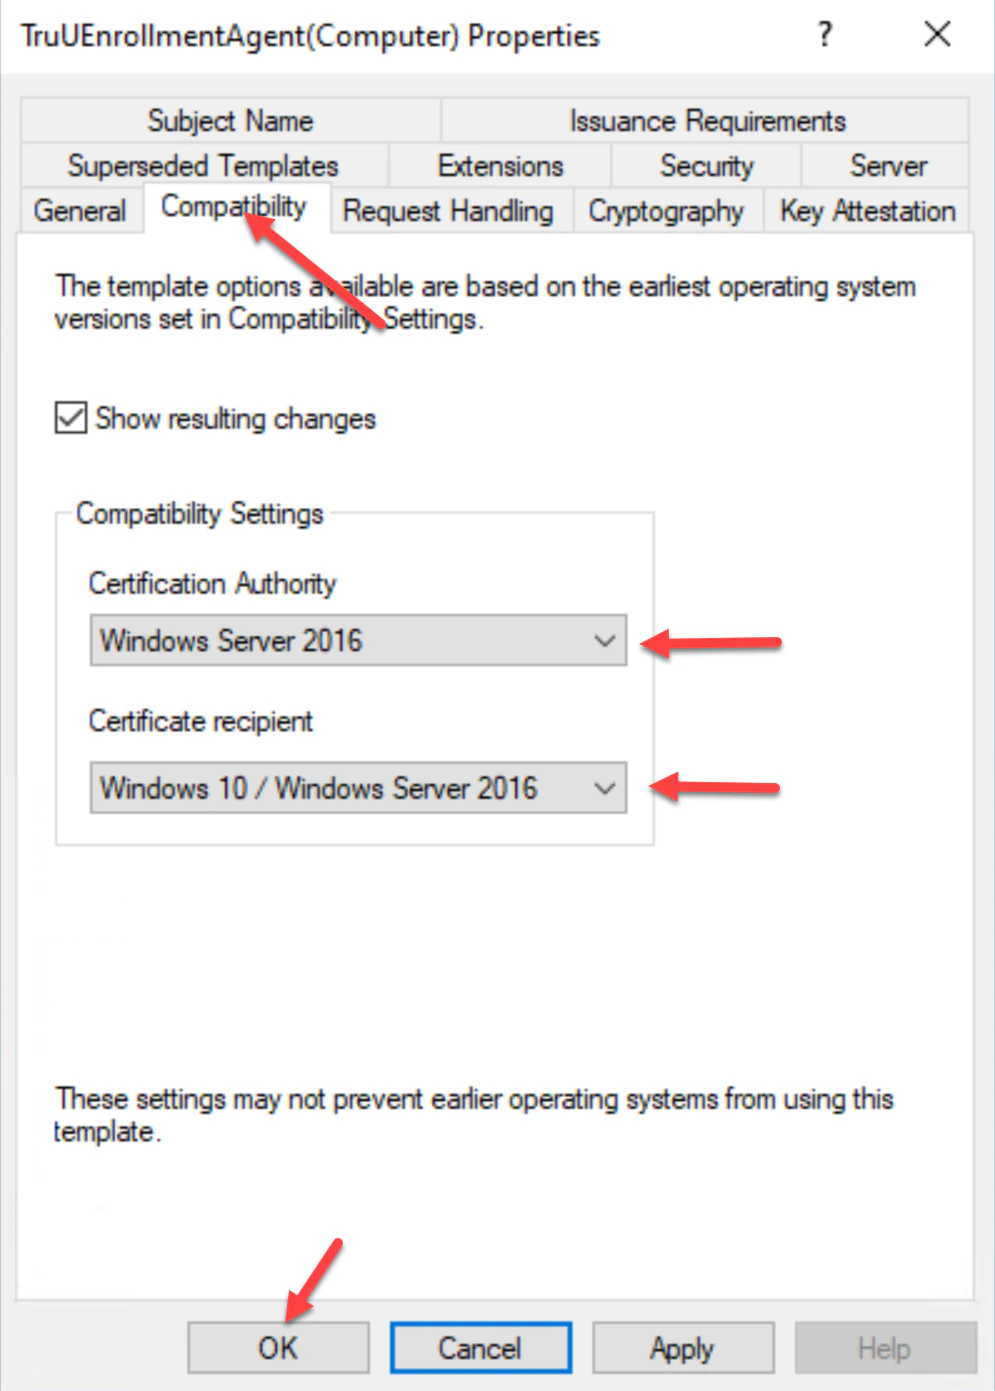
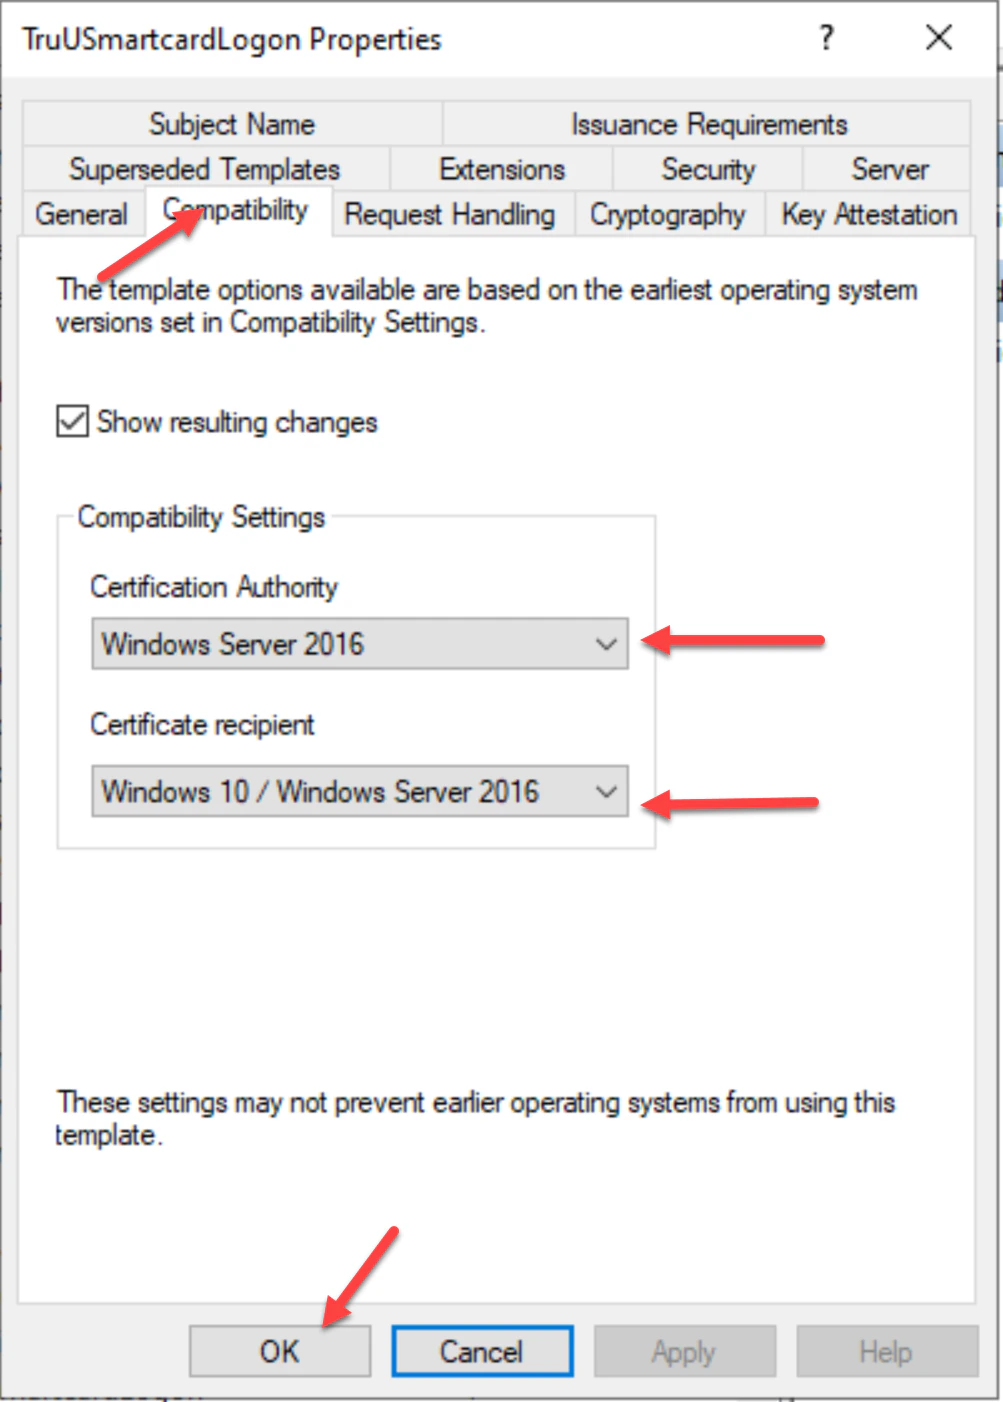
- Navigate to the Compatibility tab and check to make sure the operating system versions of the Certificate Authority and Certificate recipient are appropriately selected for your environment.
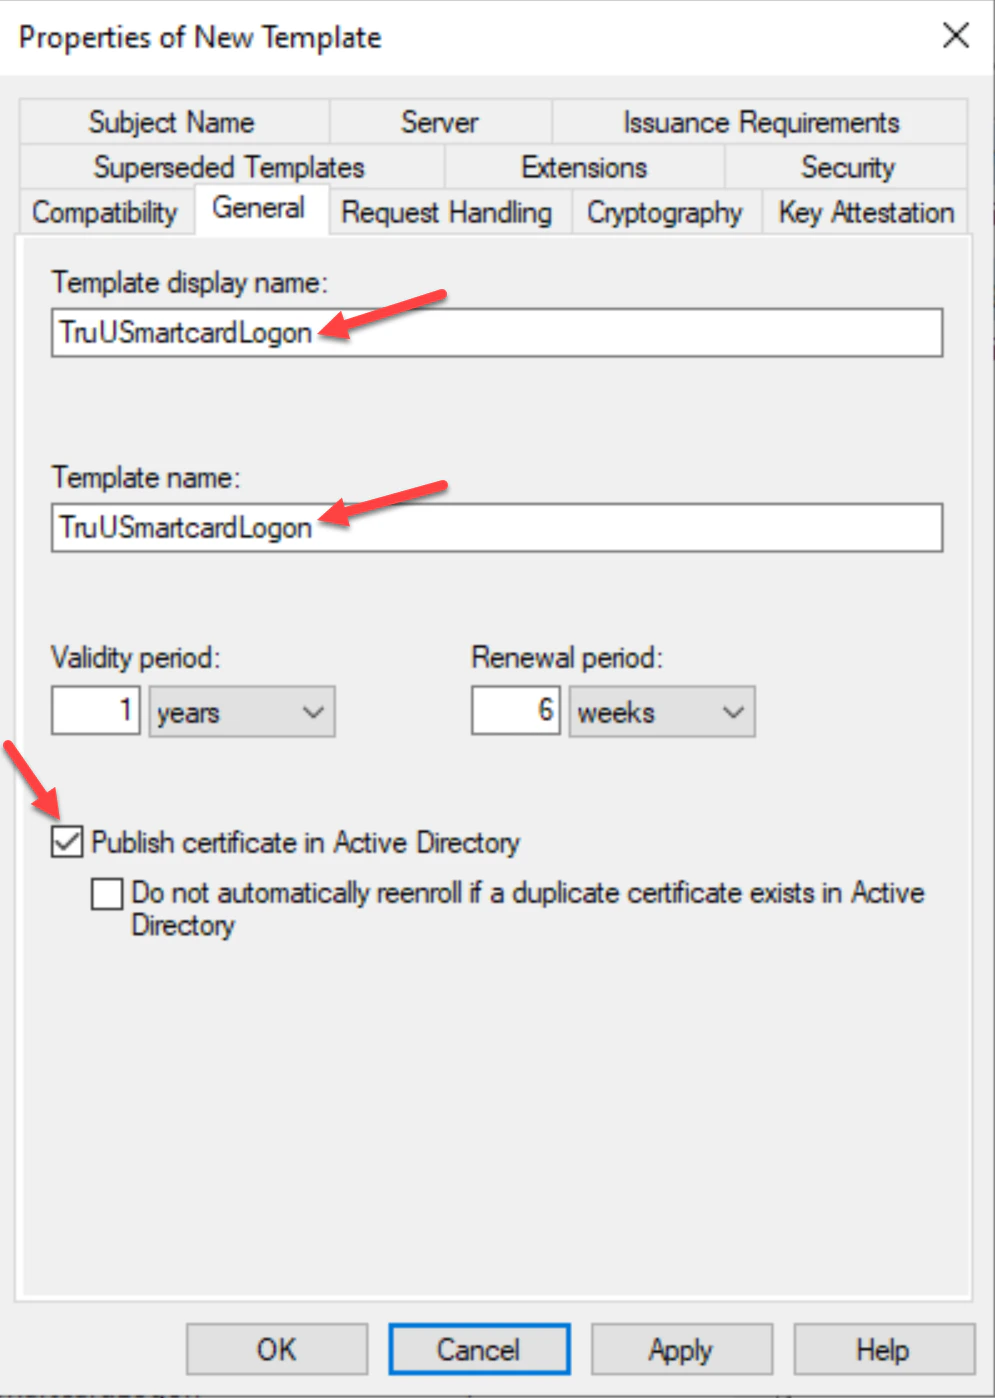
- In the General tab, create a Template Display Name for the template, then select Publish certificate in Active Directory. Additionally, specify the appropriate template validity and renewal period for your environment. I.E _TruUSmartCardLogon
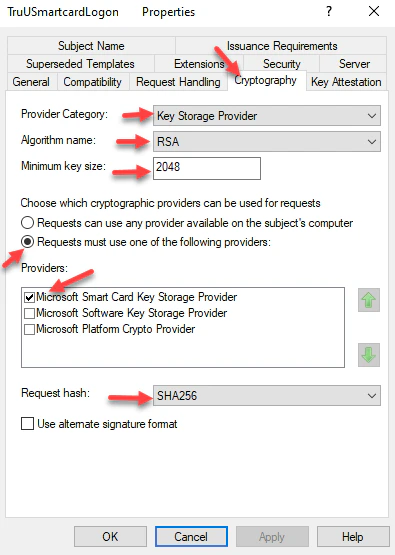
- Navigate to the Cryptography tab and set the following settings for Key Storage Provider (KSP) support:
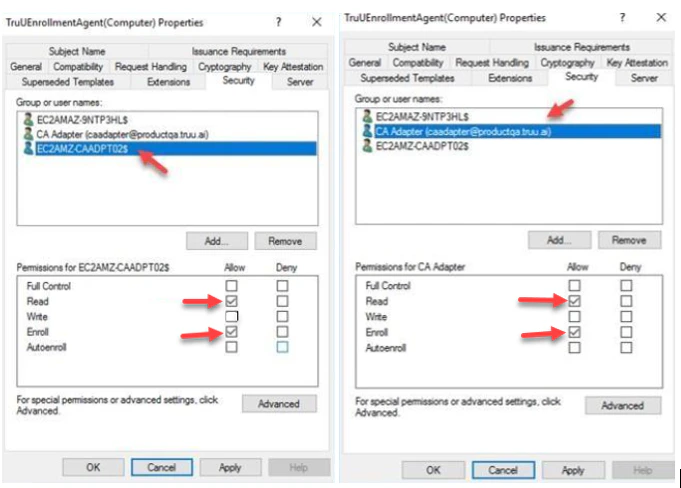
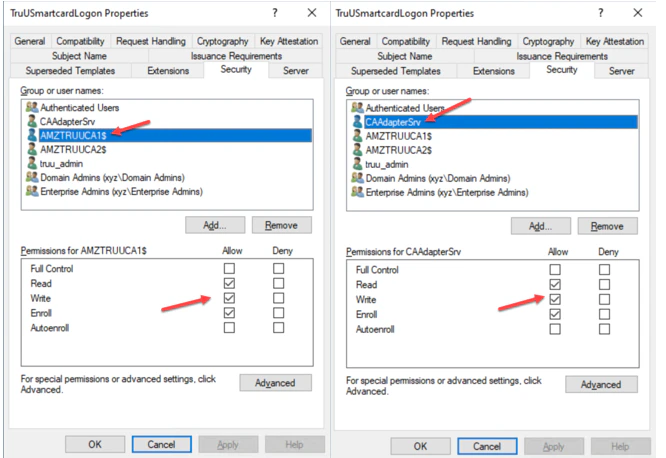
- Navigate to the Security tab, add the Server that the CA Adapter is Installed on with Read, Write and Enroll permissions. Then, select the TruU service account with Read, Write and Enroll permissions. Click Apply to complete setup in this tab. Then, click OK.
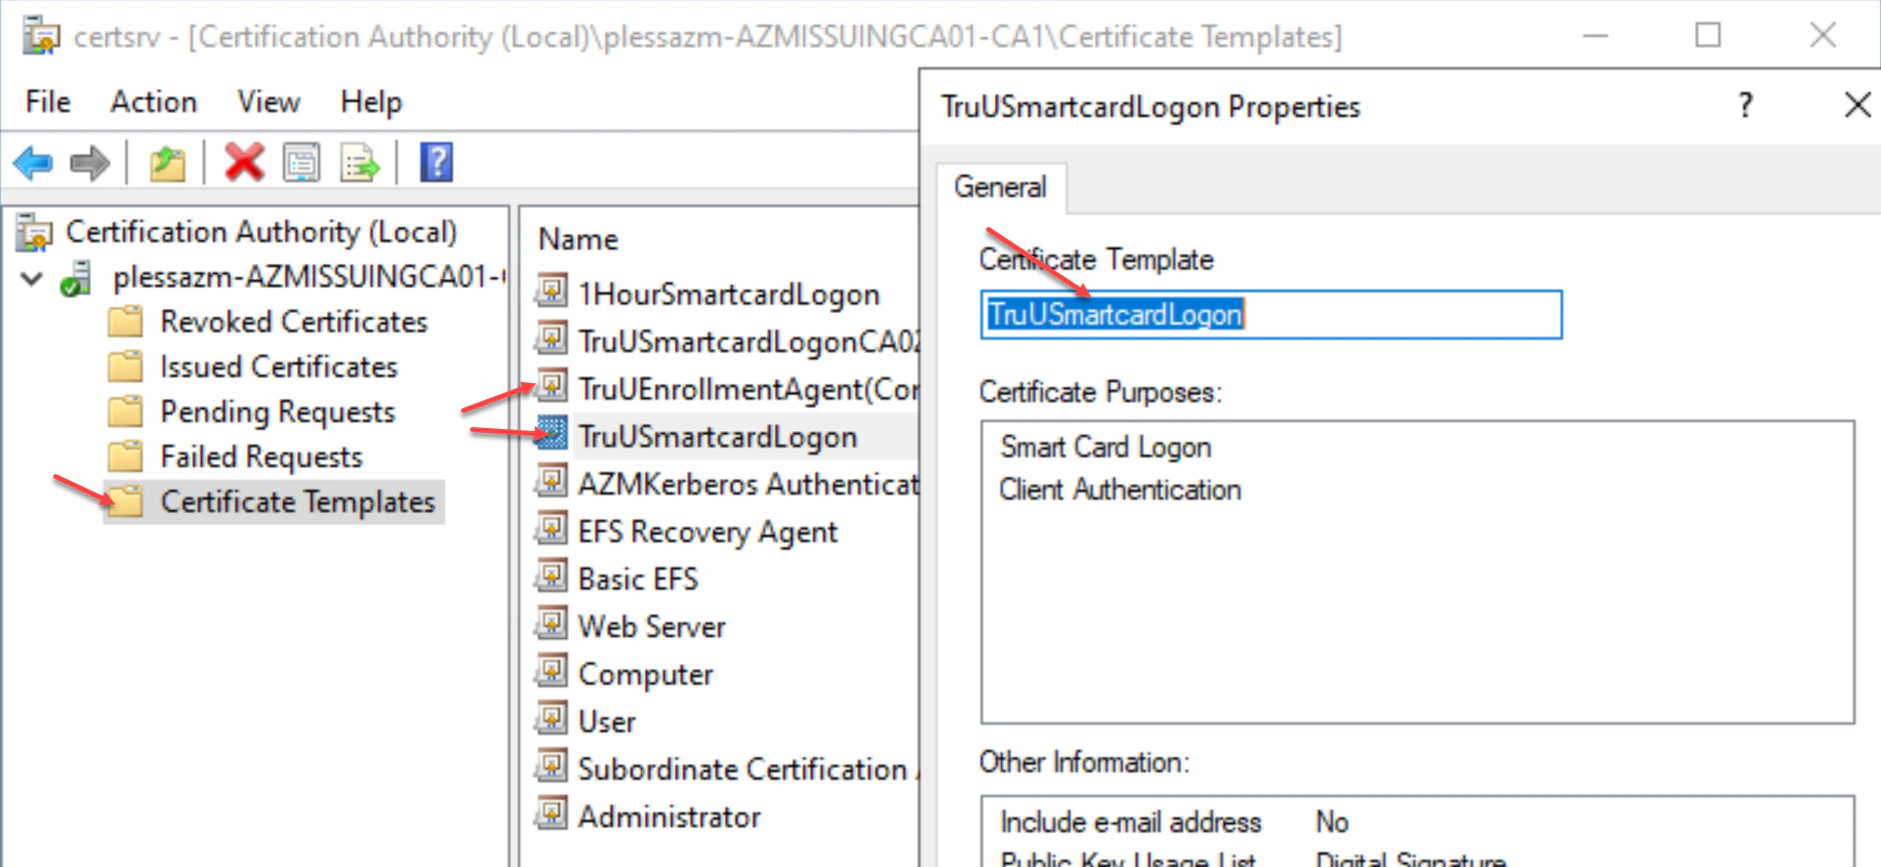
- Next, navigate to your Certificate Authority tab and click the Certificate Templates folder. Right-click on the folder and choose New then Certificate Template to Issue.

- Select the TruUSmartcardLogon template, then click OK.
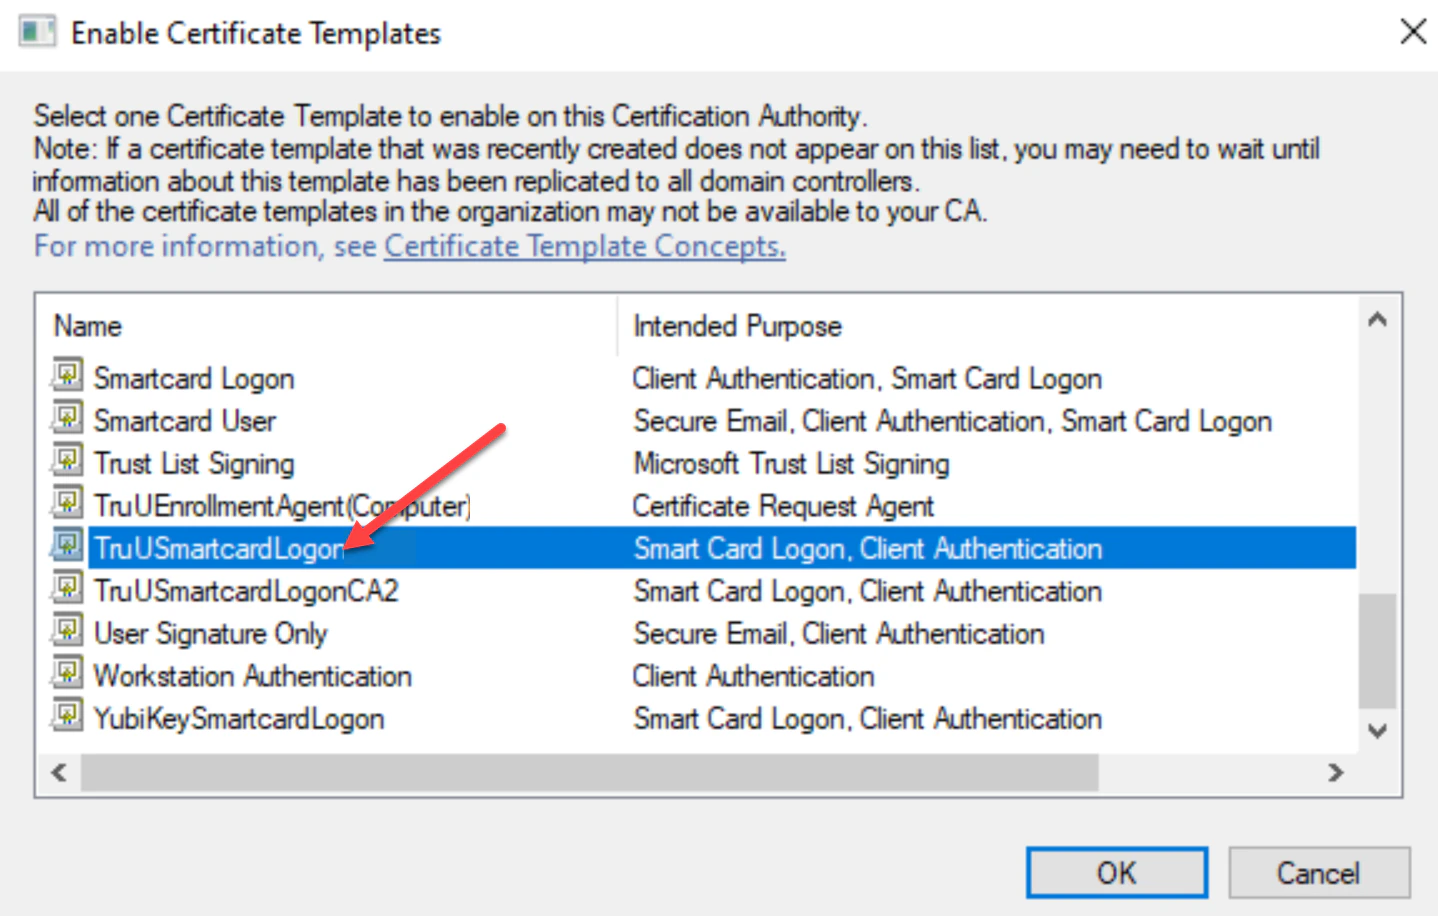
- Right-click on the new TruUSmartcardLogon template to verify its properties are set. Then, click OK.
Requesting Enrollment Agent Certificate
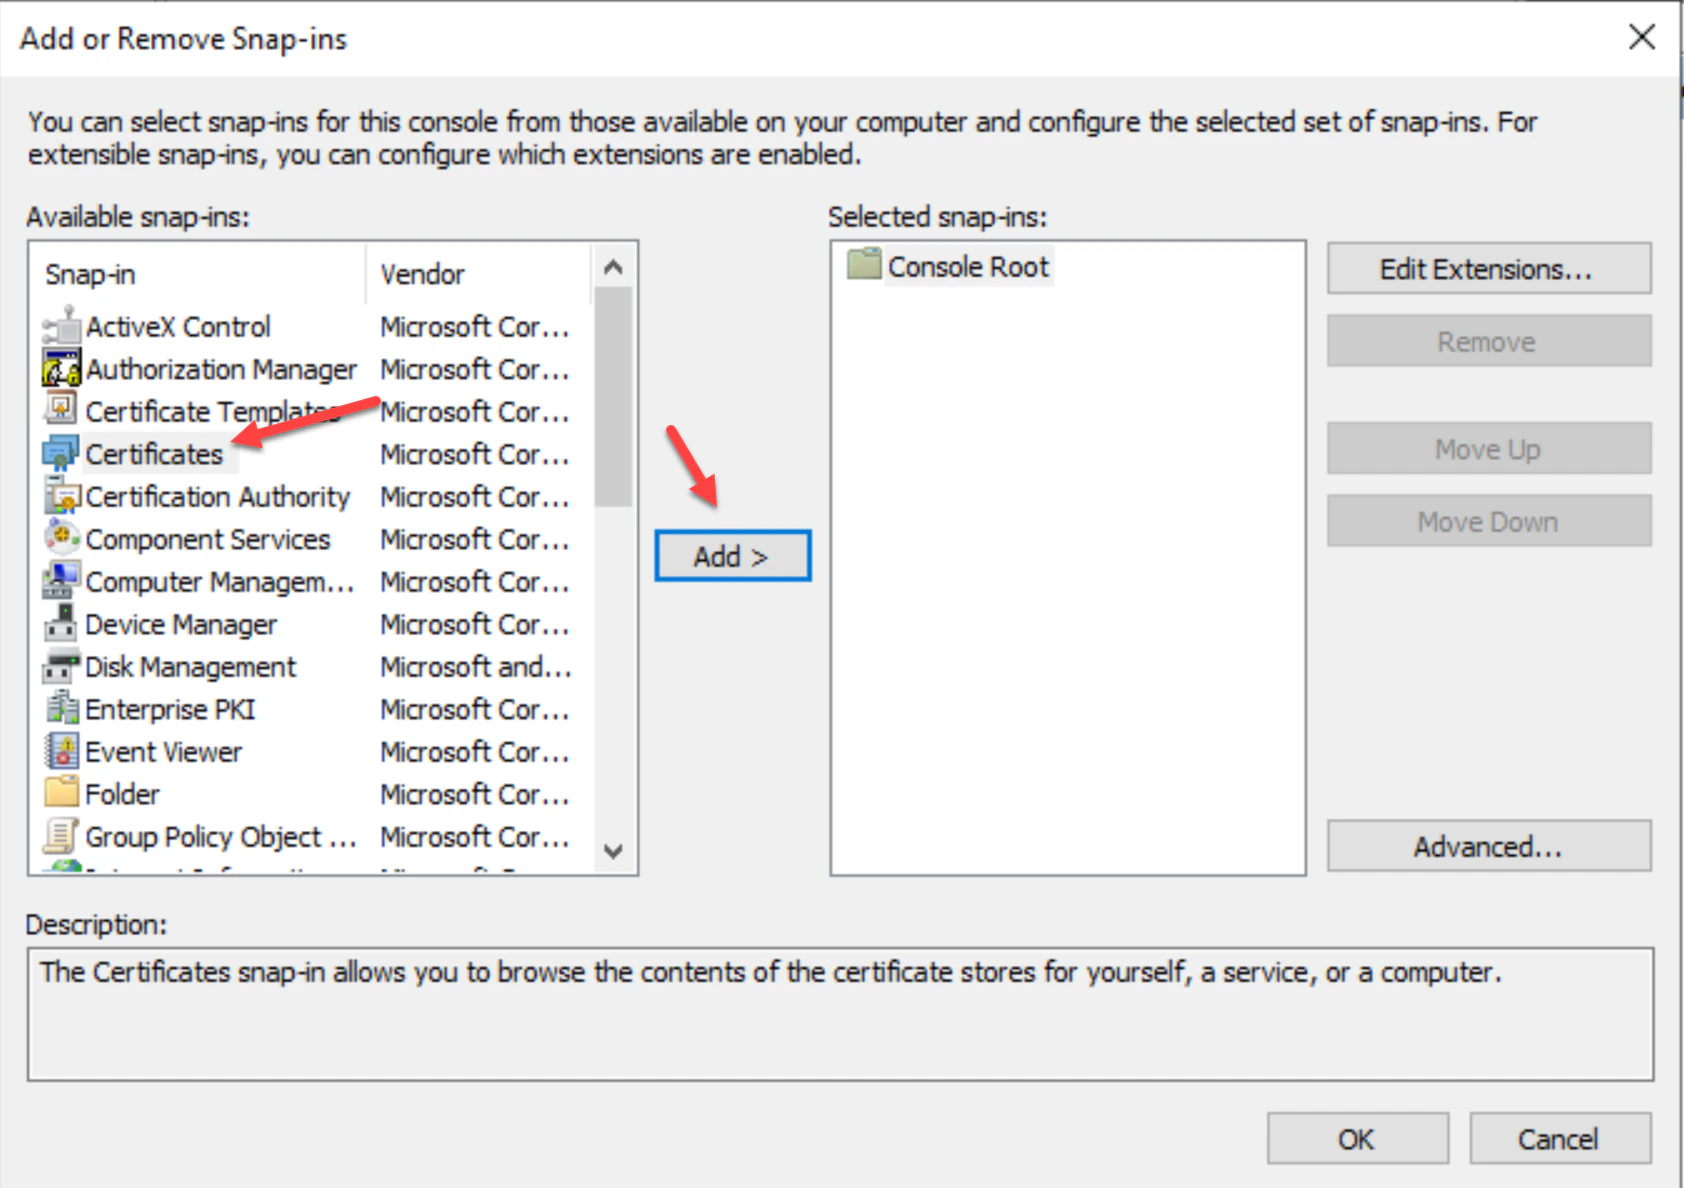
- Log onto the server you are deploying the TruU CA Adapter on, then launch the Microsoft Management Console (MMC) and click File, then Add/Remove Snap-in.

- In the “Add or Remove Snap-ins” list, choose Certificates, then click Add.
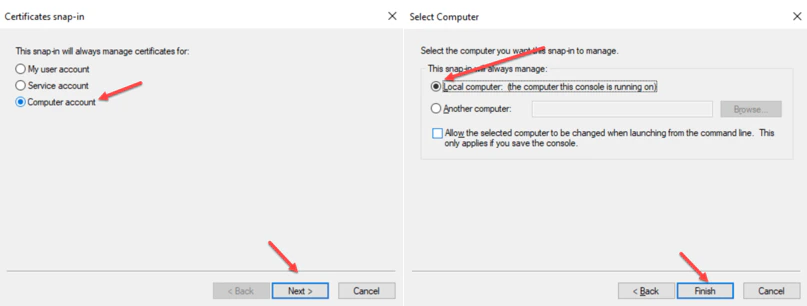
- Choose ‘Computer account’ for the snap-in to manage certificates for, then choose ‘Local computer’ for the computer you want the snap-in to manage. Click ‘Finish’ to complete.
- Next, right-click on the Personal folder, then navigate to All Tasks and then the Request New Certificate.
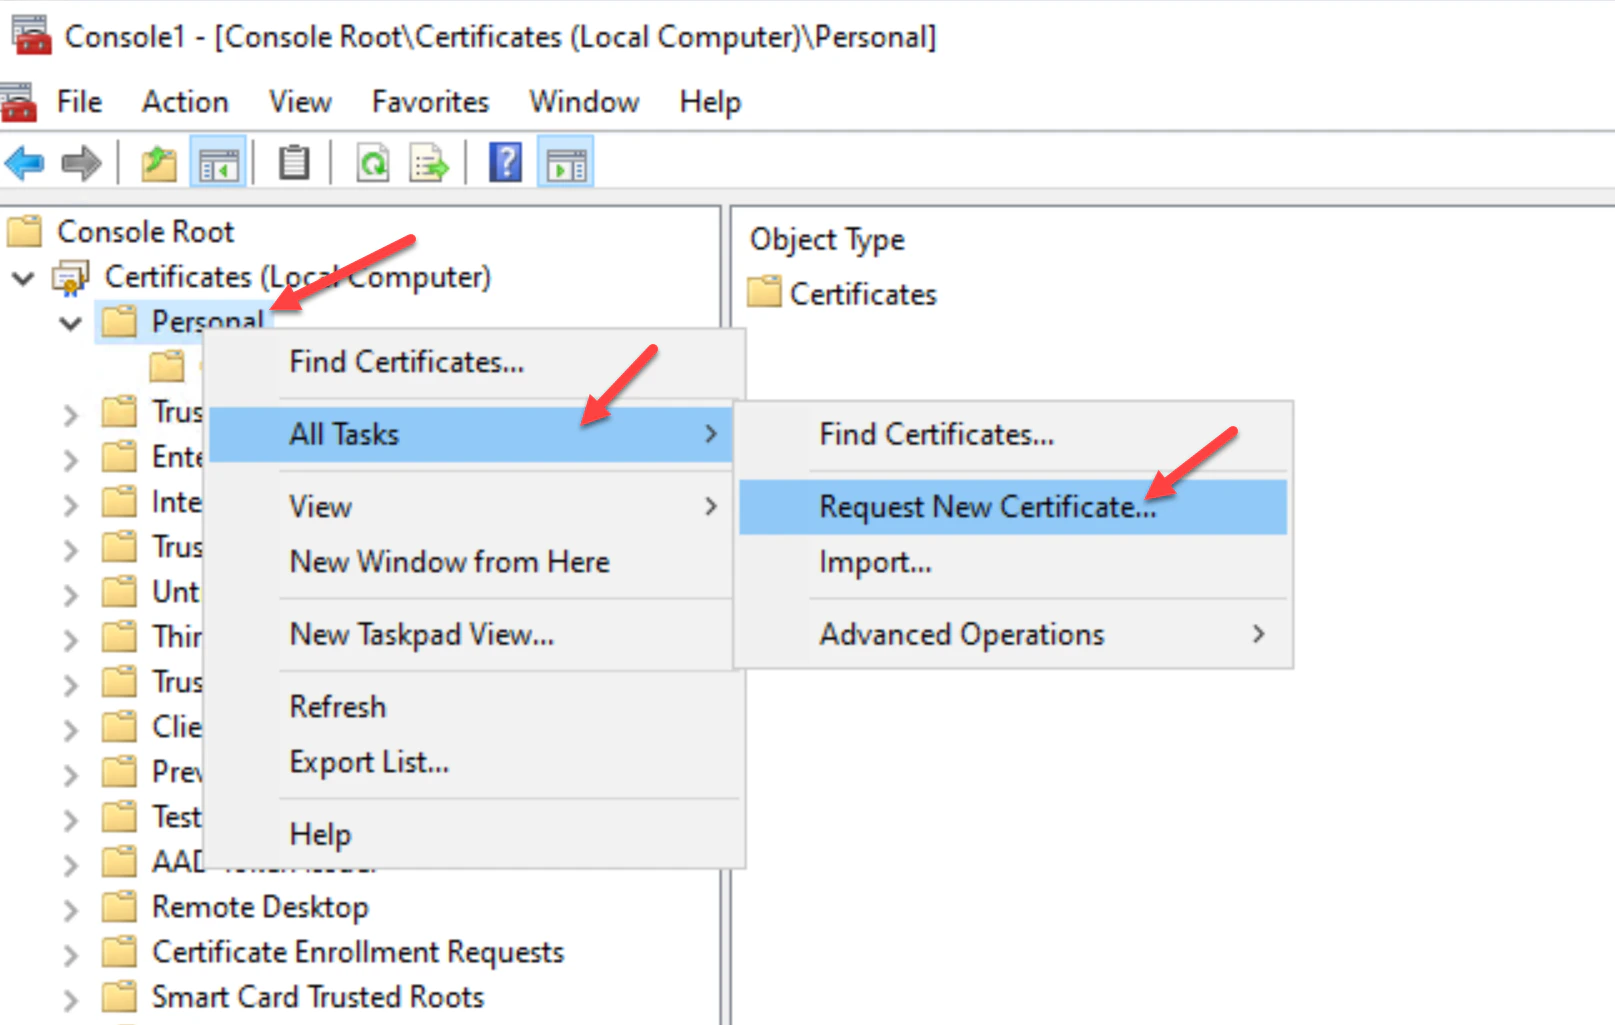
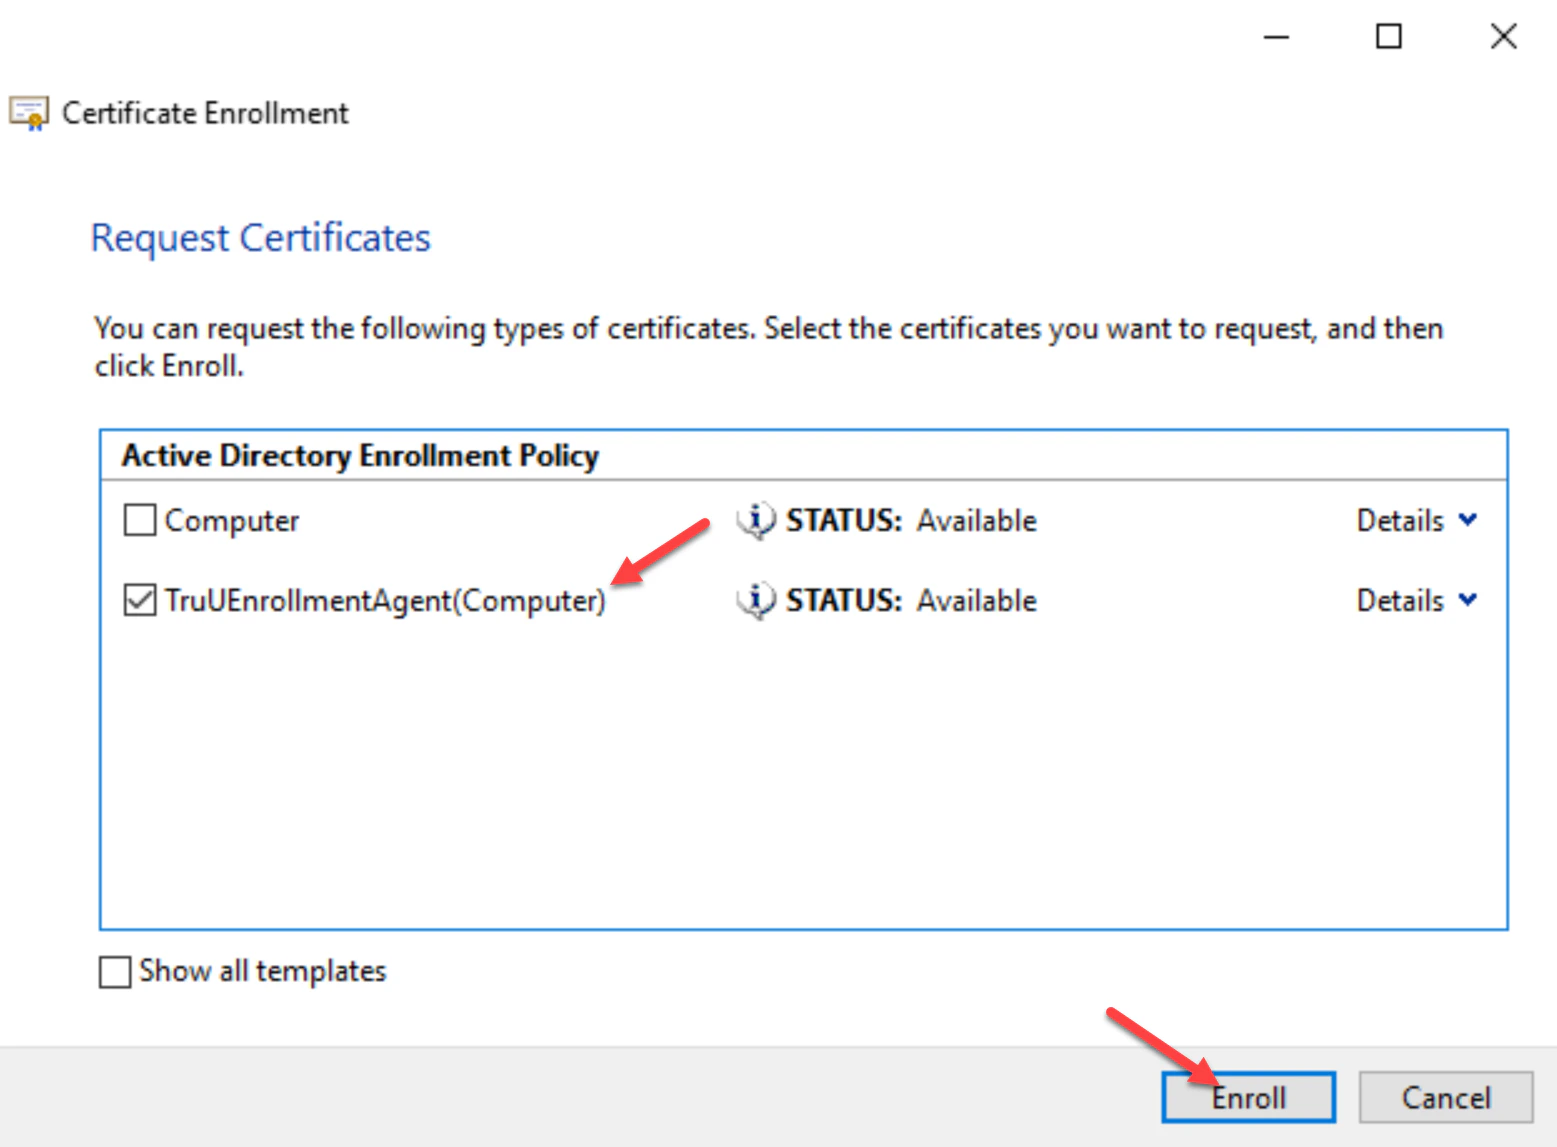
- Click Next, Next, and Select the TruUEnrollmentAgent(Computer) template you created, then click Enroll. This will install the Signer Certificate into the local personal store of the CA Adapter server. You can close all windows.
Granting the Service Account permissions to the Certificate Authority
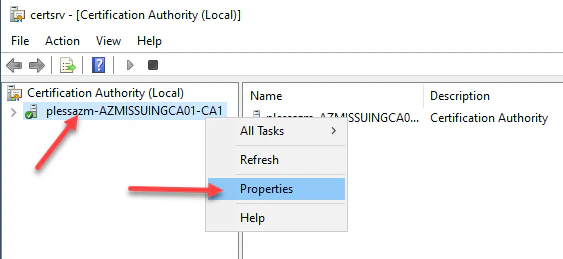
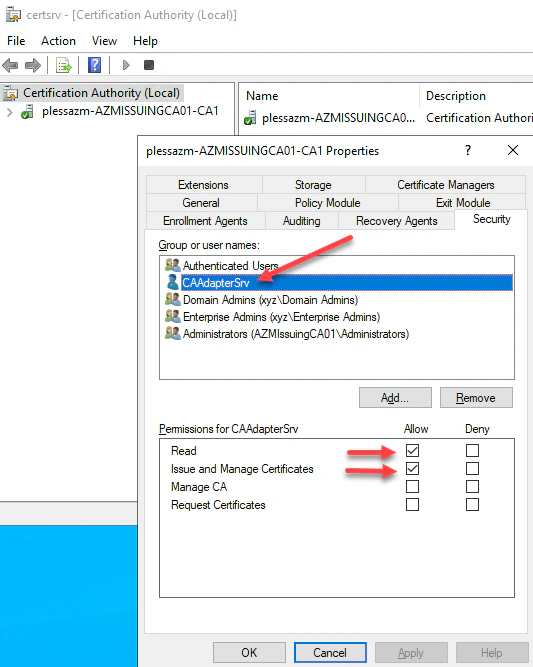
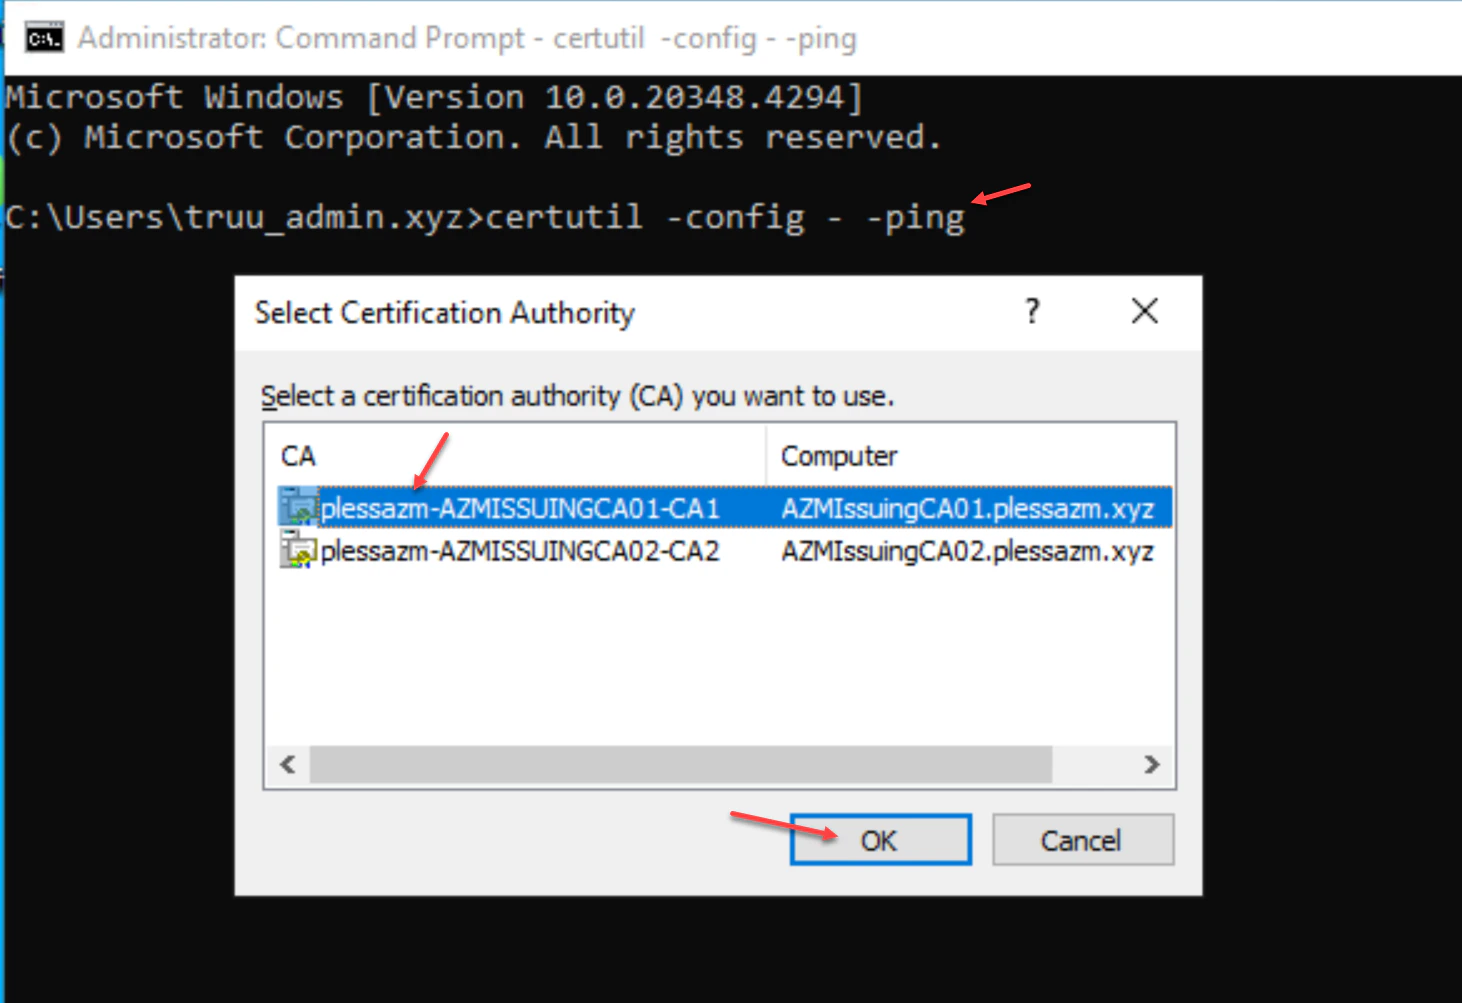
- Log into the Certificate Authority and right-click the CA and select Propertiesthen navigate to the Security menu. Add the same service account created above. Then select Read and Issue and Manage Certificates permissions, then click Apply and OK. This will delegate permissions to the services account to Read and Issue and Manage Certificates on behalf of users.
Creating a TruU CA Adapter in TruU Console
- Log into your TruU Admin Console and navigate to the Integrations tab.
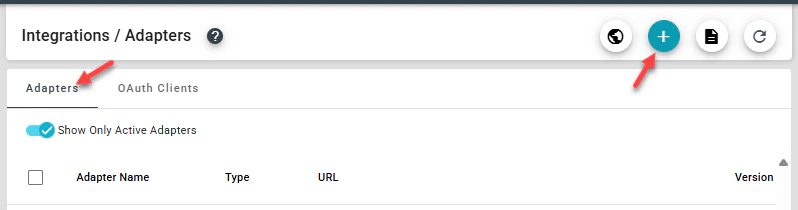
- Next, navigate to the Adapters tab, then click (+) to create a new TruU adapter.
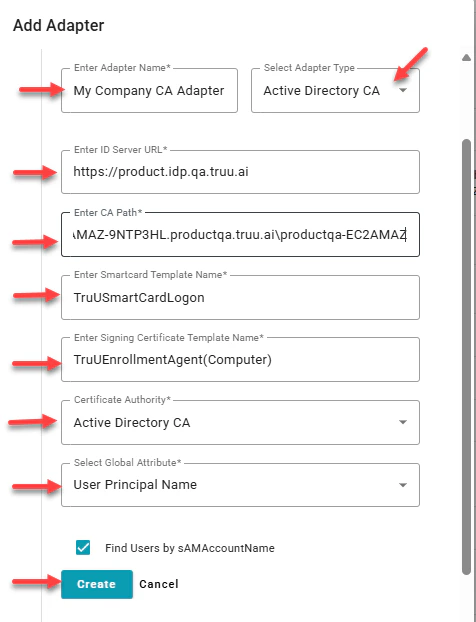
- Select Active Directory CA adapter type, then provide a name for the adapter. Add the Identity Server URL, CA Path, Smartcard Template Name, Signing Certificate Template Name and the Global Attribute Name, then click Create to add the adapter
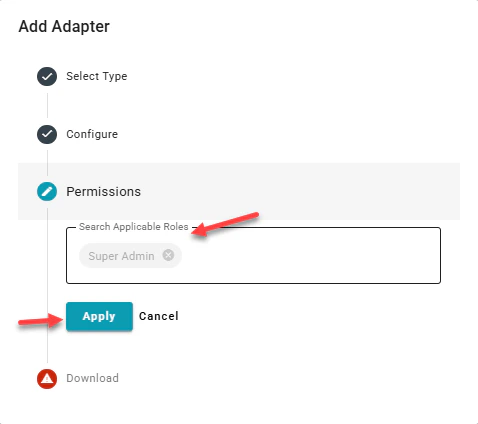
- This next field allows you to confirm type of admin you’d like on the adapter, you may add Super or **Digital **admin here, then click Apply. Adding both just gives the permissions to that group.
- To download the TruU CA Adapter files, check the Download Adapter Files and By downloading this software you accept the terms of the EULA buttons. Click Download and Finish to download the installation files to your system.

Installing the TruU CA Adapter on designated server
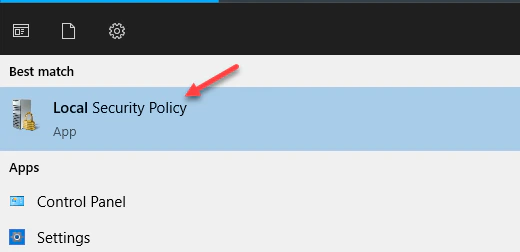
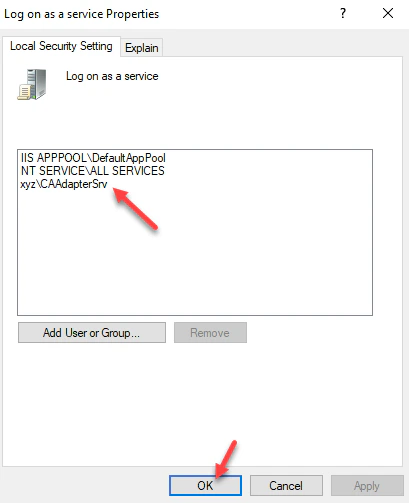
**Prerequisite: **In order for the service account to be able to run the TruU Adapter Service post installation, you must add the service account to the Log on as a service.- From the start menu on the server launch Local Security Policy.
- Expand User Rights Assignment and look for and double-click Log on as a service.
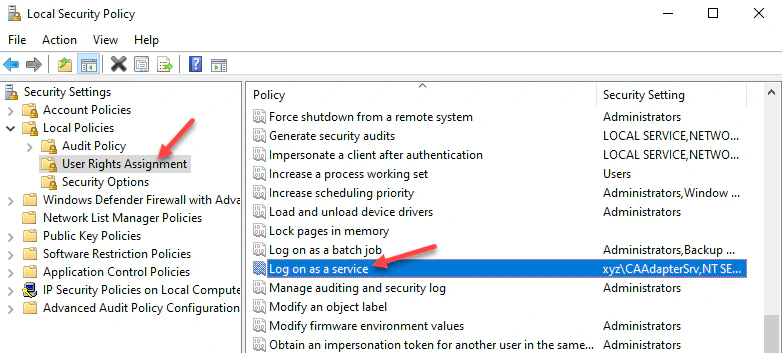
- Add the service account to this group and save and close the Local Security Policy dialog box.
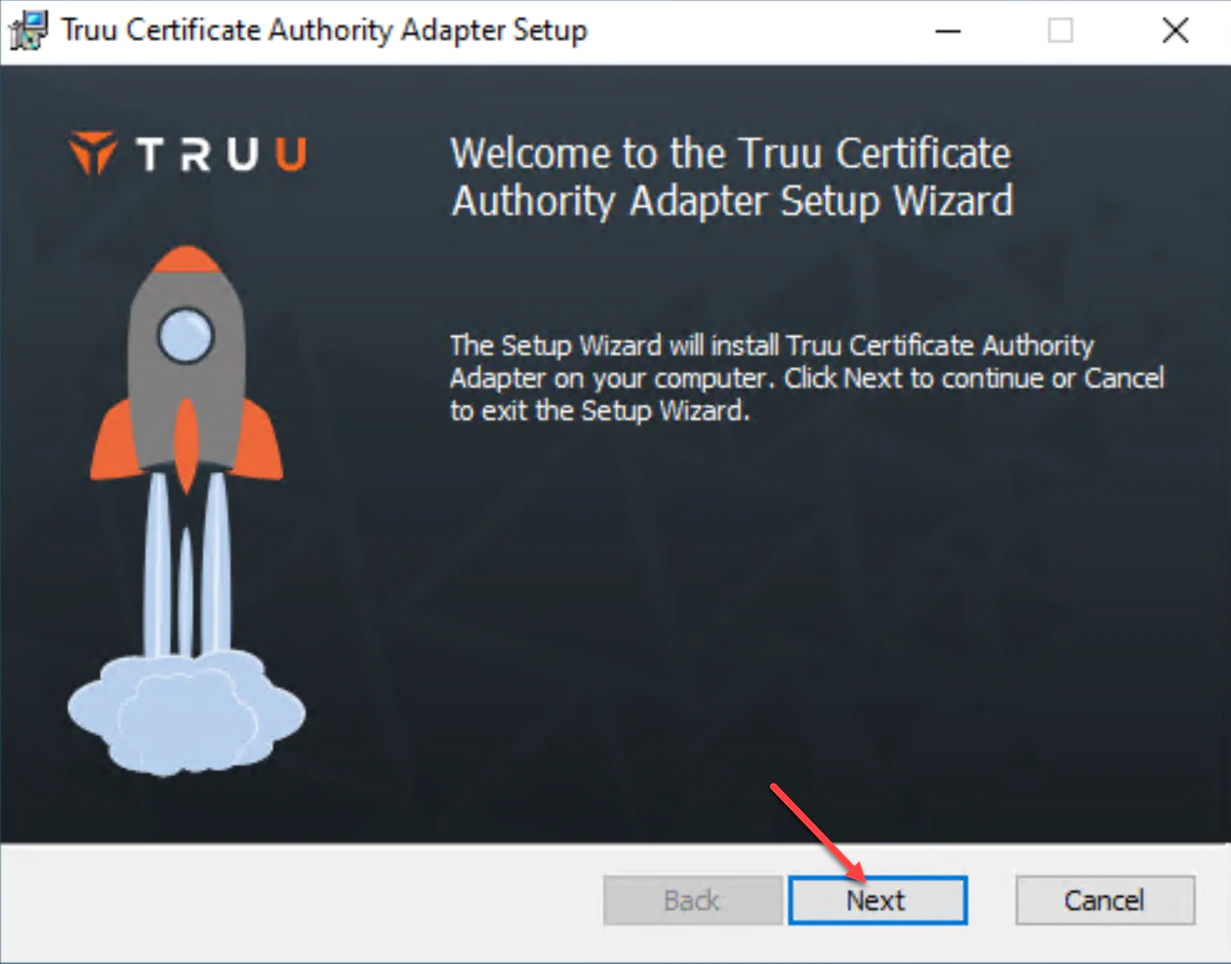
- Find the installer and config file download onto your system from previous step. Copy this package of files to your Windows server and launch to install. Then, click Next.
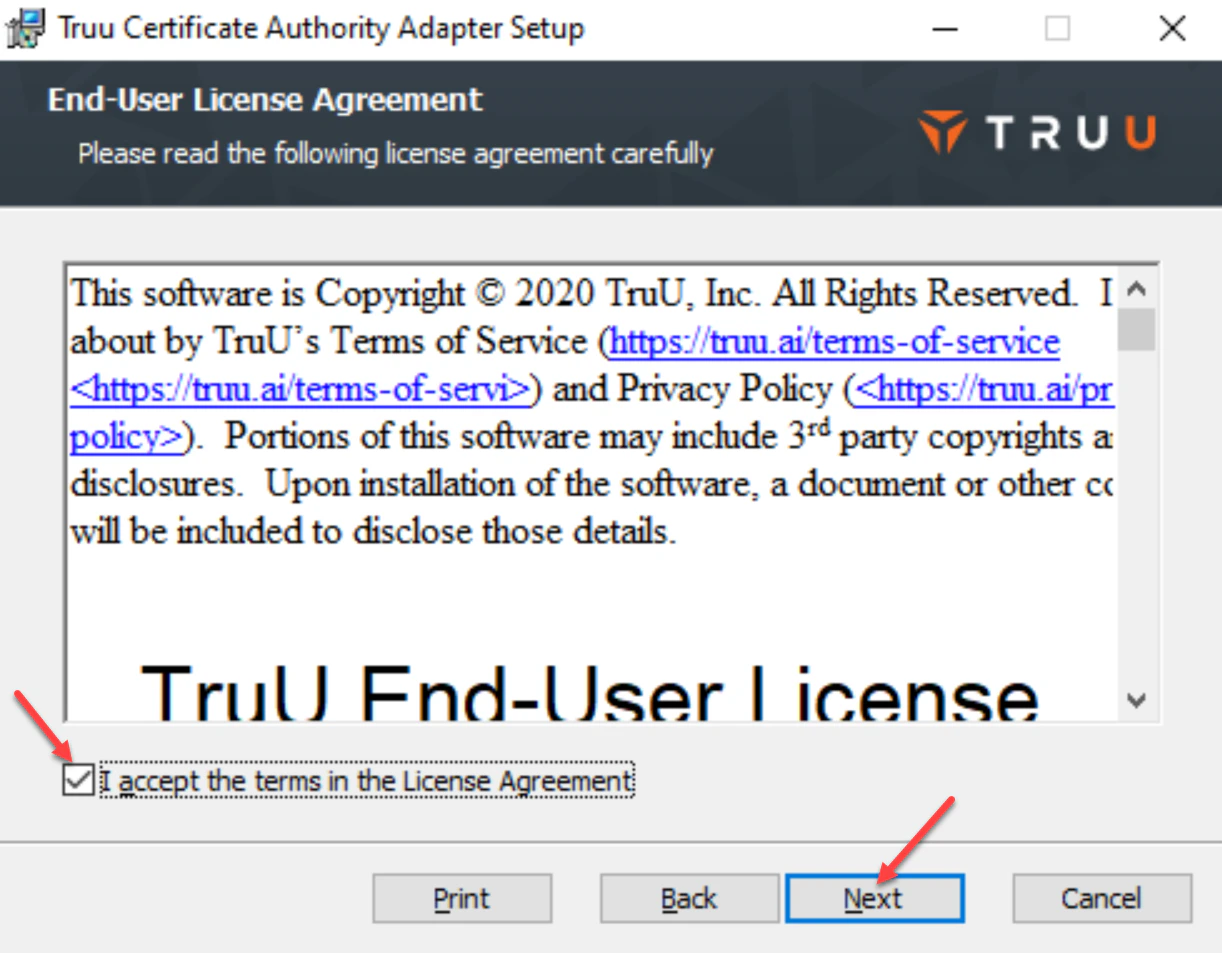
- Review and accept the License Agreement, then click Next to continue.
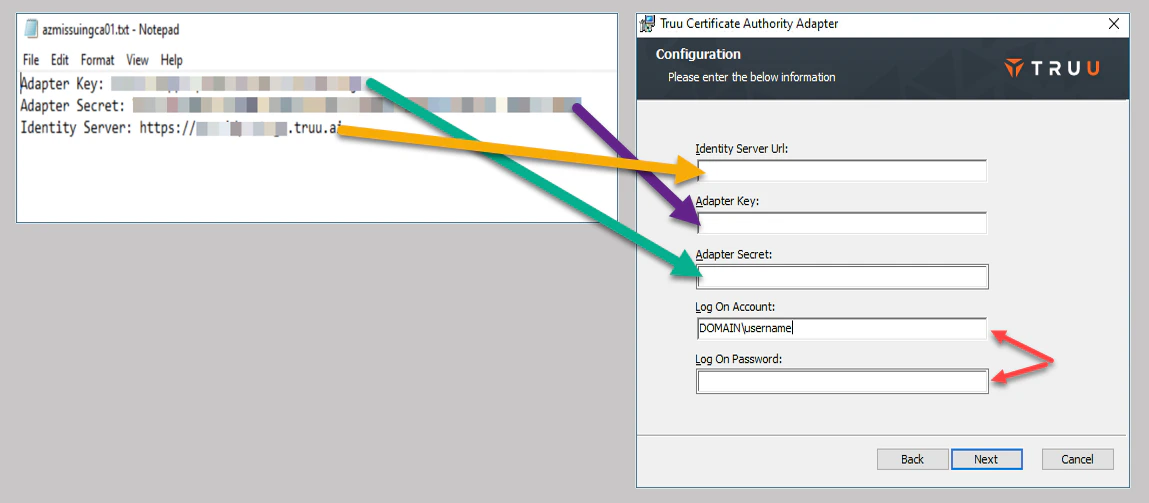
- On the next screen add the Identity Server URL (Identity Server load-balancer URL), Adapter Key and Adapter Secret that was downloaded with your CA Adapter installer. For Log On Account and Log On Password, enter the service account username and password as shown in the image. **Once entered, click Next to continue.
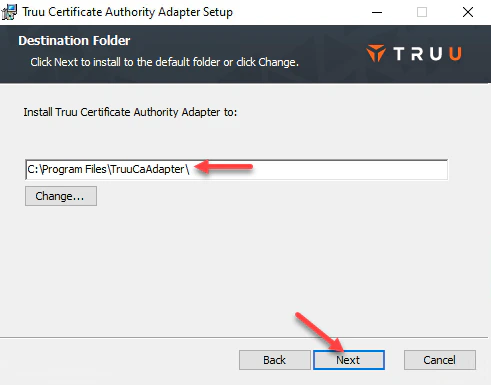
- Confirm the CA Adapter’s installation path, then click Next to continue.
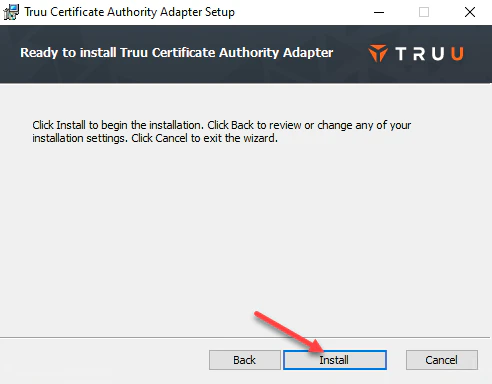
- Click Install to initiate the installation.
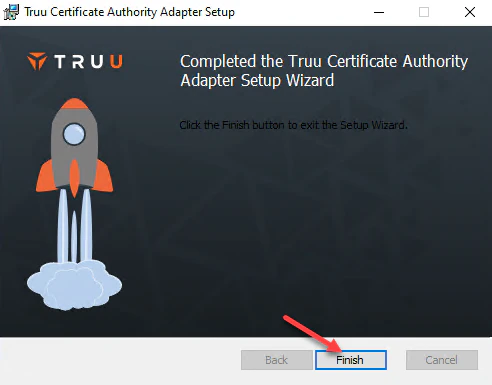
- Click Finish once to complete installation and close installer window.
- Next, log into your TruU Admin Console and on the right navigation pane, click on Integrations and over to the right look for and click on Healthy.
- Next, click on Adapters and verify the status of the adapter you created above. The adapter version should be displayed and its operational status should be true. This signifies the service account on the server has successfully connected the adapter and all is running properly.
- You are now ready to proceed with testing your adapter by enrolling a user on a device. Once TruU enrollment is successful, you will be able to logon to a device using TruU and a certificate from this adapter will show in the users personal cert store on the device.
Prerequisites TruU Cloud Trust