

- Select the language, locale, and keyboard.
- Make a network connection.
- Prerequisite
- Step 1: Create a dynamic device group with the Group tag for Self-deployment devices
- Step 2: Create Self-Deployment mode Autopilot Profile
- Step 3: Register devices as Autopilot devices
- Step 4: Package and Deploy TruU Windows Authenticator in Intune
- Step 5: Configure and assign Autopilot Enrollment Status Page (ESP)
- Step 6: Enable the Security Keys (FIDO2) sign-in
Prerequisite
- Windows 10/11 device with Trusted Platform Module (TPM) 2.0
- Intune Administrator account to configure the setup.
- Microsoft Intune and Entra ID P1 license
- MDM user scope should be set.
Step 1: Create a dynamic device group with the Group tag for Self-deployment devices
- Sign in to the Microsoft Intune admin center > Groups > New Group.

- Select Security for Group type, give a name. (eg. Self-deployment devices)
- For Membership type, choose Dynamic Device.
- Select Add dynamic query.
- Save the created group.
Step 2: Create Self-Deployment mode Autopilot Profile
You can refer to the Microsoft article and create the self-deployment Autopilot profile as per your organization requirement. Self-deploying Autopliot profile#Create and assign self-deploying-autopilot profile Note: Assign the created Self-Deployment Autopilot Profile to the dynamic device group which was created in the previous step.Step 3: Register devices as Autopilot devices
- Collect the HardwareID/hash from the devices which needs to be enrolled in self-deployment mode by referring the /autopilot/add-devices#collect-the-hardware-hash
- Sign into the Microsoft Intune admin center.
- In the Home screen, select Devices in the left hand pane.
- In the Devices | Overview screen, under By platform, select Windows.
- In the Windows | Windows devices screen, under Device onboarding, select Enrollment.
- In the Windows | Windows enrollment screen, under Windows Autopilot, select Devices.
- In the Windows Autopilot devices screen that opens, select Import.
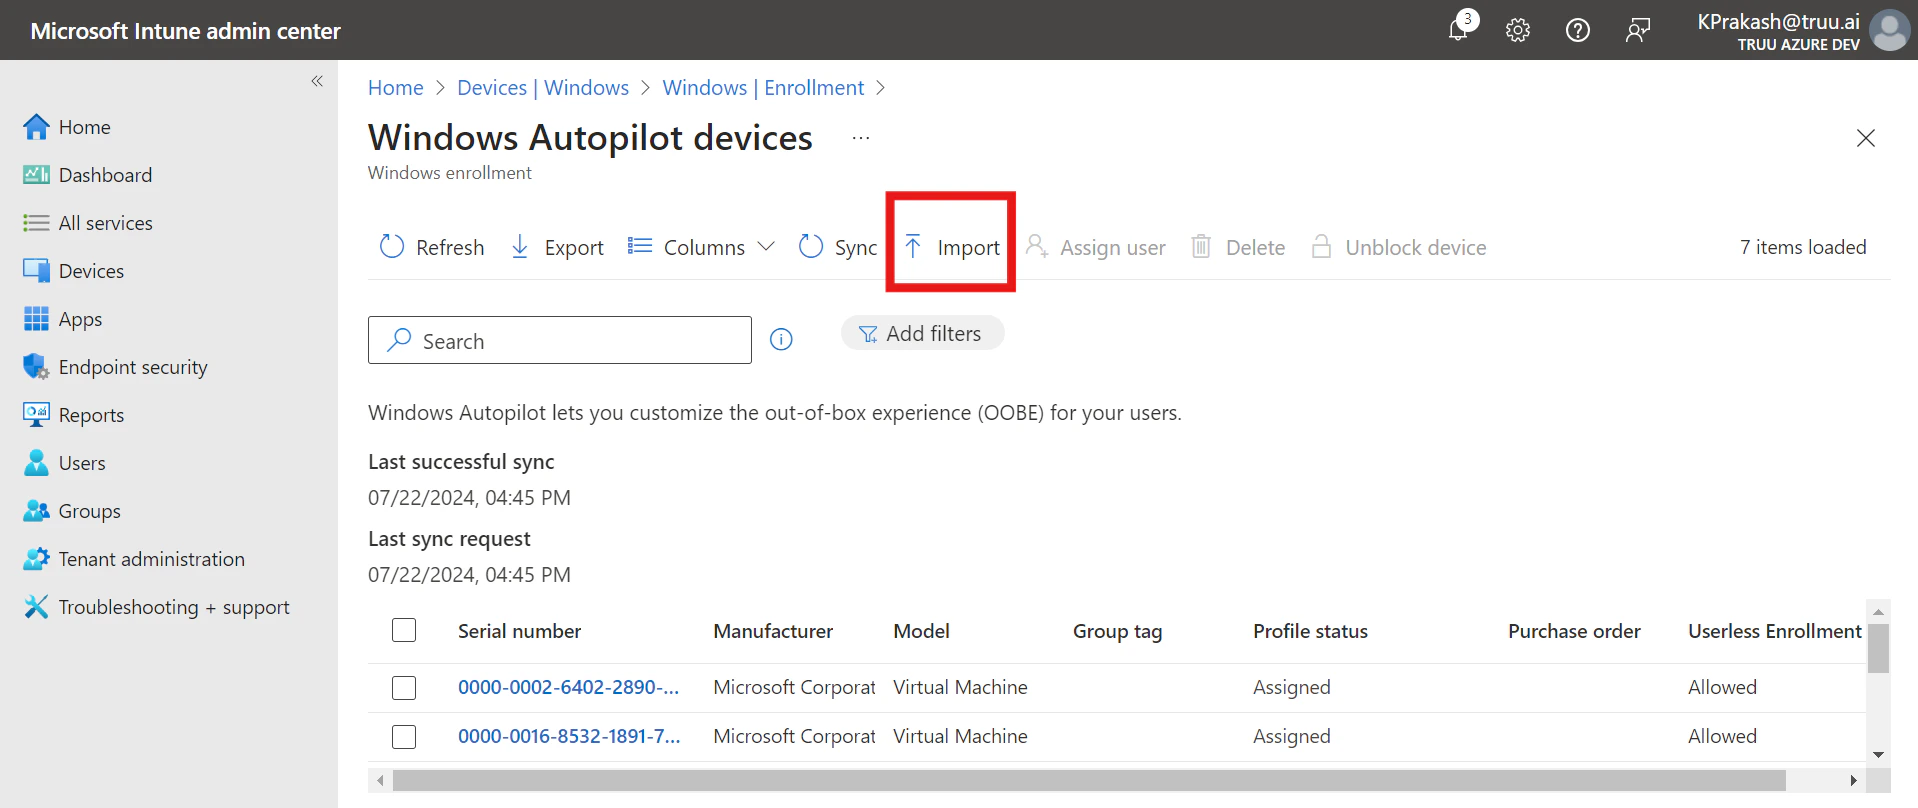
- Import the .csv(hardware hash) file of the all devices which needs to be enrolled.
- After the import is complete, select Sync. (A message displays saying that the sync is in progress. The sync process might take a few minutes to complete, depending on how many devices are being synchronized.)
- Click on the newly added devices and add the Group tag as ‘SelfDeployment’
- Once the GroupTag has been assigned, wait for the Profile status to change from Unassigned to Assigned state.
Step 4: Package and Deploy TruU Windows Authenticator in Intune
Complete this step by following the instructions in the link Package and Deploy TruU Windows authenticator in IntuneStep 5: Configure and assign Autopilot Enrollment Status Page (ESP)
- Sign into the Microsoft Intune admin center.
- In the Home screen, select Devices in the left hand pane.
- In the Devices | Overview screen, under By platform, select Windows.
- In the Windows | Windows devices screen, under Device onboarding, select Enrollment.
- In the Windows | Windows enrollment screen, under Windows Autopilot, select Enrollment Status Page.
- In the Enrollment Status Page screen that opens, select Create.
- The Create profile screen opens. In the Basics page:
- Next to Name, enter a name for the ESP profile. Eg; Self-deployment ESP
- Next to Description, enter a description.
- Select Next.
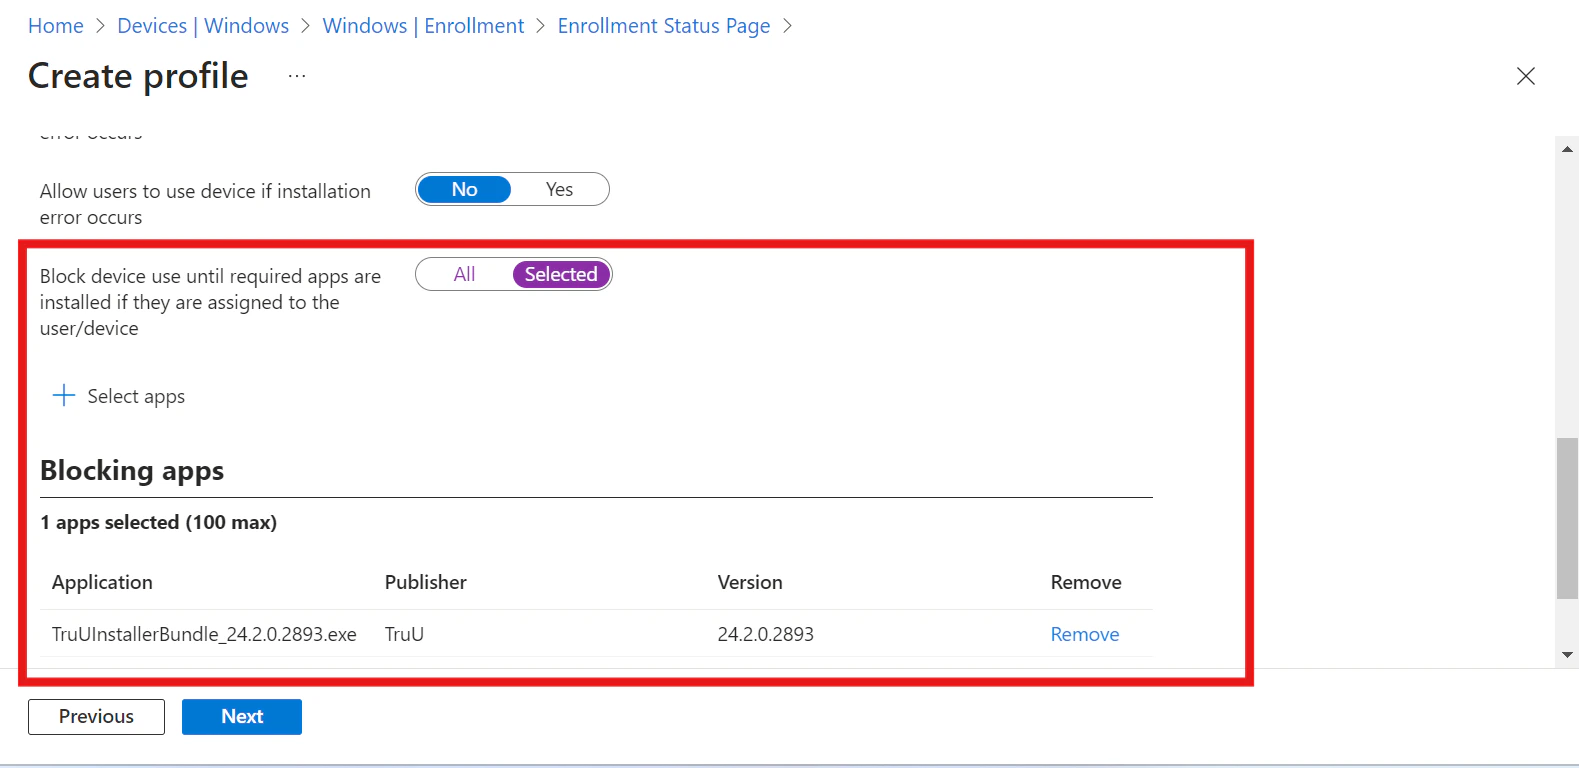
- In the Settings page, toggle the option Show app and profile configuration progress to Yes.
- Configure the settings as desired. However, make sure that you select the latest TruU for Windows application which was created in step 4 under “Block device use until these required apps are installed if they are assigned to the user/device:”
- Assign this ESP profile to the dynamic device group created earlier.
Step 6: Enable the Security Keys (FIDO2) sign-in
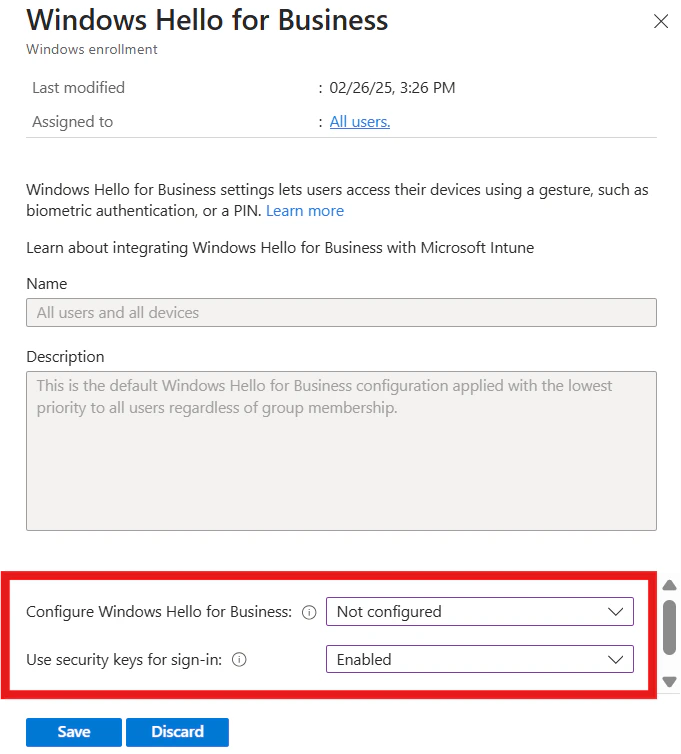
To enable the use of security keys using Intune, complete the following steps:- Sign in to the Microsoft Intune admin center.
- Browse to Devices > Enroll Devices > Windows enrollment > Windows Hello for Business.
- Set Use security keys for sign-in to Enabled.
- Configure Windows Hello for Business shall be Not configured or Disabled state.
- Sign in to the Microsoft Intune admin center.
- Browse to Devices > Windows > Configuration profiles > Create profile.
- Configure the new profile with the following settings:
- Platform: Windows 10 and later
- Profile type: Templates > Custom
- Name: Security Keys for Windows Sign-In
- Description: Enables FIDO Security Keys to be used during Windows Sign In
- Select Next > Add and in Add Row, add the following Custom OMA-URI settings:
- Name: Turn on FIDO Security Keys for Windows Sign-In
- Description: (Optional)
- OMA-URI: ./Device/Vendor/MSFT/PassportForWork/SecurityKey/UseSecurityKeyForSignin
- Data Type: Integer
- Value: 1
- Assign the Policy to the device group which was created in step 1.
Intune User Driven Autopilot Setup Intune User-driven Autopilot Enrollment Workflow