

Prerequisites
- Target computers with either macOS 13 or macOS 14 or later.
- Download the Company Portal App from Microsoft
Uploading the Company Portal App to Jamf Pro as a Package
After you have downloaded the Company Portal app from Microsoft, you must then upload the Company Portal app to a distribution point in Jamf Pro.- In Jamf Pro, click Settings in the sidebar.
- In the Computer Management section, click Packages.
- Create a new package that includes the Company Portal app.
- Click Save.
Deploying the Company Portal App to Mac Computers
Now that you have uploaded the Company Portal app to Jamf Pro, you must deploy it to your users’ computers.- In Jamf Pro, click Computers in the sidebar.
- Click Policies in the sidebar.
- Create a policy that deploys the Company Portal app to users.
- Use the General payload to configure the following settings:
- For Trigger, select “Enrollment Complete” and “Recurring Check-in”.
- For Execution Frequency, select “Once per computer”.
- Click the Packages payload, and then click Configure.
- Click Add for the package that includes the Company Portal app.
- Configure the settings for the package.
- Specify a distribution point for computers to download the package from.
- Click the Scope tab to specify which computers should install the Company Portal app.
- Click Save.
Deploying a Platform Single Sign-on Configuration Profile
You must deploy a configuration profile to your target computers to enable Platform Single Sign-on with Microsoft Entra ID.- In Jamf Pro, click Computers in the sidebar.
- Click Configuration Profiles in the sidebar.
- Click New.
- Click the Single Sign-on Extensions payload.
- Click Add.
- Under Payload Type, select the SSO option.
- In the Extension Identifier field, enter the following value:
com.microsoft.CompanyPortalMac.ssoextension - In the Team Identifier field, enter the following value:
UBF8T346G9 - Under Sign-on Type, select the Redirect option.
- Under URLs, enter the URLs that macOS should trigger a redirect to the Company Portal app for authentication. These should include the following:
- login.microsoftonline.com
- login.microsoft.com
- sts.windows.net
- login.partner.microsoftonline.cn
- login.chinacloudapi.cn
- login.microsoftonline.us
- login-us.microsoftonline.com
- Use the toggle to include the Use Platform SSO setting.
- Under Authentication Method, select UserSecureEnclave.
- (Optional) Use the toggle to include the Shared Device Keys setting.
- Use the toggle to include the Display Account Name setting.
This value will be used in the notification that macOS uses as part of the registration process. Use a value that will make it clear to end users what credentials are required.
- Use the toggle to include the User Mapping setting, and then configure it with the following claims:
- In the Full Name field, enter the following value:
name - In the Account Name field, enter the following value:
preferred_username
- In the Full Name field, enter the following value:
- Use the toggle to include the Account Authorization Type setting, then use the pop-up menu to select either Standard or Admin.
- Use the toggle to include the New User Account Type setting, then use the pop-up menu to select either Standard or Admin.
- Use the toggle to include the Authentication when screen is locked setting, and then select Do not handle.
- Click the Scope tab and configure the scope to target your test environment.
User Experience
- Once the device is enrolled into JAMF and TruU, you will see a pop-up notification to Register PSSO.
- Log in with your TruU PIN and click Continue.
- As per the instructions on the screen, go to System Preferences and enable the toggle for Company Portal.
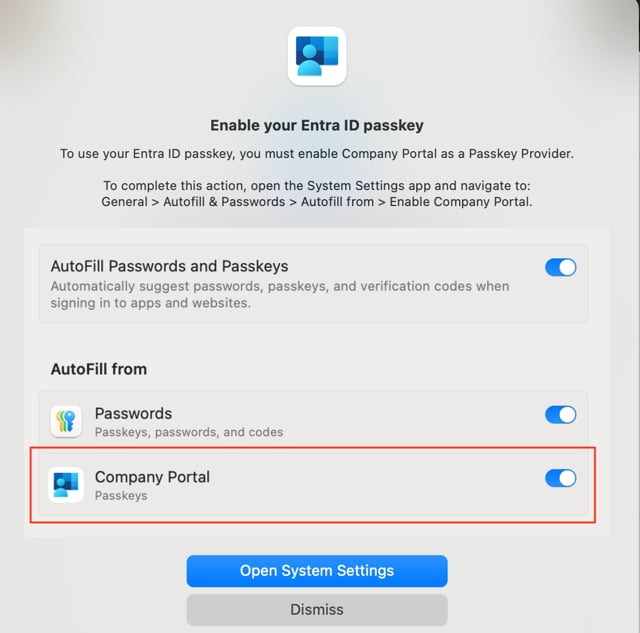
- The PSSO is now enabled on your device. You can verify this in System Settings > Users & Groups > Network Account Server.