

Option 1: Excluding the Password Credential Provider
Pros:
- Streamlined User Experience: Users can benefit from a more seamless sign-in experience when using modern authentication methods like Truu
- Passwordless: Eliminates the risk of password-based attacks such as phishing and brute force entirely.
Cons:
- Limited use cases: Users cannot use this method for Remote Desktop Protocol (RDP), “Run as another user” scenarios, or administrative logins.
End User Experience
- Observing the behavior associated with the excluded password credential provider is straightforward. To do so, simply start a configured Windows 10 or Windows 11 device and click on “Sign-in options”. This will display the available credential providers based on the excluded credential providers’ configuration.
Disable using Microsoft Intune
Configuring the exclusion of the password credential provider by using the Settings catalog- Open the Microsoft Endpoint Manager admin center portal and navigate to the “Devices” tab, then “Windows”, then click on “Configuration profiles”.
- On the Windows | Configuration profiles blade, click Create profile
-
Then, provide the following information and click Create
- Platform: Select “Windows 10 and later” to create a profile for Windows 10 devices
- Profile: Select “Settings catalog” to select the required setting from the catalog
-
On the “Basics” page, provide the following information and click Next
- Name: Provide a name for the profile to distinguish it from other similar profiles
- Description: (Optional) Provide a description for the profile to further differentiate profiles
- Platform: (Greyed out) Windows 10 and later
-
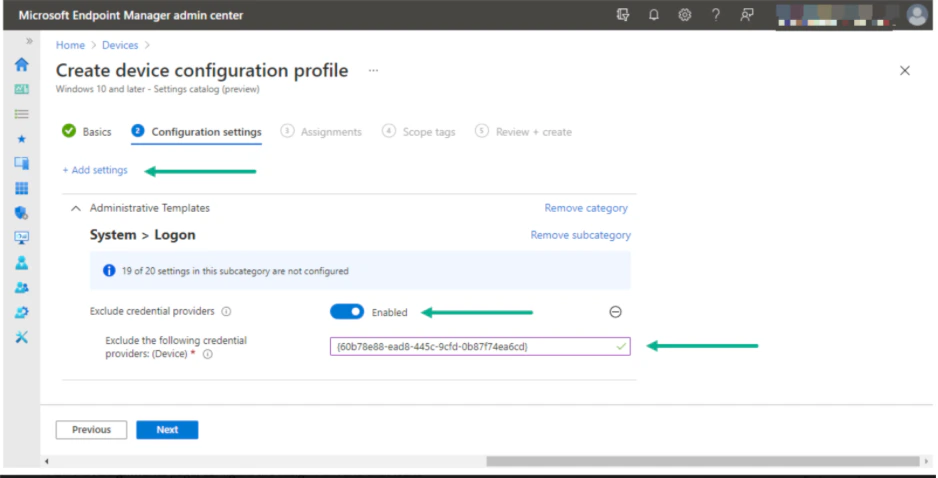
On the Configuration settings page, as shown below, perform the following actions
-
Click Add Settings and then,
- Select Administrative Templates as a category
- Select System, then Logon as a subcategory
- Select Exclude credential providers as a setting
-
Switch the slider with Exclude credential providers to Enable, provide the CLSID of the password credential provider (60b78e88-ead8-445c-9cfd-0b87f74ea6cd) with Exclude the following credential providers and click Next
-
Click Add Settings and then,
- On the “Scope tags” page, configure the required scope tags and click Next
- On the “Assignments” page, configure the assignment and click Next
- On the “Review + create” page, verify the configuration and click Create
Disable using Group Policy
- Navigate to the “Computer Configuration” tab, then “Administrative Templates”, “System”, and select “Logon”.
- Find the policy named “Exclude credential providers” on the right side.
-
Right-click on Exclude credential providers, click Edit, and then:
- Click Enabled.
- Enter the CLSID 60b78e88-ead8-445c-9cfd-0b87f74ea6cd to exclude the password credential provider.
- Open the Registry Editor (regedit).
- Navigate to HKEY_LOCAL_MACHINE\SOFTWARE\Microsoft\Windows\CurrentVersion\Authentication\Credential Providers.
- Find the key with the CLSID 60b78e88-ead8-445c-9cfd-0b87f74ea6cd (password credential provider).
- Rename or delete the key to disable it.
Option 2: Enforcing Smart Card logon to the OS using TruU
Pros:
- Selective Password Usage: Passwords are only required for local administrative accounts, while all other logins to the OS are passwordless.
- Enhanced Security: Eliminates the risks associated with weak or compromised passwords
Cons:
- Implementation limitations: Azure/Intune environments require custom scripting as there is currently no Group Policy Object (GPO) support available.
End User experience
Enforce using Group Policy
- Navigate to the “Computer Configuration” tab, then select “Administrative Templates”, then “Windows Components”, and then select “Windows Hello for Business”.
- Find the policy named “Use Windows Hello for business certificates as smart card” and set it to Enabled. This ensures that the smart card service is active.
Enforce using Microsoft Intune
- Open the Microsoft Endpoint Manager admin center portal navigate to the “Reports” tab, then go to “Endpoint analytics”, and select “Proactive remediations”.
- On the “Proactive remediations” dropdown, click Create script package to open the “Create custom script wizard.”
-
On the “Basics” page, provide the following information and click Next
- Name: Provide a valid name for the custom script package to distinguish it from other similar script packages
-
On the Settings page, provide the following information and click Next
- Detection script file: Create and select the following detection script to detect the status of the Windows Hello for Business configuration
- Detection script: [Greyed out]
- Remediation script file: Create and select the following remediation script to remediate the Windows Hello for Business configuration
- Remediation script:
-
- Run this script using the logged-on credentials: Select No as value to make sure that the script runs in SYSTEM context
- Enforce script signature check: Select No as value to make sure that the signature of the script is not checked
- Run script in 64-bit PowerShell: Select Yes as value to make sure that the script runs in 64-bit, if possible
-
- On the “Scope tags” page, configure the required scope tags click Next
-
On the “Assignments page”, provide the following information and click Next
- Assign to: Select the assigned group and configure the schedule by clicking on the three dots
- Schedule: Select the recurrence frequency by choosing between “Once, Daily, or Hourly”
- On the “Review + create” page, verify the information and click Create
TruU’s Kerberos Behavior on MacOS TruU’s Interaction with External Cameras